....And Exhale...The summer is here!! Happy Summer Break!
Now that the school is over, I have some time to reflect on what an incredible year it was. I learned so much this year so now it is time to play catch up and share it with all of you! I always say I learn as much as the kids do. That is the best part of teaching special education. Every new student comes in to teach me something new!
Unfortunately with all the learning that was happening this past semester, Considerate Classroom had to be put on the back burner. My hope is that this summer I can post lots of topics that will get us geared up for this fall. I am going to start by sharing the rest of our classroom centers.
For those of you who are new to this blog, a good place to start is by viewing our classroom tour. There, you will see how the upcoming center posts fit into the grand scheme of things. You can also view past posts on the following centers:
For those of you who are new to this blog, a good place to start is by viewing our classroom tour. There, you will see how the upcoming center posts fit into the grand scheme of things. You can also view past posts on the following centers:
- Math: http://considerateclassroom.blogspot.com/2014/04/how-to-build-math-center-in-early.html
- Pretend Play: http://considerateclassroom.blogspot.com/2013/12/building-functional-pretend-play-centers.html
- Literacy: http://considerateclassroom.blogspot.com/2013/10/virtually-tour-our-literacy-center.html
- Direct Instruction: http://considerateclassroom.blogspot.com/2013/09/direct-instruction-in-early-education.html
- Independent Work: http://considerateclassroom.blogspot.com/2013/10/tour-our-classrooms-independent-work.html
- Social: http://considerateclassroom.blogspot.com/2014/03/using-structured-learning-activities-to.html
Today, I am going to share our Sensory Center. It has definitely evolved over the past few years. To be honest, in the beginning I was a little nervous to even have the center as it can be messy and get kids pretty wound up. However, with a little structure and training, it is one of our favorites and most effective for teaching self-control, sharing and waiting for a turn. It also helps some students relax and self-regulate.
So first things first...as many of you may remember from a post I did last fall regarding rules and routines, the sensory center like all our other centers has rules to go with it.
.JPG)
The rules are pretty self-explanatory. As one might imagine, the rule most violated is "play with the materials in the table and KEEP THEM THERE!". With this rule there comes natural consequences, I have attached two command hooks on the side of the table that house two little dust pans and brooms. If the kids get a little out of hand, it is their job to help clean up.
We have also added some choices to the center. Students and/or staff can choose to have the sensory filled tub or tubs in the table or on the floor.
.JPG)
.jpg)
NOTE: The bottom of the tubs have the rough side of industrial strength velcro attached to them so they adhere to our carpet well and can't be dumped over as easily.
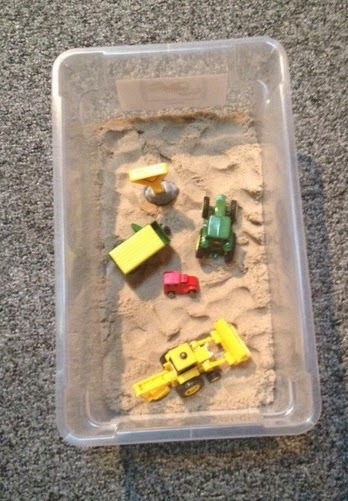
Sometimes there are two tubes in the sensory center like the first picture and sometimes it is just one large tub like the second picture. It just depends on what we have in the table and how well our students are sharing.
NOTE: The bottom of the tubs have the rough side of industrial strength velcro attached to them so they adhere to our carpet well and can't be dumped over as easily.
Sometimes there are two tubes in the sensory center like the first picture and sometimes it is just one large tub like the second picture. It just depends on what we have in the table and how well our students are sharing.
Having the materials in tubs rather than the bottom of the sensory table serves several purposes. Some kids have a hard time identifying their boundaries when they are standing up beside the table and play much calmer on the floor.
In reflecting about this phenomenon, my best guess is that sitting on the floor helps the kids feel more grounded. For some students, we notice they have less stimming behavior and more appropriate play when sitting on the floor with the tub in front of them. Another thought is that spilling sand from the tub to the floor is less dramatic than spilling from the tub at table height to the floor. Making it less likely for them to repeat the behavior.
That being said, for some kids the sensory materials are a better fit in the table because they are working on standing and walking skills. For others, it's simply a preference to work standing up alongside the table. Giving both tub location options is a small accommodation that can be made to benefit all.
So the next question you may have is "What do you put in the table?". Well, that pretty much depends on what we are studying. For example during our fire safety unit it is water and red & orange pieces of craft foam that are shaped like flames. The kids squirt the fire with little squeeze bottles to work on strengthening their fine motor muscles. Then during our Halloween and pumpkin unit, we use plastic pumpkins and white beans and pipe cleaners to serve as pumpkin pulp.
During color weeks, we use random items of each color like beans, sand, noodles, water, or other materials. For example, during yellow week it was yellow objects in corn kernels.

The possibilities are endless!! But here is a list of some of my favorites:
- Safety Unit - Random red, yellow, and green items to sort as we learn about what the lights on a traffic light mean.
- Fall Unit - Fall leaves plastic or real depending on the weather. We often go hunt for them ourselves and then put them in the table with small sticks, rocks, and plastic forest animals.
- Thanksgiving Unit - boats, plastic people and water like the Pilgrims sailing to America or soil, shovels and plastic vegetables like the Native Americans planting crops.
- Gingerbread and Bakery Unit - Two parts salt to one part flour with sifters, baking funnels, and spoons and spatulas or water & plastic gingerbread boys with all the characters from the story to pretend we are crossing the river like in the story.
- Christmas Unit - Insta-Snow! or real snow (if we are lucky) with Little People santa, elfs, and reindeer
- Winter Unit - Real snow and spray bottles with colored water and spoons
- Artic Unit - Water, bowls of ice I pre-froze to be glaziers and plastic polar animals
- Dental Unit- White beans, pink play dough, yarn (for floss) and toothbrushes (without bristles to prevent the kids from being tempted to put them in their mouths).
- Valentines Unit - Crayola pink sand and conversation eraser hearts, with sifters and spoons
- Gardening or Nutrition Unit - Soil, seeds, shovels and plastic vegetables
- Transportation or career unit - sand and construction vehicles or plastic boats and water
- Dinosaur Unit- Moonsand, plastic Easter eggs, and mini plastic dinosaurs to create and hatch dino eggs, or rocks, dirt and plastic dinos
- Easter Unit - A tub full of plastic eggs with magnetic alphabet letters to search for in the eggs or plastic Easter grass and little baskets and eggs
- Pet Unit - Little fish nets and plastic fish with water or dog food and plastic dogs
- Farm Unit - Homemade farm dirt and tractors, and plastic farm animals. This Farm dirt recipe is my favorite. I got it from Louise Younger at Wee Friends Preschool years ago when I worked for her during college. It is still my favorite! Thanks Louise!

- Beach Unit- sand, seashells, and shovels
- Bug Unit - Easter grass and plastic bugs, magnifying glasses, and plastic bug jars. The kids look for bugs that are easy and hard to see as we discuss camouflage.
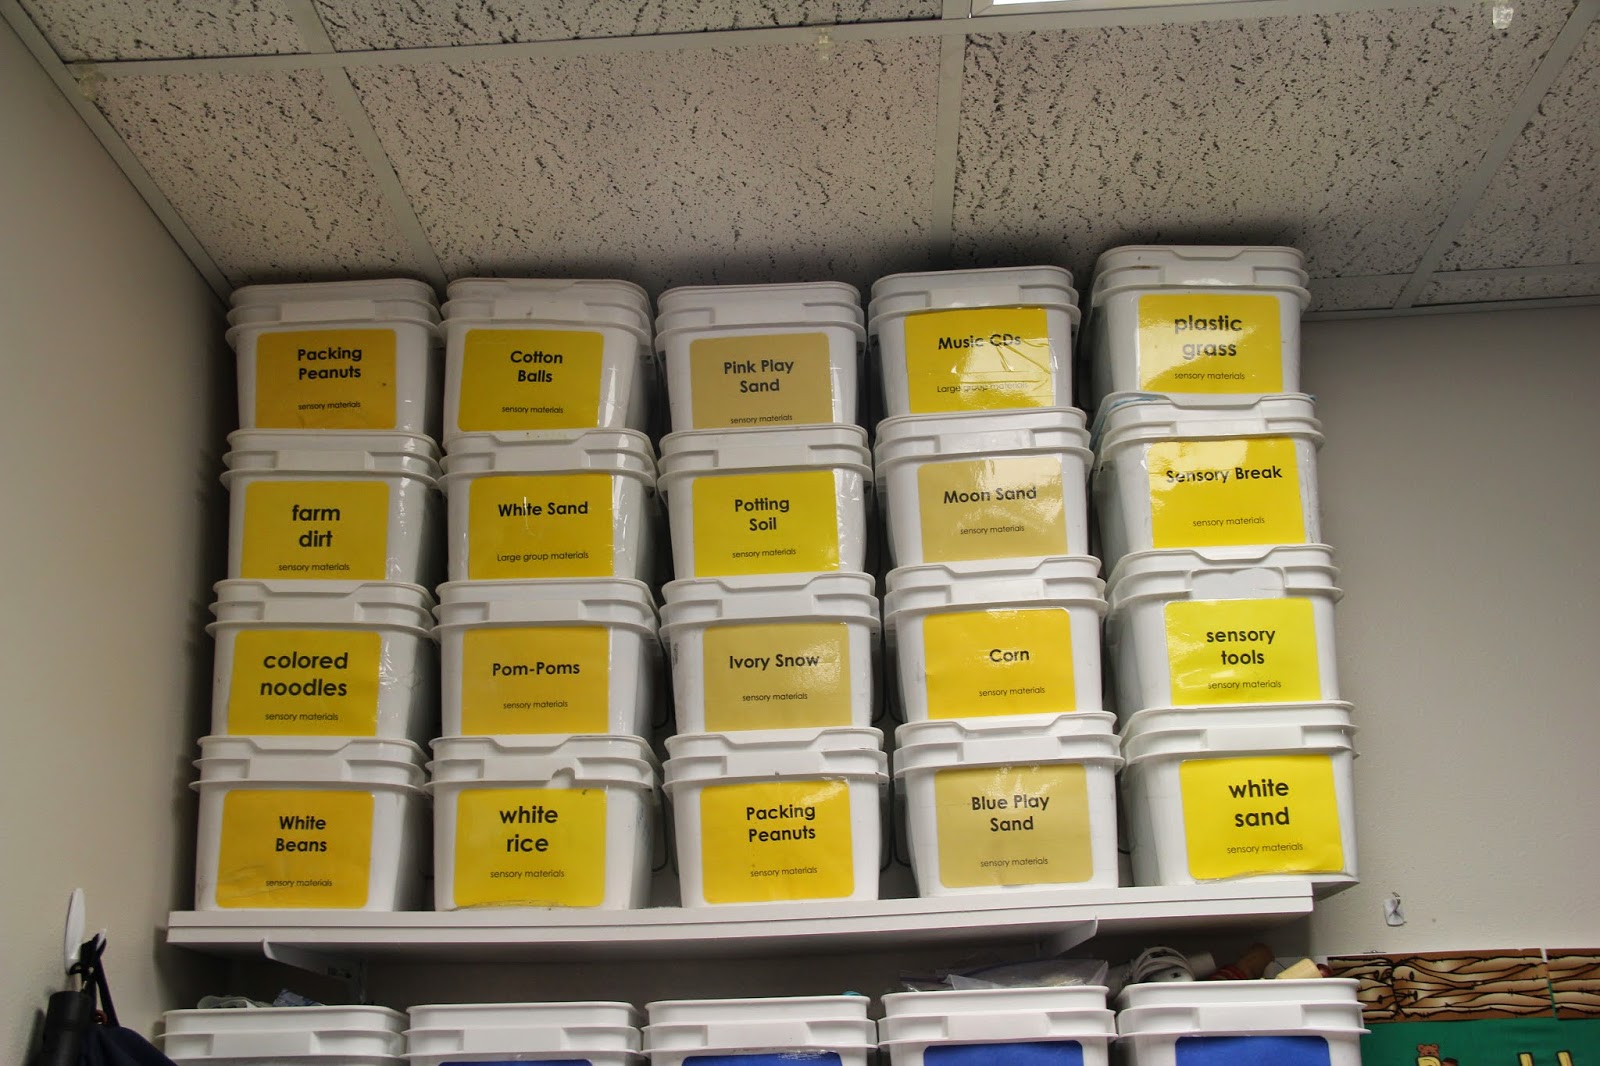
Okay so now you are probably questioning where I store all of these materials while we are not using them. Well, as you may remember from a previous post on storage, I have trusty buckets from Dillon’s Bakery that store our sensory supplies. Then, all the theme-based materials are in their own themed tubs.
In my experience, the sensory area is either something the kids love or hate. Some of the students' favorites to get a positive start to the year are playing with turkey basters and colored water dyed using Crayola color tablets. (You can also use water and food coloring but on occasion your consistency could be too highly concentrated and the kids may stain their clothes or hands) and Brookstone Sand. If you don’t have Brookstone sand, it is a must have for the sensory table! It is like sand on a beautiful beach with no mess.
For those children who love the sensory table, we often have to set limits so they know how long they get to play. They would stay there all day if we let them so we must set a timer to help them know when their time is up and then also show them when they get to go back. Some years, I have had kiddos who need it more than once during center rotations. When this is the case, I have had them start at sensory and then work through their centers at a quicker pace so they end at sensory as well. This rotation technique calms them to start center rotations and also calms them for the next activity which is usually large group.
On one occasion, I even had a kid who performed best if he got 2-3 minutes at sensory after 7-8 minutes of working proficiently at each center. This took a little training as other kids and staff had to accept the idea that he needed a little more sensory time and it also required him to learn how to share the sensory area, as well as transition to and from the area appropriately but it was a great way to train him to work hard at various centers and then earn more sensory time.
On one occasion, I even had a kid who performed best if he got 2-3 minutes at sensory after 7-8 minutes of working proficiently at each center. This took a little training as other kids and staff had to accept the idea that he needed a little more sensory time and it also required him to learn how to share the sensory area, as well as transition to and from the area appropriately but it was a great way to train him to work hard at various centers and then earn more sensory time.
For those that hate the sensory table, even more training and planning are needed. We have to desensitize them to the experience which can be tricky since we have something different in the area each week. One thing I have done to help with the process is have a towel or washcloth close by so if the issue is that the kiddos don’t want to get messy we can wipe the mess away quickly. This is a technique I learned from the staff at the STAR center when I went to visit one of my past students.
Another technique we use is creating a work system to support the kids in knowing how much work they have and how they can control their behavior to get through the activity sooner. We set up a work station with 3 to 6 scoops, spoons, shovels or other sensory tools. We then have the student fill each scoop, shovel or spoon with the sensory material on a near by table and carry them over to the sensory center. It gets them use to the area. However with some, it has taken all semester or even all year for them to be comfortable enough to play in the table.
When this is the case, we may have them do a work system using 2 different tools twice a day. But we must plan accordingly, because as you will notice in the video example below, this is a very quick activity so we have to come up with something else to fill the student's 10-15 minute sensory time up. We typically do that with functional errands. I will share those in a later post. For now, I want you to see two different videos to see the magic.
In Video 1, the student is working toward learning to walk independently and desensitize to the sensory table. In Video 2, the student is scooping material with a shovel-like tool and dumping it in the table. Both girls would prefer not to have anything to do with the sensory table and are working on following directions and attending to the table longer.
So there you have it...some first attempts toward playing at the sensory table! I am happy to say that both of these gals have made nice progress. By the end of the school year, each would stand by the table and watch or play with staff and peers for 2 to 6 minutes depending on the substance inside and their interest level. Here's Natalie at the sensory table during the last week of school. She choose the center independently during free play and stayed for about 3 minutes.
.JPG)
Huge Progress!!!! Now she is ready to hit the pool and beach this summer...for a few minutes at least! :)
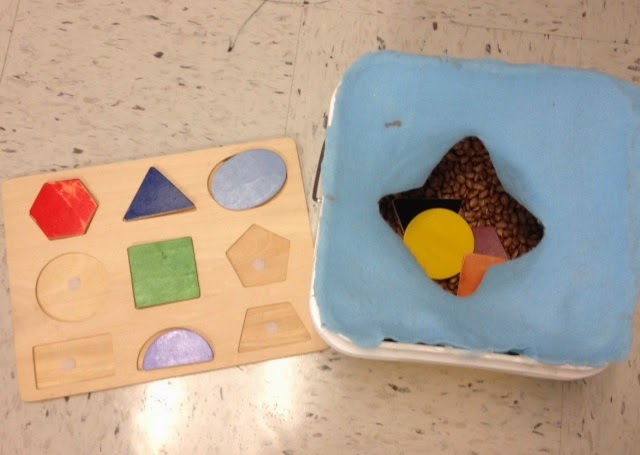
One last tip to adding sensory for kids that are resistant is by adding preferred items to a small container of sand or beans. Lay the items on top initially and ask the child to pull them out. For example, another one of our little gals loves puzzles so this little sensory bucket was perfect for her.
.jpg)
.jpg)
First, I placed the pieces on the top of the sensory container. Later, the puzzle pieces were mixed in with the beans. Notice I hot glued a piece of felt to the top of the container and then cut two slits in it. This technique prevents a little extra spillage.
First, I placed the pieces on the top of the sensory container. Later, the puzzle pieces were mixed in with the beans. Notice I hot glued a piece of felt to the top of the container and then cut two slits in it. This technique prevents a little extra spillage.
Happy summer sensory play until next time! -- Lindy
This comment has been removed by a blog administrator.
ReplyDelete