Wednesday, July 5, 2017

What I Need for My Work Today? (An Executive Functioning Skill)

Preparing for an activity and getting the materials out that you need takes executive functioning skills that can be difficult for young children and students with special needs.  By providing them with a visual support system to prepare for center and desk work students gain the life skills necessary to be responsible and independent!

For example, at the art center, we have a box of supplies for each work area.  In each box, we have the materials students need for art instruction: crayons, markers, glue stick, pencils, colored pencils, and Elmer's glue as well as a What I need for art today tub.


When students come to the art center, they take a look at the What I need for art today board, and get the materials out they need.  Then they set them in their What I need for art today tub and begin their art project so not to be overwhelmed with a full box of supplies.  


Note the board is magnetic and all the visuals for the center are printed on magnet paper for easy use. Also note that I have leveled the visuals for student who are readers, non-readers, and emerging readers.

Because the visuals are all magnetic, we simply post the extras on the metal art supply cabinet so staff can switch them out depending on the daily activity and student needs. 


(Don't have a metal supply cabinet, no problem a cookie sheet can serve the same purpose!)
A similar system is used at the math and reading centers.  The only difference is that the items are stored in pencil bags with a visual on the outside that says what is inside.  The bags are stored in the chair pockets of each student chair.


These systems work so well at centers, I plan to use it for desk work next year as well!  Each student will have a pencil box with needed supplies in their desk to pull from.

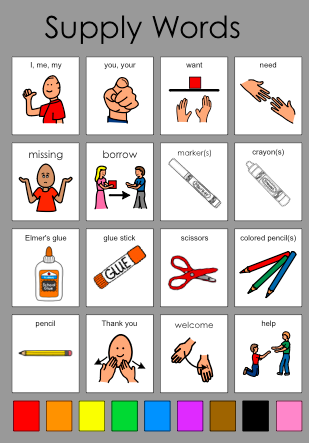
If a student is missing a supply that they need, they can ask to borrow a friends using this matching language board.  A great communication and social opportunity for students!  (Sometimes something we manipulate so a student has to problem solve and practice the skills of asking for what they need.)


Because the visuals remind staff and students what should be in each box or bag, the supply systems also serve as a weekly job for students who are working on problem solving, assembling items, and stocking materials as they check to make sure all supplies are in the boxes and bags and restock as needed using our art supply area pictured below!


To ensure that students have all the crayons and markers they need, I created little checklists for markers, crayons, and pencils.  They are in word form for readers, and picture form for non-readers.


Because the cardboard marker, pencil, and crayon boxes you get them in at the store tend to break.  I tape these checklists to more durable containers to last longer.  I use bar soap containers for our crayons, zipper bags for our markers, small pencil boxes for our colored pencils, and toothbrush holders for our pencils.  The beauty is that this offers students' purposeful opportunities to practice zipping, buttoning, and opening snap containers.

Want to use these supply visuals in your classroom, click here to purchase them from My Teachers Pay Teachers Store!

Until next time- Best Wishes, Lindy

Friday, June 23, 2017

Classroom Tour Part 2

Time to take a look at room two of our kindergarten through fifth grade life skills classroom.  Click below for the video tour!


This room is more small group and center based.  Our kindergarten through first grade students work through a rotation of teacher led and student led activities twice a day in this space.


This took three adults, and significant planning, zoning, scheduling and structuring for our little guys, however by the end of the year they rolled through it like rock stars!  Each working at their own individual level on everything from following one step directives and attending to teacher instruction to reading sight words and adding and subtracting with objects.


The best part of the whole thing is that students learn how to manage their time safely and independently at the technology center (iPads and laptops), independent work area, and self-directed choice area between teacher led times.


I will get into the logistics of that later but I wanted to draw attention to it because so often I hear "I don't have enough staff to teach at each student's individual level."  By training students to work independently, we are able to maximize quality teaching time! Each student can work one on one with a teacher or in a 2 to 1 ratio depending on their needs and what they are working on.  If they need to work on turn taking, waiting or social skills we pair them up with a friend with the ultimate goal of getting them out into the inclusion setting as they gain skills.   If they are at the early stages of learning, and need to work on following teacher directives, in seat behavior, communicating appropriate, etc then their time at the teacher rotations is on a more one on one basis.

Until Next Time, Best Wishes!
Lindy

Wednesday, June 21, 2017

Classroom Tour Part 1

Howdy, I am finally back and I proud to say. . . I survived my first year teaching elementary students!  The learning curve was steep coming from the world of early childhood but absolutely AMAZING!  I can't wait to share everything my staff and I created throughout year one.   

I started the year with 11 students and 5 paraprofessionals and end the year with 14 students and 6 paraprofessionals.  All 14 students, have a variety of needs and abilities, ranging from a cognitive level of 12 months to 8 years.  Each student has their own programming, schedule, and range of inclusion time, I will get into the specifics of those at a later date.

I want to start my re-entry back into the world blogging by visiting my classroom.  Click below to see part one of a two part classroom tour. . .


Today, I walked you through half of our space.  We are blessed to have two connecting classrooms.  The first as you witnessed in the video has individual student desks and services as our large group area and individual work space.


It also has free choice and social (play-based) centers in it.   Kindergarten and first grade students, who need support in play and socials skills, use the space as a center rotation when they are not in inclusion time.   Our second through fifth graders use the space to do desk work.   As they finish their desk work, they can earn play time at the various centers.   


In the afternoon some of our students who are not ready for large amounts of inclusion time and need practice with using time safely and appropriately, use the space as a free choice area in which they get to choose where they want to play and move from center to center for thirty minutes as long as the center they choose is not full and they have cleaned up their previous center.  


They use the choice board container above to request where they want to play.  Then they take the clothespin with their name or picture on it to that center, if there are two clips at the center they have to pick a different place to play so not to overload one center in particular.  

My higher students also use the round table in the corner of this room for our writing lessons.  Our district recently adopted Readers' and Writers' Workshop,  a fabulous program but one that is a little too abstract for some students. So we work from the workshop's philosophy of having a love for reading and writing but made the work more concrete for our students using a language based technique from Utah State University, called SKILL- Supporting Knowledge in Language and Literacy, which I will share more about at a later date! 

That is all for now, join me next time for part two of the classroom tour, where I will share 6 more classroom spaces!

Best Wishes, 
Lindy

Saturday, January 14, 2017

Milk Delivery with an Academic Twist

Several months ago,  I shared a few of my favorite classroom jobs.  Today I bring you one more jobs- Milk Count!

Originally, my students were doing one to one correspondence with the milk visual below that sat inside dish tubs.  Students would deliver the dish tubs to the three kindergarten classrooms at snack using our delivery cart.  (NOTE: There are more than 12 students in each kindergarten class but only those that choose to pay for milk do 'special snack milk'.)


At semester I realized it was time for a revamp.  Although the students the job was designed for have not mastered one to one correspondence, with 100% accuracy they needed a change.  After a little brainstorming with my friend Tasha, we came up with this.


Now my students are able to work on looking at a chart for information. . .

  
Then transferring that information to a number line on our delivery cart made of duct tape and a permanent marker. (Note the number line only goes to 10 so our students have an opportunity to do real world addition as they count out snack for Kindergarten C since they need 12 milks.  Also note the numbers on the chart are written with a vis-a-v so my staff and I are able to change the numbers on the count if students are absent or if we want them to use a different set of numbers to get to 12 as many of my students will start to memorize that 7+5 is 12.)    


After finding the number they need on the duct tape number line they mark it with a bulldog clip.  


The students then simply line milk up to that number.   Next they have a second opportunity to count as they errorless-ly put the milk lined up on the number line into the three milk tubs (one for each classroom- Kindergarten A, Kindergarten B and Kindergarten C).  


The milk then gets put in our fridge until snack time.  Then our kindergartners deliver the milk to the corresponding classrooms yet another opportunity for academics as they match milk tub A with classroom A, and so on and so forth.  


Our delivery cart gets used for many other jobs throughout the day!  The cart is simply a repurposed technology cart that I added weights to- to help ground the kids, keep them from going to fast and give them some sensory input!  Stay tuned for more ideas using the cart as well as another job Tasha and I modified for this semester.

Best wishes, Lindy

Friday, December 30, 2016

The Power of Flexible Seating for Students with Autism

Do you have students who struggle to sit at their desks?  If so this post is for you!

This year, we started the school year with several students who struggled to sit at their desks, let along do desk work and participate in classroom activities. As my colleagues and I began to brainstorm how we can help these students, we began reading about the Flexible Classroom.   

In taking this concept a step further, I began to think about students with Autism.  Many students with Autism have overwhelming sensitivities and preferences within their environment.  For example, one of my little gals hates hard surfaces, every morning when we start group she resists joining us.  For several reasons, number one their are too many people, number two it can be too loud and unpredictable, and number three she hates being confined to a desk with a hard cold chair. By the way I didn't come up with this conclusion just by watching her behavior, I also had a little help from Naoki Higashida after reading his book, The Reason I Jump.  

In the book Naoki shares many examples of why children with Autism have certain preferences and unusual behaviors.  After reading it, I had an overwhelming sense that our students with Autism do the best they can in each moment but sometimes the environment is just too much!  


By offering alternative seating, we can take some of the discomfort and hardship away so they can perform even better in each moment.  For example for the little girl I described above, we introduced several different chair options.  In doing so we learned that she prefers to sit in soft chairs that have some give and allow her body to sink in.  We started allowing her to use a Saucer Chair pulled up to her desk.  The chair itself was super comforting for her but when pushed up to the desk, she wanted nothing to do with it so instead we offered her a Big Joe Chair from Wal-Mart.  

It worked like a charm but was not conducive to being pushed up to a desk so I bit the bullet and removed her desk completely.  I say bit the bullet because this was a big step for me.  I am very type A and I want everything to be in perfect harmony.  By having one student sitting on the floor in a different seat than her peers what would others think, how would that look.  But after getting over my own personal feelings the chair turned out to be the best thing ever!  


The student is now able to participate in group comfortably and share what she knows in a whole group setting.  Her verbal skills have started to blossom in front of her peers and she is able to manipulate the Smart Board and use her morning lap book more consistently. Prior to adding the chair, she would either hum loudly, chew on her chewy and stim or be so overwhelmed by the whole experience that she would request a break.  

Now she is participating at a level equal to her peers, especially since we added this velcro white board to use as a table top for her to write.  (To make it my husband purchased a White Panel Board from Home Depot and cut it to size, then I added heavy duty soft velcro on the chair and hard on the back of the board.)  


We still work on in seat desk behavior other times throughout the day as we know at some point she will be in a general education classroom and other environments where flexible seating is not available for one reason or another.  But we no longer expect in seat desk behavior from her during large and small group activities because at this time these activities are hard enough without adding the element of a desk.  Instead we expect in seat desk behavior during preferred activities such as looking at alphabet books and using the iPad.  Over time the success of sitting at a desk for preferred activities will hopefully generalize to other activities throughout her day.

Until Next Time, Happy Flexible Classroom Making!
Lindy  

Saturday, November 5, 2016

An Inside Look at My Classroom Centers

I often get asked how I keep up with it all!  Sometimes I actually wonder this myself, but I will say one of my key timesavers is the way I organize my classroom centers. 

Each week we focus on a letter and a number.  Each day, we do fifteen to twenty minute rotations at the literacy center, math center, and art center to work on concepts related to the letter and number of the week. 


As you can see in the photos each center is also detailed with a color. Red is literacy, orange is art, and blue is math.  This helps our students know where to go for each activity as the colors are used on the schedules of students who are not yet readers.  


At the literacy center the students practice writing the letter of the week (with the help of Heidi Songs and Handwriting Without Tears concepts).  Then they make and read a story about the letter (with the help of The Printable Princess). Then they identify words that start with the letter (with the help of Crystal McGinnis' I Know My Alphabet Sounds).  These three steps are done using a three drawer worksystem so students know how much work, what work, and when the work is finished as suggested by the TEACCH model.  


Students know that their work is done when they have completed the work in drawers A, B, and C.  For most the drawers themselves are enough for them to understand how much work but for some we add a picture frame to mark off each activity or a match to match icon system for those that need movement, as they stand up and match the icons to the drawers, then bring the contents of the drawer back to table and sit down to work.


Notice that each drawer also has a detailed description of what to do with the contents of the drawer this so staff can support students at each center in a consistent manner.  

But how did we make it simple to switch out materials at the end of the week?  By filing them in a Letter of the Week Bin that is stored on top of the metal cabinet at the literacy center that doubles as a magnetic letter wall and storage for other letter and literacy materials.  


Also inside the bin are letter of the week interactive letter books by Gabriella Dixon from Teaching Special Thinkers for the library center and art projects that are made at the art center each day.   In order to have the materials for the art projects ready for each week, I put them in my staffs' to do tube to work on during free moments a week or two before each letter is the letter of the week.  Then they go in drawer three (the STOP THIS IS FOR TEACHERS drawer) at the art center for future use. 


In drawer one, we have each day's art project and in drawer two we have art choices for the week that  students can play with after they finish each day's art project.  Note on Mondays the students do not have a daily art project as they simply learn how to use and play with the art choices of the week.  Then on Tuesday they do an art project with the capital letter, on Wednesday they do an art project with the lowercase letter and on Friday they make an alphabet zoo letter to add to their alphabet book.  
(On Thursday's our students have the privilege of doing adaptive art with our building's art teacher!)


Note the Friday art projects are stored in a small file system on the cabinet by the art center so we can simply begin alphabetizing each students' book as we complete it page.


That's all I have time for today, but stay tune for how I organize the math center and other classroom areas!

Happy Organizing, 
Lindy

Thursday, October 20, 2016

A Great Resource: The 2017 Hanen Calendar

Recently, I had the opportunity to preview Hanen’s 2017 Calendar: Building Language and Literacy Through Powerful Conversations.  Wow!  What an opportunity it was! 


The calendar is a great addition to any home or classroom that supports young children with social and communication needs. As stated on the inside cover of the calendar, “quantity of words matter, but the quality of the interaction matters more!”   When we are in the middle of a busy day, this concept can unfortunately be forgotten as we rush to get the students to the next activity, cook supper for our family, or prepare for the next day.

As parents and educators, we can become overwhelmed with daily to dos, shoulds, coulds, and have tos!  The Hanen Calendar is a great way to keep perspective about what really matters, the conversations we have with our students and children.

Each month, the calendar provides strategies for making the most of conversations during daily activities, play time, book reading, and on the go.  


Not only does the calendar provide practical strategies for daily life but it also divides ideas up into to two stages of development: those who are learning to talk, and those who are talking to learn. 

I am so excited to hang the calendar in our class library center this year to help my staff and I stay accountable for quality conversations with all of our students both those who are learning to talk and those who are talking to learn in the literacy center and beyond! 


To purchase a calendar of your own click here! 

When you are over at the Hanen site check out all their other amazing literacy and communication products and be sure to like them on Facebook for updates, training opportunities and so much more!

Until next time best wishes, 
Lindy
SaveSaveSave