Tuesday, April 30, 2013

Encouraging Appropriate Behavior Through Class Incentives

As the school year winds down, my students need extra incentives to participate appropriately and stay on target.  Okay, so who am I kidding...my staff and I do, too!!  We have found just the thing that motivates our afternoon group and keeps them working like the little Buddy Bears we know they can be.  Several of them are really into Jake and the Neverland Pirates, a cartoon on Disney Junior. 

In the cartoon, Jake and his friends earn Gold Doubloons for completing various missions. So I created a social story about how we will work as a team like Jake and the Neverland Pirates to earn Gold Doubloons as a class.  


The story goes like this. . .

We work as a team like Jake and the Neverland Pirates.  
We use kind words.
We use gentle touches. 
We listen to our teachers.
We share with our friends, and help each other. 
When we are kind. . .
we earn Gold Doubloons. 
If we earn 25 by the end of the day
we get to see what is in the treasure chest. 

At the beginning of each day, we read the social story to remind the students of our mission. Then the teachers hand out Gold Doubloons for good behavior and kind acts throughout the day.  The Gold Doubloons are gold tokens my wonderful para, Miss Molly found at Hobby Lobby for $3.00.   

As the students earn the Gold Doubloons, they place them in our Jake and the Neverland Pirate Treasure Box.  


My son got the box for Christmas as part of pretend play set.  I bought the set at Wal-mart for $14.97.  

I strategically place the treasure box on top of a high shelf. The students have to use their gross motor skills to climb on top of our large group bench to add their tokens to the treasure box. This puts the children in an organized movement pattern as they place their Gold Doubloons in the treasure box and then return to the activity asked of them. 


When we started this system, I was not sure how it would go.  Would the children get distracted on their way to and from the treasure box?  Would the distraction make the incentive program more trouble than it was worth?  Well, the answer for this particular group of students is "no"!  It is just what they needed.  It provides them with a little movement and sensory input that helps them regroup and increase attention spans. 
  
At the end of each day, we count our Gold Doubloons by attaching them to our paper mache’ treasure box I got at Hobby Lobby several years back.  Each gold doubloon has Velcro on the back to make it easier for the class to see if we met our class goal. 


As it turns out, it is a great one to one counting activity and is highly motivating for the whole group.  If the class earns 25 Gold Doubloons to cover the front of the treasure chest, they get to see what is inside the chest.  Sometimes, it is a small candy for each of them. Other rewards may be mini oreos, marshmallows, pencils, stickers, or a note that lists a special activity the children can play for the last 10 minutes of school. . . bowling, pull tubes, a 10 minute educational video, etc.  

Instructor's Insight: The key to the success of this system is the element of surprise.  Children love to work for the mystery of the unknown.  If I told them what was in the chest, some of them may lose interest.  To make sure the chest continues to stay motivating, I often put choices inside.  For example, “You may choose a smelly sticker or a Hershey kiss today.”  By providing choices everyone continues to be excited because they have the power to choose and it is more likely that they will like at least one of the options in the chest.  

Because I often put choices in the treasure chest, I can also add an academic element.  I have the students sign up for which choice they want.  Wow!! This has been motivating kids that usually resist writing their names.  


Thursday, April 25, 2013

Name Practice for Pre-K Students

View binders, or binders with the clear plastic covering that allow you to slide in a cover sheet, are an excellent tool for students to practice writing.


Teacher's Tip:  For students who press hard, you can hot glue
a heavy piece of cardboard or a small piece of wood inside the cover
to make the binder more sturdy.

The 2 ½ or 3-inch binder provides students with nice slant to put their hands in a good position for holding their pencil correctly.  Then, slide papers in and out of the cover pocket and have the children write on them using dry erase markers or crayons.  Dry erase crayons are a newer item that can be found at any craft or department store or at Crayola.com. 

Instructor's Insight: When you use dry erase crayons you have the option to break them down into smaller pieces  so that students have to hold them with the correct pencil grip because they are so small.
For another use for "Crayon Nubbins, check out the previous "Literacy Workbox" post.

The "Green for Go. Red For Stop." hand-writing form will assist students with writing names using the green line as the starting point and the red line as the stopping point.  Click here for the template.

Last year with my students headed into kindergarten, I used this idea for the students to practice writing their names.  I would pre-write the student's name with a yellow highlighter and then have the student trace the writing at direct instruction in the binder Monday through Wednesday.  Finally on Thursdays, our student's last day of school for the week, I would have them write on the actual page.  

This procedure saved paper but also helped show progress because we had weekly documentation of the student's writing skills.  As the student begins getting a concept of writing his/her name, I pre-write less of the letters and have the child write from memory with dots to show them where to start.  (Refer to "Susie's" provided example above.)


Tuesday, April 23, 2013

The "No, Thank You" Plate

Sorry, it has been a while since I have posted. For those of you who are school teachers, you know how crazy it is this time of year. . . IEPs, transition meetings, field trips, and parent meetings.  All important stuff...but so, so busy!! Not to mention all the wonderful behaviors and such, we get this time of the year. All apart of spring fever, I suppose!!  

Anyway this week, I wanted to share something we have been exploring this school year at snack time.  To support communication and socially appropriate eating skills, we always offer two snack choices.  It allows the students to practice requesting food and saying "no, thank you", as well as allowing them to pass serving dishes.

This year two of my students have heightened sensory systems that really impact their choices at snack time.  They are both very selective and will only eat certain foods. Therefore, we always offer at least one food that we know they will eat.  The philosophy being that we don’t want them to go hungry or miss out on the social aspect of snack time.  It has been working well with one exception..it does not support them in experiencing new foods.

After some brainstorming with our occupational therapist, we decided it was important for them to experience new foods on a level that they could handle.  At the beginning of the year, they were hesitant to even pass the serving dishes that had the foods they didn’t like to their peers. However, both students have learned to cope with that skill so we then added another element: a "no, thank you" plate to each of the snack tables.


As the children passed food around the table if they didn't want a specific snack item, they still needed to use the serving spoon or tongs for a small portion and place it on the "no, thank you" plate.  Yes, it does waste a little food. But it also provides an opportunity for students to experience new foods with future hopes of them trying a new item or two.  Prior to the the visual "no thank you" plate, if I asked the students to take an item they didn't like they would refuse and remove themselves from snack, throw the dish or put it on a teacher's plate. 

They adjusted well to the no thank you plate and used it very appropriately. Mostly because there was a visual to show them they didn't need to eat the food, but rather they just needed to serve it to the "no, thank you" plate.  

So we added one more step. One of the spots on the snack trays for the students who struggle with trying new things was a "no, thank you" spot.  It took the place of the "no thank you" plate.


This provides students the opportunity to try new foods.  It also preps them for school lunches in which they need to take a specific number of items and put them on their tray for lunch.


Thursday, April 11, 2013

Teaching Students to Come In from the Outdoors

Coming in from outdoors has always been a challenge for some of my students.  To support them with this challenge, I created a social story about how to come in from outdoors.


As you can see, this story has been well-read.  It's looking a little rough these days!

The story reads:

During outside time. . . (pic of playground)
I play with my friends.  (pic of friends)
We go on the slide, (pic of slide)
We swing. . . (pic of swing)
And we run.  (pic of someone running)
When the whistle blows (pic of whistle)
We line up (pic of lining up)
If I choose to run and not line up (pic of girl running and friends lined up with a no symbol on top of it)
I do not get to play as much the next day, I have to sit in the line-up early circle.  (pic of someone sitting)
So I am safely waiting to go inside. (pic of someone waiting)


We have used the story with several kids and it works well.  It provides a visual of what they need to do and also offers a consequence and boundary for the future without the students missing out on the much needed gross motor-free play.  


Here's a picture of the line-up line & the circle where students
must wait if they did not line up properly on the previous day.


Tuesday, April 9, 2013

Teaching Children to "Follow the Leader"

One of my students is having a very difficult time learning to walk in a line.  Last year, he was very anxious and nervous in environments outside the classroom. Each time we walked into the hall, he held a teacher's hand for comfort and security. 

This year is a whole different story! He has really come out of his shell now. He looks forward to functional walks in the hallway. He is willing to explore new things and resists holding a teacher's hand to do so.  Normally, I would be very excited about this development.  We like for our students to be as independent as possible and walking in the hallway without holding a teacher's hand is a good independent skill for all students. However, he does not understand of the concept of walking in line behind a friend or teacher.  He prefers to run ahead.  He does not like to walk behind someone because he can’t see what is ahead and because I think it makes him feel as though he is losing control. 

Throughout the year, we have tried many techniques to supporting him with this skill.  We have used social stories and video modeling of walking in the hallway.  We have also had him do daily hallway errands alone with the teacher to work on walking behind and following.  Unfortunately, our efforts were unsuccessful.  It was as if he did not understand the concept of walking in line. 

I then began thinking of other ways to teach him the concept of following behind.  I remembered that he loves cars and trucks and is highly motivated by playing with them. I created a play activity where he and friends could line up cars and put them in the back of a car-carrying truck. 


The only catch was I used packing tape to adhere pictures of his classmates and teachers on the cars so he could visually see what it meant for students to follow behind their friends and teachers in a line.  


It was the golden ticket! Within a few days, he got the concept of following in line behind someone and could do so each time we were in the hallway.  

Instructor's Insight:  To support his success, I hung a visual of the toy cars lined up next to his place in line.  

Thursday, April 4, 2013

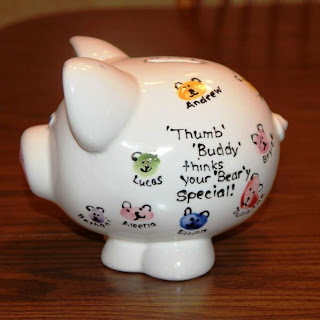
Personalized Piggy Banks: Great Homemade Baby Shower Gift

Welcome to the world, Baby Jett!!  

It is a tradition in our classroom that whenever a staff person has a baby, we make their child a personalized piggy bank.  Miss Molly, our wonderful para from last year had a baby two months ago and I had to share the students’ piggy bank masterpiece!  

Each student put a thumbprint on the piggy bank then I made their thumbprints into bears (since we call our class the "Buddy Bears").  Below each bear, I put the name of the student that made the thumbprint.  In the middle of the bank,  I added “'Thumb’body thinks you are ‘bear’y special!”  


A special thank you goes out to our local pottery store Pottery Works and Pam Fellers for always being so good to our classroom.  Whenever we have a special project in mind, Pam gives me ideas and is willing to accommodate our needs by letting us check out the paints.  She also helps us fire the painted ceramics.  Thanks, Pam!!! You are wonderful!!! Here's 'a link to her Facebook page.  

Teacher's Tip:  Don’t have a pottery store near you?  You can purchase a ceramic piggy bank in the craft department at Wal-mart for your students or children to paint.  Here is the link

Tuesday, April 2, 2013

Handmade Gift Ideas for Staff Appreciation

Our school recognizes paraprofessionals in April by celebrating "Para Week".  Each teacher and classroom takes the time to appreciate the hard work of its paraeducators and teacher assistants.  I did a little research, and unfortunately, learned that there aren't any national special days or weeks designated to recognize the hard work of paraprofessionals.  

However, I think any & every day is deserving to thank those who make our classrooms more successful. I'm the first to admit my classroom would not run effectively without the hard work and dedication of my staff.  I often joke with them that they are my brain.  Some of my best classroom tips and strategies come from them because they truly have the best interest of the students in mind.  Therefore, this week I am posting my top five ways to recognize classroom assistants.

1.  "Hand"some Bouquet - Help your students secretly make a bouquet of flowers made from their hand prints.  Simply trace their hands on colored construction paper and glue them together. 


Then, wrap them into a flower shape and hot glue the flower together using a colored popsicle stick as the stem and colored pom-poms as the inside. 


Next, have your students sign their names on their flower and place them in a vase with colored aquarium rocks inside.  Add a pretty ribbon and you have a gift your paras are sure to love!  


2. Show Off Their Greatness - Take vertical photographs of your paras working with the students. Download the photos to the Walgreens Photo Website and print as a pretend magazine cover.  

The cover I like to use is Woman’s World:Woman of the Year.  Put it in a nice frame and wrap it with student-decorated wrapping.  Your paras will smile when they open such a unique gift.  

This sample is of my son and his daycare provider.
THANKS, JACKIE!! YOU ARE THE BEST!!
It is so reassuring to know my kids are in good hands when I can't be there.
Parent Tip: Childcare Provider Day is Friday, May 10th this year.  Moneysaving Thought: Watch out for Walgreens' sales! You can often get 30 to 50% off of photo gifts and prints. 

3.  Paint Them a Masterpiece - When your paras are away, secretly have your students take turns choosing a paint color. Have them paint a few strokes across the same piece of paper.  Keep a list of what color each child chose. After each student paints, fold the paper in half to make the paint merge together for an abstract affect.  


When the paint dries, frame the painting in a nice frame with a mat, wrap it, and attach a special note that reads: 
    A special thank you for all that you do! This one-of-a-kind artwork was painted with you in mind. Each student painted with a different kind. . . Red by Jake, Brown by Kendall, Pink by Kathy, Orange by Jim, Blue by Payton, Dark Blue by Todd, White by Steve, Green by Mike, Dark Green by Julie,
    Teal by Stacy, Hot Pink by Emmitt, and Yellow by Douglas

    4.  Make Them Famous for the Day -  Help your students decorate crowns for your paras.


    Order personalized trophies that say "World’s Best ParaEducator" or "Number One Para".  I ordered mine from Crown AwardsNext, grab some red bulletin board paper for a ‘red carpet’ and have your paras walk the red carpet as your students clap and cheer for them. 

    5.  Give them a Taste of Home - Send out a note or email to parents that you are secretly collecting favorite family recipes for a special surprise for your paras. 


    You will be surprised by how into this your families will get!  Several of our families typed them out and added pictures of their kids cooking them or had their children draw special pictures on them.   

    Then, have your students help decorate a recipe box for them.  I got my recipeboxes in the craft section at Wal-mart.  My students decorated the boxes by using their hands to make various fruits and vegetables.  I added silly little sayings for each piece of produce.  


    • For the cherry - "You are ‘cherry’ cool!"
    • For the grapes - "You’re ‘Grape’!", 
    • For the carrot -"You ‘carrot’ about us!" 
    • For the bananas - "I am bananas for you." 
    • For the peas - "You are ‘pea’fect!  


    Note: I removed the class pictures to post this idea on the blog. However, the class pics definitely added a special touch to a wonderful keepsake!

    Teacher's Tip: These ideas could also be used for a variety of other occasions.  For example, we have made the painted masterpiece and recipe box as retirement, housewarming, going away and wedding gifts.  We have also used the handsome bouquet as a get well gesture.  They could be used as unique gifts for family and friends, too!  Keep in mind that Teacher Appreciation, School Nurse’s Day, and Secretary’s Day are just around the corner!! :)

    I hope you enjoyed my top five paraeducator appreciation gifts.  My only wish is that I could give my paras much more because that's what they deserve!!  Happy Paraeducator Week to my current paras Miss Penny and Miss Molly. . . I truly couldn't do it WITHOUT YOU!!!!! And to those who have worked in our classroom in the past: Miss Alaina, Miss Molly K, Miss Andrea, Miss Wendy, Miss Jolene, Miss Lori, Miss Rene',  Miss Kelsi, Miss Joelene, Mrs. LaFond and Mrs. Linenberger. . . each of you have made an impact on my life, as well as the lives of our students and their families.  Thanks for your love and dedication!