Showing posts with label Extra Credit. Show all posts

Tuesday, September 17, 2013

Monitoring Self-Portrait & Name Writing Progress for Pre-K Students

First, I would like to thank you all for the amazing response to last week's post, my classroom virtual tour.  I must say I have been incredibly humbled and appreciative of the kind feedback.  Hearing how you plan to use my ideas in your own classrooms makes all my efforts worthwhile.  There are a lot of great teachers out there and it's been wonderful to hear from you. Thank you from the bottom of my heart!! 

And now for my apologies....between my 6 year-old’s birthday celebration and presenting at the State Speech and Hearing Conference, last week really got away from me.  No regrets though!  You only celebrate a sixth birthday once and the KSHA conference was outstanding.  I was honored to be invited to present and meet so many passionate SLPs. 

That said, like many working mothers out there, I over committed last week.  Frankly, six years into this dual mother/teacher role, I still struggle to find balance between my professional passions and family commitments. As a result, my plans for this week's post have changed.  I had planned to share how direct instruction is set up and operates in my classroom. 

Instead, this week I will share a simpler (less time-consuming) tip I discovered while monitoring and managing progress of student's self-portrait drawings.  As you may remember, last winter I shared how we break up drawing ourselves into steps via a visual task analysis Essentially, we have the students draw themselves each month and track their progress by hanging the drawings in page protectors above our library center.  By adding a signature box on the self-portrait template, you can also use this strategy to track progress of name writing.  

Teacher's Template:  You can access my self-portrait template here.  The smiley face inside the signature box is a visual to help the kids know where to start printing their name.  This feature came from Handwriting without Tears.  (Note: In the examples below, I have cropped out the children’s names.)

Here's the update I made this year.  Before I ask the students to draw a body part, I model it on my own paper.  Each body part is drawn in a different color, so we can accurately gage progress or share specific interpretations with parents and staff. I simply staple my copy to the back of the students' copy.  Take a look at the provided examples.


Even at the lowest student drawing level, do you see the resemblance between my model and the student's multi-colored model?? 

I used to have the students draw in one color and then write on their drawing the names of the each body part. That method took more time and didn't communicate each month's progress as effectively.


Last year's method
The new color-coded approach has worked much better.  As my students get better at drawing themselves, I will change it up and model drawing two or three body parts in one color. Then, I'll ask them to draw those two or three body parts all at once.  It will show their improvement in following two and three step directions, as well as monitor their drawing progress.  

Our ultimate goal is to have an adult draw an entire body self-portrait then have the students draw their own independently at their desks.  It may take quite some time to get to this point, but at least we can monitor their monthly progress.  As you all know, in this field it's important to celebrate the small steps! 

(Extra Credit: While drafting this post, I also realized you could use the same concept when the students practice writing their names by using a different color marker or pencil for each letter.)
 

Thanks for visiting this week.  Stay tuned for next week's post when I'll show you how we work on improving fine motor, attention, writing skills and so much more through direct instruction as I love the way it is set up this year and I think you'll enjoy it too!! 


Tuesday, February 5, 2013

Valentine's Pretend Play for Pre-K Classrooms

It is an annual tradition in our classroom to transform the pretend play center into a post office a few weeks before Valentine's Day.  

We add individual mailboxes that were created and given to me by a well-respected mentor and dear friend, Louise Younger.  I believe she got the idea from Mailbox Magazine several years back.  


We add a wooden mailbox made by Melisa and Doug and a small free standing plasticmailbox made by step 2  In the play center, there are a small scale, cash register, a few boxes and small packages, as well as envelopes programmed to work on specific skills.   


The children pretend to be mail carriers and customers getting their mail.  We incorporate academic concepts by having the students place mail in the correct boxes.  Some children work on matching the pictures of friends to the correct mailboxes, while others work on matching the correct address number or reading & matching their friends' names.    

Number Recognition:  Matching envelopes to the correct mailbox number.
Face Recognition: Matching envelopes to it's corresponding photo.
Name Recognition:  Matching envelopes to the correct name.

To make the center even more fun, the students have the opportunity to dress up as mail carriers.  They wear postal hats, button down shirts and a mailbag.


Extra Credit: We have also incorporated a field trip to the post office in recent years.  It allows the children to see what real mail carriers and postal workers do. Rework:  Another option is to plan a trip to the school's office to hand-deliver our parent valentines to our school mail carrier and watch him leave in the mail truck.  The students then see how the process works a few days later when their parents valentines arrive at home.  

Tuesday, January 8, 2013

Task Box Countdown: Task Box #2 - The Bubble Gum Machine Fun

My Top 10 Task Box Countdown began last week with "TaskBox #1: Academic Sensory Bags".  This week we move onto an excellent multi-purpose task box, The Bubble Gum Machine.

My students often get tired of the same old task boxes. Even though they may not have mastered the skills being practiced in the task, it gets old working on the same task over and over.  Other times students master a skill when presented in a specific context, but have difficulty using the skill in a different capacity. Needless to say, I am always looking for new ways to work on the same concepts.  
Teacher’s Tip:  When creating task boxes for the classroom, think of ways to make your materials fit more than one skill. You’ll get more bang for your buck!!!  

For example, this week I found these small bubble gum machines for a dollar at Dollartree.  Simply add some fuzzy pom-poms and you have a motivating and unique assortment of tasks.


Activity #1 - Basic Counting Task:  Add number flash cards and you have a counting game.  Instructor's Insight: Add sticker dots to your flash cards and you have a way to work on one-to-one correspondence.  Or if you put the sticker dots on the back, they can be used for the more complex skill of self-checking. 


Activity #2 - Advanced Counting Task:  Put several different colors of pom-poms in one machine and have your students count how many of each color.  For a higher-level challenge, use this template to increase the task’s complexity. 


Activity #3 - Fine Motor Skills Task:  Add an ice cube tray & tongs and you have a unique fine motor skill building activity.


Activity #4 - Non Verbal Task:  If you have nonverbal students or students who do not know their colors yet, you can use this aided language page.  The students can match or point to the colors as they draw them from their bubble gum machine. 

If you are playing the game with a student who is at a higher-level and already knows how to sort and name colors, ask him/her to graph the colors he/she and their friends draw from the bubble gum machine using this graph template.   


Language-Aid Page

Activity #5 - Taking Turns:  Lastly,  add a "Take 1" fabric bag or container for a turn-taking practice game.  

A "Take 1" bag or container is just a little fabric bag or container with the phrase “Take 1” written on it.  I make them to use in our classroom to practice selecting only one item.  Often times when students are asked to take one item from a bowl or bag of items, they grab a   handful.  By using the take one bag we can work on the skill of taking one, and all support staff will remember to prompt with the term "take one" as it is printed on the bag.  Instructor's Insight:  If a student is having trouble with the concept of taking one, I will only put one item in the bag or container to make their selection errorless. 

To use the "Take 1" bag in The Bubble Gum Machine Game, you would simply have the students take turns taking one pom pom out of the bag, name the color they pulled, and then  put it into the correspondingly-colored gum ball machine.  Or add several different colored pom-poms into the bag.  Have the student draw only one pom, identify its color, and place it in the bubble gum machine.


There you have it .... five activities for the price of one!  And to think, I almost passed up purchasing these bubble gum machines because I thought it was too much storage for one simple sorting activity.  

Extra credit:  A great app that goes along with the same idea of sorting gum balls is 
Candy Count - Learn Colors & Numbers. 


Thursday, November 29, 2012

Homemade Christmas Gift Ideas: Perfect Pre-K Parent Gift

Five years ago, we started a tradition in our classroom that each year the children will paint a glass Christmas bulb as a gift to their parents.  In an effort to keep this year’s ornament a surprise, I am going to share the designs from the past four years. 

Last year, we made the "Loving Candy Canes" ornament. Use the student’s thumbprints to paint two red & white patterned candy canes in the shape of a heart on a green bulb. 


Poem for "Loving Candy Canes" Ornament
Thumbprints of red and white,
Oh, what a beautiful sight!
Loving Candy Canes, don’t you see. . .
One for you and one for me!

Two years ago, we made the "Tree-mendous Christmas Tree" ornament.  Use the student’s thumbprints to make a Christmas tree. Make one green thumbprint on the top, then two on the next row, three on the third, and four on the fourth row.  Next using the student’s other thumb, paint a brown trunk.  After the paint dries, help your students glue small jewels to the tree with craft glue.  Finally, help them use glittery gold puffy paint to make a star at the  top of the tree.


Poem for "Tree-mendous Christmas Tree" Ornament.
Oh Christmas tree, 
Oh Christmas tree, 
This tree was made. . .
Especially for you by me!


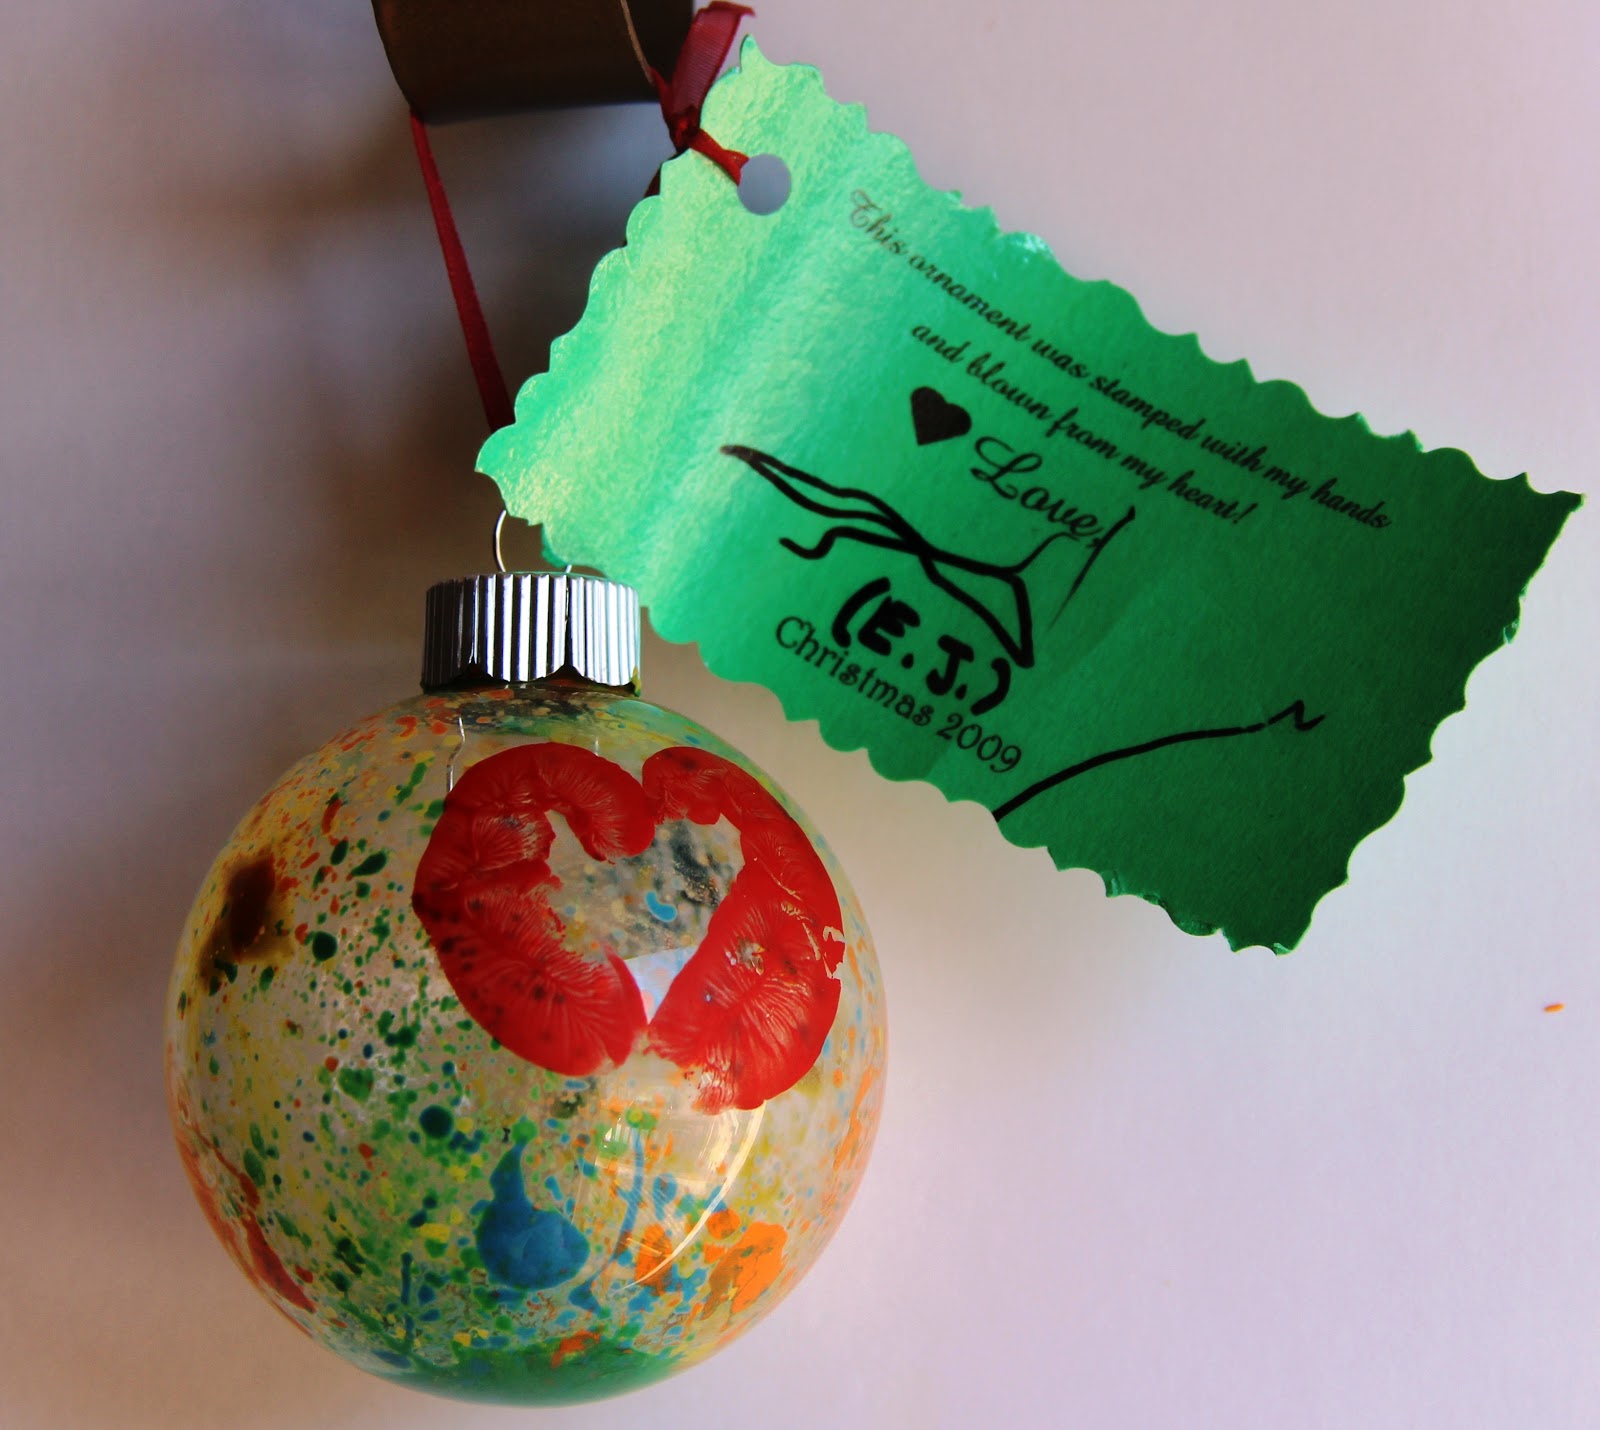
Three years ago, I purchased clear glass bulbs from Hobby Lobby and had the students blow different colors of paint into the ornament with a straw.  They then painted a red heart on the outside of their ornament using the sides of their hands. 


Teacher's Tip:  Use a paintbrush to paint the outside of the
student's hands.  This makes a better print than having the
students dip the sides their hands in paint.


Poem for the "Blown from the Heart" Ornament
This ornament was stamped with my hands,
and blown from my heart!

Rework:  For students who did not understand the concept of blowing paint out of a straw and to prevent them from sucking painting into their mouth (how you would typically use a straw), I had them do a marble effect by dipping heart beads into different colors of paint and then dropping them into the inside of the bulb and rolling them gently around.  We left the heart beads in the bulb and rewrote the poem.  The children put one heart beads for every person in their family into the bulb.  

Adapted Poem for this Ornament
This ornament is special don’t you see. . .
Painted hearts circled around for all of you and me.
Together we make a wonderful family!

Four years ago, we started our glass bulb tradition by borrowing an idea from Miss Andrea, one of our paras, who got the snowman bulb from her son the previous year.  You can see the snowman bulb here


Home Adaption:  What makes our glass ornament tradition even more dear to my heart is that my paras and I take each year’s idea home and make the glass ornaments with our own children.  Each year my boys make the ornaments for special people in our lives like their aunts, uncles, grandparents, neighbors, teachers and daycare providers.  

To me, the best part of our glass ornament tradition is making a bulb each year for our family tree.  The boys and I love decorating the tree with all the ornaments they have made.  

For our own tree, the boys make the ornaments by themselves and sign them versus an ornament they make together.  That way the ornaments can eventually be keepsakes for each boy when he's grown.

Extra Credit:  Printing the poems on card stock, cutting them apart with scrapbook scissors, and then laminating them makes for a longer lasting keepsake!  

***Post Update:  In response to popular demand, here are the gift tag templates from this post:  Blown from the Heart OrnamentBlown from the Heart - Adapted VersionTree-mendous Christmas TreeLoving Candy Canes.***


Tuesday, November 6, 2012

Multi-Purpose Seasonal Sorting Activity

Check out this fun way to review concepts such as colors, shapes, letters, numbers or even Thanksgiving vocabulary.  

All you need is a disposable pie pan, glue gun and one piece of off-white felt.  
  1. Cut your felt into a circle the size of your pie pan. 
  2. Fold it in half and cut three slits in the middle.  
  3. Glue it to the edge of the pie pan.

Here's a photo of the completed "pie".

You then have a "pie" to draw cards or objects out of.  Put small items or flash cards inside the slit of the pie. Students take turns pulling out various cards or items after you sing:  "What’s in the pie?" to the tune of “Are you Sleeping?”  

What’s in the pie? What’s in the pie? Stick your hand in and find out. Stick your hand in and find out.  What’s in the pie? What’s in the pie?  
Lesson Plan Note:  I use this activity as an extension to one of my favorite Thanksgiving books by Alison Jackson, "I Know an Old Lady Who Swallowed a Pie". 

Instructor's Insight: Put the same number of items in the pie as students who are playing the game. This gives the students a visual cue of how long the activity will last.  When the pie is empty, we are all done.  


Here we are using the activity to practice Thanksgiving vocabulary,
as well as sorting the items by color. 

Teacher's Tip:  Get the most out of this activity by adding other concepts to the game. For example, if you have three different colored items in the pie then have three sorting bowls beside the pie for the kids to sort the items by color. Or if you have numbers in the pie, have a Velcro paint stick outside the pie and put Velcro on the back of the numbers so that students can put the numbers in order as they pull them out of the pie.  

Extra Credit: It is always good to have a structured place for kids to put game pieces so they are not fiddling with them and can attend to the task at hand.


Tuesday, October 9, 2012

Pumpkin Sensory Activity

As a preschool teacher, I am always trying to come up with new ways to use our sensory table. This year I am putting navy beans and lima beans in our table with orange, yellow and brown pipe cleaners (cut at various lengths) to serve as the inside of a pumpkin.  


Before playing at the center, we will cut a pumpkin open and explore it’s insides so the students understand the correlation.  So often children do not like touching the yucky insides of a pumpkin so this will be a touch friendly version of pumpkin guts.   


My son, Payton, testing out the pumpkin sensory table.
I will add various-sized plastic pumpkins so the children can work on stuffing the pumpkins using size relationships.  We will work on stuffing small pumpkins with smaller seeds like navy beans and larger pumpkins with larger seeds like lima beans.  We can also add magnet wands for the student to pick up the pipe cleaners later in the week.

Teacher's Tip: I usually change what is in my sand table weekly, but as the week progresses we add more items, skills and concepts to the table.  To start the week, the goal is simply appropriate exploration, playing with the materials inside the table, getting used to the new textures and items in the table.  

Instructor's Insight:Many students with special needs need time to adjust to change.  Then as the week goes on, we add more items and skills.
 
Extra Credit:  The items in the table such as corn, beans and rice seem to be too loud and it bothers students’ sensory systems.  I place a soft padded carpet at the bottom of the table to make it less noisy.
  

Tuesday, October 2, 2012

Literacy Workbox Idea

Purchase board books with various pictures and concepts in them.  Have students find certain items and pictures in the books.  Ask them to mark or circle the pictures using Dry Erase Crayons.  (You can purchase dry erase crayons at any craft or department store or at Crayola.com.)

By using dry erase crayons, the student’s findings become more visual and concrete.  The activity is more like a task box where there is a clear beginning & end.  Take the book in the picture below for example.  

Here the student has been asked to identify and mark certain items in the board book.

The child knows when all the wording on the page is crossed out that they have found everything and may move onto the next page.  This activity supports a students ability to stay on task, as well as addressing listening and comprehension skills.  There is also a fine motor component to this workbox.  

Extra Credit:  You can break your dry erase crayons into small pieces so that the students have to use the correct pencil grip in order to hold them—we call these "Crayon Nubbins". 


Teacher's Tip:  "Crayon Nubbins" are a great way to address  pencil grip.

Another extension for this activity is to use dry erase crayons on seek and find books that are printed as board books or on "I Spy" floor puzzles.  


The student has been asked to draw a line between the puzzle key
& the matching image in the picture as he finds them.

Instructor's Insight: A Task Box, which is sometimes referred to as a Workbox,  is an activity that is designed with the following three major components in mind. 
  1. How much work? 
  2. What work? 
  3. When is the work finished?
This concept is based off of the TEACCH model and research done by the University of North Carolina.  Students with Autism are visual learners. By presenting the work in this manner, it helps the child's level of anxiety go down making them more successful and independent, which in turn builds their confidence. 
You can learn more about task boxes by visiting the Tasks Galore website or by reading the book "How Do I Teach This Kid? by Kimberly A. Henry. One great blog to visit to get your taskbox library built up is Building Blox.