Tuesday, July 30, 2013

Where in the State are Mom & Dad?

Recently, I spent a week in Manhattan, KS for an ABA training provided by the Kansas Center for Autism Research and Training(K-Cart).  The training was fabulous.  I learned a lot from Jill Koertner and her staff.  However, I will save all that knowledge for future post after I put it in practice with my students. For now, I want to share a mommy revelation with you. 

Every time I am away I struggle with mommy guilt which usually manifests itself in me buying the boys some sort of toy or trinket.  This coping mechanism does serve my wallet or mind well. It can be difficult to find them something that they don’t already have and something they truly need.
  
Here's my solution...this time I bought the boys a Kansas map.  I then went to Hobby Lobby and purchased a poster frame.  


MONEY SAVING TIP: Last week happened to be a frame sale week.  As a result, I got the frame for a mere $6.00!  However if you go when they are not having a frame sale, just log on to the Hobby Lobby website via your phone and you can access their daily 40% off coupon by simply giving the cashier the code from your phone!!  

Then, I simply framed the map and added a key to represent both mom & dad's travels. (My husband is a flight medic and flies to small and large towns throughout Kansas adding to the daily Kansas geography lessons for our boys.)  


The poster frame serves as a dry erase component to map out our trips.  


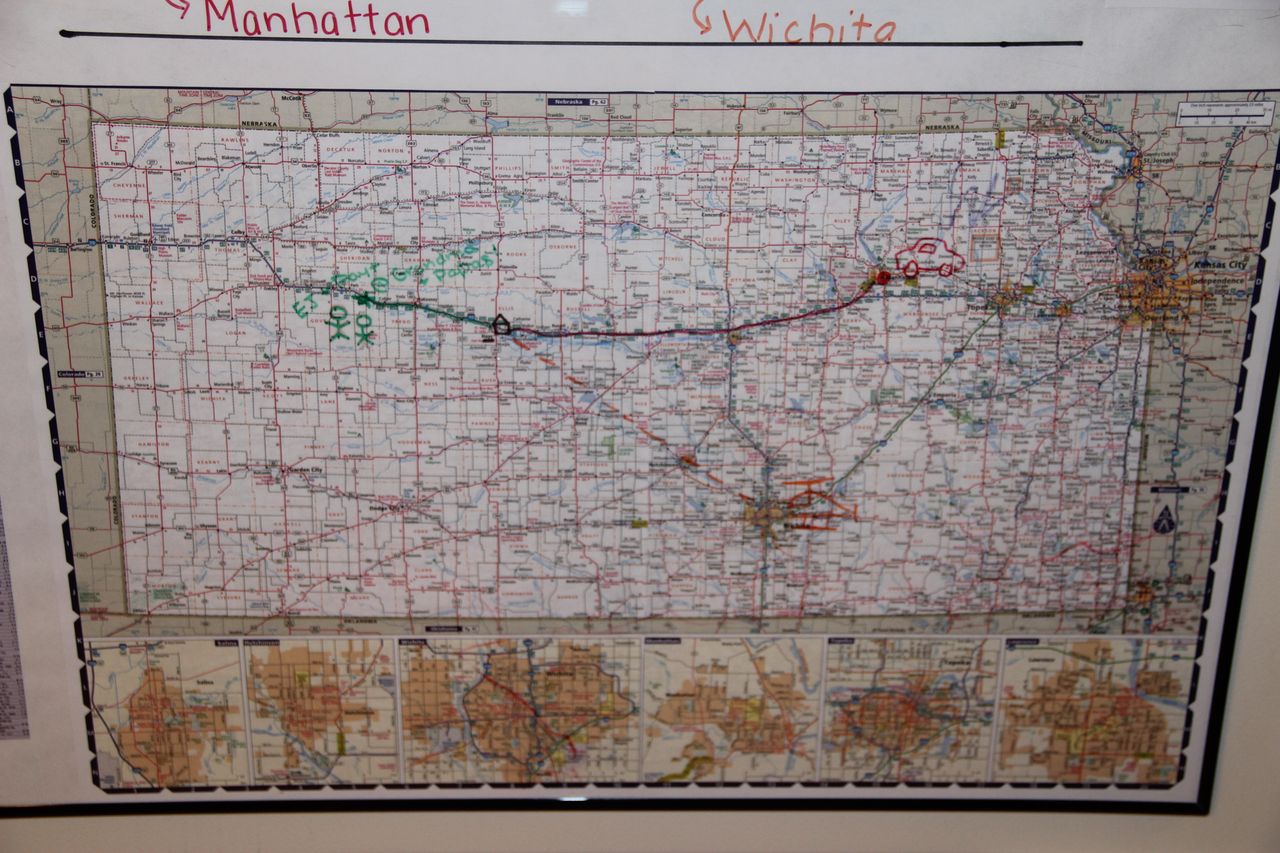
In the future, they can even learn to read and find cities on the map using the legend on the side!  


So far, EJ loves it!  He doesn’t even realize he's being taught! He just thinks of it as a fun thing to do.  (Little does he know, everything is a learning activity when Mommy's a teacher!) 

As I go around the state, I also plan to bring back brochures, postcards, or other items to share special things about the places we go.  My only wish is that I had more national or global travels...but Kansas will have to do for now!! :) 
   

Sunday, July 21, 2013

7 Day Work Task Challenge - Day 7: Counting, Sorting, & Pincer Grasp

Day 7 of the week-long work task challenge and I am taking it easy!  A wonderful friend, Vickie Unruh, gave me this medicine tower. Here it is on amazon, but I believe she said she found it at a dollar store.

I simply added sticker dots with numbers to each section. Then, the students can screw them together in numerical order. 


Or they can count out that many pony beads, put them in the section and screw the section to the next color. 


This can be done with a single color bead to demonstrate the one-to-one correspondence counting skill.  


Or you could use beads that correspond to the color of each container to make it an errorless learning activity.  


I also added an all done tube. The students will put the colored tower inside the tube prior to putting it in the finished hamper.  


Instructor's Insight: In my experience, students tend to toss their tasks into the all done hamper, in which case I foresee the medicine tower shattering as it lands.  As much as we train students to sit things in carefully, it doesn’t always happen so the tube will insure the tower’s safety.

One more side note, I used the clear container of the tower to hold the beads, this forces students to use a pincer grasp to grab each bead from the container as it's small and they can’t drag the beads to the side of it and pull them out as easy.  It also makes the task store itself which is a nice feature. 

Love the medicine tower!  Vickie, thank you for donating it for the final task number of the 7 Day Work Task Challenge.


Saturday, July 20, 2013

7 Day Work Task Challenge - Day 6: Put in, Sorting & Fine Motor Task

Today’s task is one I have been wanting to create for a long time. It is a little more involved and costs a bit more than the others (mostly because I don’t have any little girls at home to steal hair clips from!). In this task, students have to use fine motor skills to pinch off hair clips and place them in a correctly colored hole.  This task goes beyond sorting by the basic colors and moves on to black, brown and clear.  


 All I did to make the task was cover a box with contact paper and trace the tips of the dowel rods on to the top of the box.  Then, I used an exacto knife to cut out the holes.  I put Velcro on the bottom of each dowel and the inside of the box to make the dowels more sturdy and to make them removable for storage purposes.  


Notice I also velcroed a paint stir stick to the top of each dowel.  This makes it so the students can’t simply slide the clips off the dowel.  They must pinch them off using fine motor skills. 


I then cut three squares on the top of the box and outlined them with white, black, and brown For black and brown outline, I used permanent marker and for white outline I used an Elmer’s Paint Pen.   Next, I taped two pieces of cardstock as dividers for inside of the box so it could be self checking. 


Just add the hair clips and Ta-Da, you have a fine motor sorting task.  To make it an easier task, I can remove two of the dowels and just have the student put in one size clip.  The large clips can be easiest for little hands or sometimes even the medium sized clips are easiest depending on the student.   


Another variation is covering two of the square wholes and having the student work on taking off and putting in, rather than taking off and sorting to put in.  


Or yet another variation that is a little trickier is taking all the clips off and having students pinch to open them and put them on the right sized dowel. 


So there you have it a hair clip task that works on fine motor and can work on put in, sorting by color or sorting by size!  What do you think?  What tasks can you make from hair clips?  I see lots of potential with them.  


Friday, July 19, 2013

7 Day Work Task Challenge - Day 5: A "Put In" & Fine Motor Task

It's Day 5 of my Work Task Challenge and I'm learning it is very difficult to keep a challenge going mid-summer.  Lucky for me, I found inspiration on page 50 of the book, Visual Support for Children with Autism Spectrum Disorders: Materials for Visual Learners by Vera Bernard-Opitz and Anne Haubler.


I am always looking for variations of "put in" and fine motor tasks.  We actually have these links in the classroom, but the students never use them appropriately.  They usually dump all the links out, throw them around until the links are tangled, and then leave the area to find something else to play.  This task is a perfect variation on the old colored links. 

That said, my only problem with this activity are my commitments to storing task boxes in condensed containers and establishing multi skill levels for each task. Here's my creative solution to that dilemma.  

I took an old Velveeta cheese box, turned it over, and cut two slits in the bottom. The bottom then became the top of the box as it is much sturdier than the top. Next, I cut two paint sticks down so they would measure the length of my storage shoe boxes.  I added Velcro to the inside of the box and the bottom of the paint sticks. This makes the paint sticks sturdy and removable for storage purposes. 

Then, I screwed a hook into the top of each paint stick. I used an exacto knife to cut out four holes on top the Velveeta box for each of the different colored links.  Notice two holes are vertical and the other two are horizontal. This increases the fine motor skills needed to complete the task  because students must twist their fingers to put the links in the correct holes. 


And yes, I met my goal, the task fits into a shoe box with a little extra storage for even one more task!  


It also has three levels of difficulty by: Level 1. Taking off and putting in, Level 2. Taking off and sort by two, or Level 3. Taking off and sorting by four.


Level 1:  Taking Off & Putting In 


Level 2:  Taking Off & Sorting by Two
Level 3:  Taking Off & Sorting by Four

And one for last feature, I taped cardstock to the inside of the box's bottom for a  self checking component!


Thursday, July 18, 2013

7 Day Work Task Challenge - Day 4: Counting & Color Matching Support

As I read through the disassembling and assembling section of the book entitled Visual Support for Children with Autism SpectrumDisorders: Materials for Visual Learners by Vera Bernard-Opitz and Anne Haubler, I found a way to put my husband’s golf obsession to good use!  When you buy a dozen golf balls, they often come in 4 sleeves of three balls each. This packaging makes for an excellent assembly task without much work at all. 

I purchased a bucket of colored practice balls and made one assembly task where my students have to fill all the golf ball sleeves with the same color balls. I added sticker dot numbers to the side of each sleeve so the student can count the number of balls. 


By adding marks to the bottom of the large box, the student can see how to pack the golf ball sleeves when they are finished.


To add a color sorting skill to the task, purchase multi-colored balls and add a piece of colored tape around the outside of each golf sleeve.  Ask the students to match the ball to the corresponding  golf ball sleeve. 


Big thanks to my husband and a family friend of ours for "lending" me your golf ball boxes!! What hobbies or items does your household have that could pay off in the work task department?
  

Wednesday, July 17, 2013

7 Day Work Task Challenge - Day 3: Developing the Non-Dominant Hand

Today's inspiration comes from page 52 in the Visual Support for Children withAutism Spectrum Disorders: Materials for Visual Learners book by Vera Bernard-Opitz and Anne Haubler, "Pulling scarves through the holes in a ball and stuffing them into a container". 


While replicating this task, I developed a more advanced version of the same skill. I cut 1½ by 8 inch felt strips and added a wiffle ball.  The goal is to have the students stuff the wiffle ball with the felt strips. It may be a difficult task because the student has to push the felt into the holes using his/her fingertips.  However, it's a great activity for students who neglect to use their less dominant hand as the guiding hand (i.e. the students who you have to remind to hold their paper down with the left hand as they write with the right hand).


I tried this task with my 5-year-old and he loved the challenge so much that it made me think...let's add an academic piece to it.  I took a white wiffle ball and outlined several of the holes with various colors. Then, I got strips of felt in those colors and had him match the felt to corresponding wiffle ball holes.  


Worried about getting the felt out of the ball once it's stuffed?  Actually, the strips come out quite easily.  The trick is not having too many pieces of felt shoved into the ball.  I went with five felt strips. However if you want to increase the number of strips to make the task longer, a good friend of mine, Angela Moxter, suggested that you could use a crochet hook to get the felt out.  I haven’t tried it but it sounds like a great idea!  It could even lead to another task in problem solving and fine motor as a student works to get the felt out.  

Thanks Angela, love your restructuring idea!  See how fun and easy it is to restructure, think outside the box, and come up with new ways to make and create this task.  

Until tomorrow, Happy Task Building!

Tuesday, July 16, 2013

7 Day Work Task Challenge - Day 2: Matching & Fine Motor Skills

As my son & I raided the cabinets for random lids that snap closed for Day 1's task box, another task came to mind.  I can’t remember where I originally saw it, but it's a great one.  (If it came from you, please let me know I would love to give you credit for it.)  Anyway, it's matching up and screwing on various lids. 


I simply collected six travel-sized containers with lids and traced the bottom of each of them on one of my favorite reusable boxes, a Birchbox.  Then, I used an exacto knife to cut out the openings for each container. And voilà ... a new matching & fine motor skill task that works on functional self-help skills, too!!


My favorite part about this task is that it is compact and the lid of the box serves as a place to hold all the container lids. This element structures the task and makes it easy for students to keep track of the pieces.  I simply attached some velcro to the side to keep both box pieces together. And, it literally cost me nothing!! Score.


What other household items could be repurposed as task boxes?  Do you have a clever, cheap task idea you'd like to share?  You are welcome to share them on my Facebook Page.  (Teacher's wallets worldwide would thank you!)

Monday, July 15, 2013

7 Day Work Task Challenge - Day 1: Developing Functional Fine Motor Skills

Recently, I received a book entitled Visual Support for Children with Autism SpectrumDisorders: Materials for Visual Learners by Vera Bernard-Opitz and AnneHaubler.   As I skimmed through the book, I quickly realized it was time for me to create some new work tasks. So with the book as my inspiration, I am taking on a "7 Day Work Task Challenge".

For the next seven days, I will create and share a new task.  The stipulations are: think cheap, use household materials, and keep it compact enough to fit in this storage system. 

Task Box Organization

As you may have learned from earlier posts, I store my tasks in plastic shoe box containers. In an effort to save room, I store as many tasks as possible in each box.   Then, I label each box with what it contains and the purpose of the tasks in the box like fine motor, math, literacy, social, etc.   I also work to make each task represent a variety of levels so that it can be used by several students to work on multiple concepts and skills.

Task Box Labeling

Without further ado, here's my first task of my 7 Day Work Task Challenge!!  My inspiration is on page 60 of the Visual Support book captioned "7. Opening and closing shampoo bottles". The image shows four shampoo bottles placed inside holes cut into the lid of small box.  I modified the task to include a few more trials by using smaller lids from travel-size containers.
  

My son and I basically raided our kitchen and bathrooms for random lids, everything from ketchup bottles, lotions, shampoos, and dried out acrylic paints.  I hot glued the lids we collected to the top of a box.  Next, I used a thin screw driver to poke holes through the box under each lid opening. I also placed a small cup on one side of the box to store dowels in.  Finally, I cut up a thin dowel to add a "put in" or "take out" element to the task.  

The task is simple yet it contains two skill levels.   In the more basic skill level,  the student removes the dowels from each lid, place it in the cup, and close each lid.


The more advanced skill requires the student to open each lid and place a dowel inside it. 


For both skill levels, the student knows when he/she is finished because either all the dowels are either in the cup or in the lids. This task is a great way to work on the functional fine motor skill of opening and closing containers.

It's amazing how one small image can inspire an entire task box!!  I would love to see and hear how you make this task or what it inspires for you.


Tuesday, July 9, 2013

A First Then Potty Schedule that Works Like Magic!!!

A parent approached me about how she could get her son potty-trained over the summer.  We know he understands the concepts because he pulls his pants down and potties when playing outdoors. But when he is at home or in the classroom and asked to go potty, he gets very upset and resists the whole thing.  

Recently, we started using a First Then clipboard schedule with him in the classroom to transition from one activity to the next. Our Individualized First Then Visual Schedule was very effective for him so we decided to give a First Then Potty Schedule a whirl! 

His mother gathered several of his most preferred toys (trucks, tractors, and dinosaurs).  She sent me pictures of them via her phone, then put them in crate and placed them up high.  I imported the pictures into Boardmaker and created picture icons for a choice board, as well as a green & red First Then board.  (First is represented in green for "go". Then is portrayed by red for "Stop, this activity is next.".)  


Go to Boardmaker Share and access the ConsiderateClassroom group to print my first then potty template.    
I put the First Then board on a small clipboard for easy access.  Next, I put velcro strips on the inside of the clipboard for the student’s choices.  


Preferred Activities used as "Then" options.
Whenever his mom asks him to go potty, she presents him with the clipboard and says "First potty, then. . ." and flips the First Then chart up to let him pick what he wants to play with after going potty.   The idea here is to get him to comply with the restrooming process. Even if he does not go potty, he can still have the "Then" choice if  he sat on the potty without resistance and gave it his best shot.  

After he successfully goes potty or successfully tries to go potty, his mom presents him with his "Then" choice.  She sets a timer and lets him play with it for 8 minutes then puts it up as a possible choice for next time.  


I am excited to say he was successful on his first try with the system.  The key is going to be staying consistent so the success continues, as well as making sure he doesn’t get tired of the toys in his "Then" box.  It will also be important for his mom to only allow him to play with the toys for a short time after restrooming. It's 8 minutes now, but down the road that time allowance may be even shorter.  By limiting the amount of time he gets to play with these highly preferred toys, he continues to be reinforced for using the potty.