Sunday, March 29, 2015

A Fun April Fools Day Treat

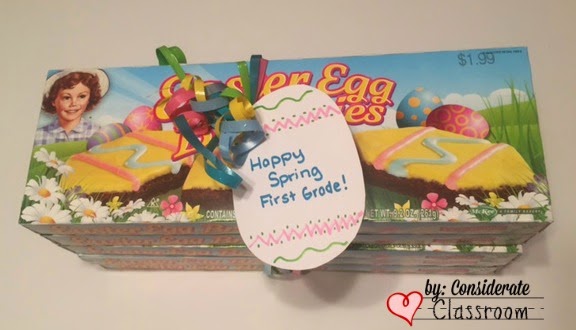
I couldn't resist sharing this fun April Fools Day treat my son and I made for his first grade class!  All you need is a brownie box, brown construction paper, scissors, ribbon, paper, a writing utensil and a glue stick. 


Cut out brown letter E's and write a note saying April Fools! Brown letter E's for Brown-Es get it:)


Our note has an added message that states there are just enough 'Brown E's' for each student to take one home to play the joke on their families.
 

We also included extra (real) Brownies for the student to have a special treat after the April Fool's Brown- Es!  We simply wrapped them in a ribbon with a note that said "Happy Easter!"  I then sent EJ's teacher a note to let her know they were coming and to tell her to be sure to open the box on the top first (an empty brownie box with brown E's inside)!  Then the kids could have their real brownies.


I just love this April fools joke!  I only wish I would have thought of it last year when I had a classroom of my own.  We always use to go around giving staff holiday cards and special treats.  This one would have been a lot of  fun.  For students who were a little shy or had limited verbal communication we could have programmed a Big Mack button to say, "Would you like a brownie?" and then another button that said, "APRIL FOOLS!"

Happy April Fools Day! Hope your kiddos don't play too many jokes on you this year.  
Lindy

Saturday, March 28, 2015

Expanding Student Diets and Exploring Sensory Differences


In honor of the work the Friends and Family of Trisomy 4P did this month to
bring awareness to the disability, I wanted to share the latest milestone
of Miss Natalie, my favorite friend with Trisomy 4P.

Recently, she has expanded her diet and learned to eat finger foods!  This
may not seem like a huge achievement, but for children who have sensory
issues and the need for sameness, it is a phenomenal feat.

When I first met Natalie, her diet consisted of yogurt, pudding,
applesauce, oatmeal, and foods that were pureed to a similar consistency.
In the beginning, this was out of medical necessity.  NOTE: If you are
working with a student who has food sensitivities and/or a  limited diet,
BE SURE TO WORK CLOSELY WITH THE STUDENT'S FAMILY AND PHYSICIAN to insure that the student is ready and able to explore new foods.


After Natalie's doctors gave her the green light to expand her diet it
wasn't a quick process.  Her parents started by pureeing food a little less
smooth and adding small amounts of texture (for example, a little cupcake
crumbled into her yogurt or pudding). 

Natalie eating a yogurt and cupcake mixture at
school for her birthday with her big brother. 

This expanded her diet.  But through observation we found that Natalie was
only eating new things that were presented on a spoon.  From a very young
age that was the only way she ate, and a challenging one at that, we worked
and worked to get her to eat with a spoon independently and now we were
expecting her to change it up and she was not having it!

Natalie has always struggled with change and new experiences, for example
when she first started school she would scream or cry in the presence of
new toys and activities.  She resisted touching and interacting with most
toys, books, and puzzles.  We worked toward progress in this area by
strategically using 'put in' tasks with new materials.  'Put in' tasks were
her favorite activity and something she was very successful at so by using
an area of strength and interest we were able to expand her repertoire of
toys and learning materials, which is a whole other post. But what I want
to point out here is that we used an area of strength and interest to
further her skills in small increments.

In regard to foods, and working toward eating finger foods, we used the
same concept.  I purchased toddler yogurt drops and cereal puffs.   In the
beginning, the only expectation we had for Natalie was that she put the
toddler finger foods into a container.  This was the only skill that
existed for several months (patience is often our best friend)!


Then last summer, Natalie's amazing parents started noticing Natalie
putting dirt in her month while playing outside.  This was huge as she had
never put anything in her month via her own fingertips!


Although this picture is a little blury, I wanted to share it as this was a
make or break step in Natalie's progress.  First off, if her parents hadn't
noticed this new skill of putting dirt in her mouth, and took it as a sign
that she was ready for the next step, she wouldn't be where she is today.
Secondly, if they hadn't been so supportive of this new skill she may have
stopped progressing.  I am sure they weren't super excited she was eating
dirt but if their reaction in that moment was very alarming and concerned,
"NATALIE STOP EATING DIRT, THAT IS TERRIBLE!!"  She may have held back and
stopped putting things in her mouth. Instead, her mom did the most
ingenious thing, she brainstormed what foods looked like dirt, and created
a crumbled Oreo mixture with the consistency of dirt.


From then on the pace began to pick up, but not without a few more bumps in
the road.  Natalie became used to eating things out of a cake pan, and
would only do so from that sized pan, so her parents went to work again.
They began using smaller and smaller pans, and then moved to a bowl and
even to eating food off the table in efforts to eat out of a bag, her
hands, and off a plate like children traditional do.


Without knowing Natalie, you still may not recognize the huge achievement
this is for her, but take a moment to think about the variety of foods, and
eating opportunities we experience every day.  Natalie's old eating habits
were very limiting to her and her family.  The family had to be very
mindful when going on family trips or even when traveling out of town for
her doctor's appointments. By strategically changing Natalie's eating
habits, through hard work and perseverance, her family has opened her world
up to new opportunities.


With that I would like to bring us back to honor the families and children
affected by Trisomy 4P and other Trisomy conditions.  March is Trisomy
Awareness month but I also like to think of it as Trisomy Acceptance
month.  Whether affected by Trisomy or any other disability, every student
is a person first, who has so much to offer.  I certainly recognize this as
I reflected back on my journey with Natalie and her family.  She is a
beautiful young girl with an abundance of love and determination.  I have
learned so much from her and her family's belief in her and advocacy for
her!  For that I am truly grateful.

I wish her and her family the very best throughout the many milestones they
will achieve in the future!


Do you want to learn more about Natalie and her 4P friends? You can also
click here to read more about her home and school programming and another desensitizing technique for snack time!

Wednesday, March 25, 2015

Three Quick and Easy Easter Activities


I was planning to get this Easter post out sooner so you could use it in your Easter lesson planning, but things didn't go as planned so instead I am hoping I will be giving you all the PRINTABLES necessary to add these three quick and easy Easter activities to your lessons in a snap!

First up a fun math activity called How many eggs in your basket? Watch the video below to see how to play.   

All you need is the printable above, an egg stamp (I found my in the Easter section at Wal-Mart last year), and a number and/or dot die. 


If you have both a number and dot die you can differentiate instruction very easily, like I did in the video.  EJ can read numbers so I used a number die with him. Payt cannot so I used a dot die with him until the end when I tried the die I made that had numbers one through three, the numbers he has mastered thus far. 


TIP:You can make your own dice with a variety of numbers, colors, letter, shapes or even sight words on them by using a sharpie and one inch wood or foam cubes.  The foam ones are nice because they roll quietly. 

Second up a fun science and math activity called What do you hear inside the egg?  Watch the video below to see how to play. 


All you need for this game is the printable above, (a dry eraser marker and page protector if you plan to reuse the printable), a medium sized plastic egg, and small items to put in the egg for guessing. 


The first year I did this activity I gathered two of every item I was going to put in the egg to make the visual below so my students had a concrete support to make a guess as to what they thought was  in the egg.


I still use this with some of my really concrete thinkers put I moved on to the version below for those that can generalize between the actual item and an icon drawing of the item. 


This also services as an aided language board for students who need it to support their communication. 

Last up, Shake and Listen Eggs  Watch the video below to see how to play.


All you need for this game is the printable above, plastic eggs in the colors that are on the printable, super glue, rice, and tongue depressors. 


To make the egg shakers simply put a small amount of rice in one side of the egg and super glue the other half on top. 

So there you have it 3 quick, easy and FUN Easter activities.  Happy Easter!

Lindy

Sunday, March 22, 2015

Communication for Centers


In writing a guest post for PreK Pages a few weeks back regarding behavior and communication, I realized it was time for an upgrade.  My classroom had huge success with the original framed center words as featured in previous posts, but just as little Miss Lilly needed more words on her communication cuff as discussed in a personalizing communication post I did last fall.  It is time to give those who are using my center words more WORDS! 

So without further ado, I give you multiple pages for the pretend play, block, art and writing centers:  


You can bind the multi-page center specific communication systems as a book:


Or simply put them in a clear plastic picture frame as the tabs on the side give students the opportunity to expand their vocabulary and talk about a variety of things at each center. 


The possibilities are endless!  As you can see in the video below with my boys, one using the block book words and the other using the writing word frame. 


Both boys have typically developing language for their ages, the boys and I just giving you examples as it can feel awkward to use pictures to talk at first.  But like I have mentioned in many posts in the past, we must MODEL language with pictures in order for the pictures to become meaningful communication for our limited language learners. 

In my new center mini books and frames I have added color coded backgrounds to help students and staff navigate the systems better.  For example if you want to build at the block center then you pull out or turn to the orange tab to choose a place to build.  If you want to add people, dinosaurs, farm animals, vehicles or zoo animals to the structure you built then you pull out or turn to the corresponding colored tab.  Again, this may seem awkward at first but as you get to know the placement of where words are it becomes more fluent. 


Also note you can start out small by only offering a few topics like I did in the block video. This is done easily by marking off the items that are not a choose for the day using a dry erase marker.    

To purchase these mini books head over to my teachers pay teachers store.  Also included in the updated center words are one page center words for the technology center (iPads and/or computers), the library center, table toys, and a sand and water table.


For those of you who are new to my blog, you might find it helpful to read more about my classroom's journey with aided language boards here.  If you are new to aided language boards, my products on teachers pay teachers give you sample phrases of how you can model communication with them. 

Aided language boards can truly benefit so many.  All children are visual learners by having pictures of the words you say they can create a visual in their mind that supports the expansion of their language and literacy skills.  When used with consistency, the boards can help children who are non verbal or have limited expressive language for a variety of reasons, including lack of exposure, communication delays, developmental disabilities or because they are learning English as a second language. 

Once a again happy communicating!  Until next time, Best Wishes!
Lindy

Wednesday, March 11, 2015

Home and School Communication


Have you ever thought about how students who are non-verbal or have limit language communicate with their parents and families about their school day? Even as language is starting to emerge it is hard for these students to share details out of context and it is equal hard for family members to understand what they are saying out of context.

The solution a home and school communication book.  I know this is not a new concept however this version has added aided language boards to facilitate communication!  On the front cover a label that says, "What I did at school..."


And on the back cover a label that says, "What I did at home..."


Then on the inside of the front cover an aided language board that supports the child in sharing where he/she went, what he/she did and who he/she played with at school.  


And on the inside of the back cover an aided language board that supports the child in sharing where he/she went, what he/she did and who he/she saw at home.  


Because my students use aided language boards throughout their school day for activities and games, it was a very natural progression for them to use the home and school aided language boards to  communicate with their family about their day at school and their teachers about their day and night at home.  

The beauty of the whole process was expanding language, a difficult task when the conversation is out of context and the student's sounds and articulation are in an emergent state.  So the inside of the book is used for correspondence between teachers and staff and parents and family members.  Teachers and staff write on the front pages and parents and family members write on the back pages.  


Last year, we used this home and school communication book with two of our students, who were socially motivated to share what they did throughout the day and were very good at using the PODD book and aided language boards. One student was in the morning class and one was in the afternoon class, so strategically our amazing speech clinician, Mrs. Wichers, pulled each one of them at the  beginning of their school day. With them they took their communication book to share what they did at home as part of their speech session!  

Then at the end of our school day during snack a para or myself would discuss with the students what they wanted to share about their school day with their parents and family members.  At that time, we would write a short narrative about what the students did at school and draw clues on the aided language board with a vis-a-vis marker as the boards were laminated so the clues could easily be erased the next day.


Click here to get a generic version of the printables for the home and school communication book.  Obviously this version does not have specific pictures of places and people but it does have some blank spots for you to add your own places and activities.  

Along with the printables for the book you will find the communication tags we use with the rest of our students, who were not quite ready for the elaborate communication book. Because of the varying levels and goals for the students, I made two versions of this tag.  The first one is simply a way for students to share how they felt about their day.


and the second one a way for students to share what they did throughout the day.  


You might notice that both versions have a comment section for staff to add context clues to help expand conversation between the students and their parents when they get home.  


All you have to do to make these tags is print them, cut them out, laminate them and attach them to your students' backpacks with a ring or shower hook.  (My preference is shower hooks as they are a little more durable!)  Then simply use a vis-a-vis marker to share about the student's day.

Happy communicating, until next time!

Lindy

Monday, March 9, 2015

Special Education Blogs!

Greeting Everyone!

I recently realized how often I was referring to the Valentines’ blog hop logo that 27 other bloggers and I linked up to last month. 


It has been the gateway to more tips, strategies, and freebies for special educators like yourself!  So I thought I would save you the trouble of looking for these amazing tools by listing the 27 special ed bloggers that linked up below. 


Happy Exploring!  I assure you, these bloggers won't disappoint:) 

Lindy

Thursday, March 5, 2015

March Work Tasks for Easter


Okay so I know it is a ways off, but I am super excited to share 8 Easter work tasks as part of Autism Classroom News' Workbasket Wednesday!  All you need is a few sets of these Easter erasers from Dollar Tree and the eraser visuals from my TPT store and you have the first 6 tasks at your fingers tips! 


And what's even better, they are leveled!  Level One- a Simple Put in Task


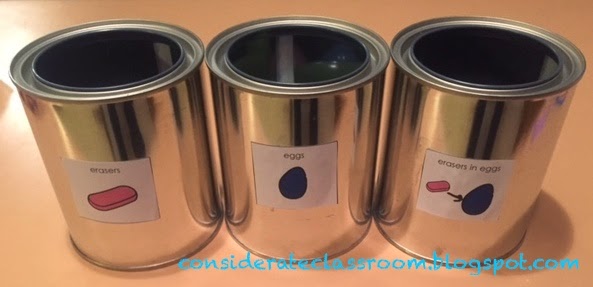
Level Two- Egg Assembly:  (My favorite!)  All you need is three cans and some plastic Easter eggs. Arrange the cans left to right for students to take an eraser, open an egg, put the eraser inside, close the egg and put in all done.  


Level Three-Sorting Easter Erasers to Picture Images:  All you need is the picture images, magnet dots and a muffin tin.  


***If you have a student or two who are very rigid and have a hard time being flexible 
you can add a few erasers that don't below and then a symbol that says 
'this does't belong' (like in the photo below).  Just a little extra problem solving :)


Level Four- Sorting Easter Erasers to Icons: This task helps generalize vocabulary.  For example the purple egg and the pink egg are still both eggs.  It also helps students work toward recognizing icons have meaning for icon schedules and visual communication supports.  


Level Five- Sorting Easter Erasers from Christmas Erasers: All you need is some Christmas erasers and a microwave dinner tray with two sections (or any container with two parts or two cans or bowls).  

Level Six- Graphing Easter Erasers: All you need is the worksheet printable and a can to put the erasers in after the students graph them.  


***BONUS: Print the colored version of the worksheet, put it in a page protector 
and use it as a math or social small group activity using a dry erase marker and a take one bag.  


For students who are non-verbal or have limited language you can use this aided language board to facilitate communication about the erasers the students pick out.  


And before I sign off for the night, two other Easter fine motor tasks using this box of Easter memory cards also from the Dollar Tree.  

All you need is a box and clothes pins and you have a fine motor and matching tasks all in one!


To make the task a little more challenging for students who need to strength their fine motor control use binder clips.  

Thanks for stopping by on Workbasket Wednesday or in looking at the time, Workbasket Thursday!

Until next time 'spring' into some new Easter work tasks!

Lindy


Workbasket Wednesday at Autism Classroom News