Showing posts with label communication. Show all posts

Saturday, November 14, 2015

Supporting Self-Regulation: Using a Cool Down Towel

The safe place has always been a tough sell for the students who need it the most.  As the saying goes, what we need the most we resist the most.  

In some cases, students are unaware that they need it, while in other situations when we suggest it, they have a hard time getting there and/or taking our advice.  To support these students, I suggest offering them the choice of a cool down towel. 


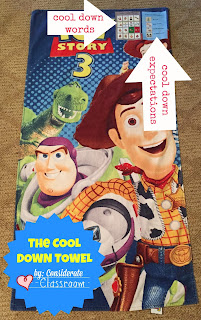
A cool down towel can be made with any beach or bath towel, so you can adapt it to the students' special interests, or favorite colors and then incorporate choice.  For example my staff use the phrase, "your body is not calm and quiet let's take a break." Then we offer them a cool down towel by sharing the basket towels with them . . .


Or by saying something like "would you like the Toy Story towel or the Star towel?" 


This gives them some choice so they don't have to give all their power away in a moment when they are already feeling powerless.  Notice that the basket has the phrase we say right on it so all staff can use the same language consistently.  We say it in a calm, caring and non-threatening manner out of respect for the student and to support them in not escalating further.  If needed, we state the choices over and over again in the same calm tone using the parroting technique that we learned through Conscious Discipline.

Next we designate a place for them to sit on their calm down towel or offer them two choices we are okay with, "would you like to cool down in in the library center or by the window?"  Again giving choices, but in a way that we can insure the safety of the whole class. The two choices or designated spot will be a place where other students are not present in that moment and places the child can get to pretty easily as we know in a moment of upset if we ask them to go across the room to a specific place they may hit or throw anything in their path or simply resist the transition all together. 

Think about a time when you were upset, angry or sad, did you go to a place that was designated for you or did you go to the place that felt good in that moment... your car, the hallway, the bathroom or a quiet place in the room were no one was.  It is important to take cues from the student and observe for what might feel best for them in that moment as they may not be able to make those decisions on in their own.  For example, I had a little guy a few years back that would always crawl into a corner beside the art easel.  This space was a way from his peers and felt safe to him so that is where his cool down towel went. 

Once a student has found their space in the moment of upset, they can use the expectations that have been ironed on the towel to support them in using the towel appropriately.  If you are interested in making your own cool down towels click here to get the images. All you have to do is print them on fabric paper and iron them on your beach and/or bath towels! 

NOTE: It is not as much about the space, whether it be a cool down towel, a Safe Place or break area, as it is about teaching students how to use the space.  Just like any other space in the classroom, you must have expectations that both students and staff know and you must teach those when the student is a calm state.  In some situations, you may model their use by using one yourself, or share a video model of how to use them.  

I also iron on an aided language board to the cool down towel:


Just like any other center, students need a way to communicate their wants and needs.  For example, by using the communication board on the towel, students can communicate:  "I'm not ready" "I need a hug" or "I need help." This is especially important for students who are non-verbal or have limited language, however in a moment of upset, we know that all children are less likely to use their words or use them appropriately because they can't access them in that moment.  Think about the last time you were really, really angry, did you use your words appropriately, or did you scream and curse? 

By offering children the words visually, they can express their needs in an appropriate way.  Remember: ALL BEHAVIOR IS COMMUNICATION!  When a child doesn't have the words to say "I feel angry" or "I need help!"  They may communicate those messages by throwing things, tearing down posters in the safe place, or screaming at the top of their lungs.  Yep!  You guessed it, our safe place also has an aided language board and expectations posted:


I think the most powerful words we have to offer children in the moment of rage and upset are "I AM NOT READY!"  I have written two posts prior about this very concept however I do want to mention here that every student's Cycle of Escalation is different and sometimes a student who appears very calm is not yet calm enough to return to classroom activities.  If we ask them to rejoin the group from their cool down towel and they are not ready but have no way to communicate "I am not ready,"  we can restart the cycle making the child more angry and frustrated than before.   To learn more about the Cycle of Escalation, I suggest Colvin and Scott's book Managing the Cycle of Acting Out Behavior in the Classroom.

I want to stress one more point, before I sign off, a student who is upset, whether they are using a Safe Place, break area or cool down towel, needs OUR HELP!  We must stay with them through the process and support them with self-regulation.  When a student is upset, they may be developmentally at the level of a baby or infant, and where do babies and infants go when they need help to self-regulating, they go to the lap or chest of someone who cares greatly for them, someone who is going to make it feel all better!  Now that being said this may look different depending on the age of the child and the situation but in a lot of situations students are looking to us to be calm so they can gain their own calmness.  In the words of Dr. Becky Bailey, this is called downloading calm.  For more information on how to do this I  recommend you check out Dr. Becky Bailey's work at consciousdiscipline.com.  Her work has laid the foundation for me, my staff and my students, to be more successful. 

Until Next Time, Best Wishes,
Lindy

Sunday, July 19, 2015

Adapting Books to Support Communication and Interaction

Tis' the season for excellent finds in the dollar bins at Target!  Among the many amazing school supplies, books, games, and flash cards, I found six excellent board books that I just couldn't pass up. 

First up this series of four flap books: Are These My Spots? Whose Ears are These? Who Makes that Sound,  and How Do I Move? 


I added simple aided language pages to support students in answering the questions in each story. 


Great for students who have limited verbal skills or are just starting to use complete sentences as the pages will aid them in expand their responses to phrases and shorts sentences.  Such as, "The frog makes that sound" or " A turtle has a shell."

Simply print the pages, laminate or packing tape them, and tape the edge of each page to the last page of each book.  You can then fold the page inside the back cover for storing purposes.

NOTE:  If you print on cardstock or mount to thin cardboard the aided
language pages will hold themselves up so students have access to
the words as they look at the books.

Next up, Disney Pixar's Inside Out Colorful Emotion.


I added sentence strips and a Velcro word bank for students to work on pronouns, colors, and emotions. A great set of concepts especially for a book that was only a dollar!


This time tape the cardboard to the edge of the front page so you can fold it inside for storing purposes and then tape a sentence strip on each page with words on it.


And for my last dollar bin treasure, Fisher Price's Little People Time to Count.


For this one, I simply added instructions and questions with a permanent marker. 


For example, on this page I asked the student to circle the wheels and circle how many oranges.  Like I have shared in a previous literacy workbox post all you need is dry erase crayons to make board books interactive!

That all for now!  Just a short post to make sure you didn't pass up these great finds at Target!

Happy reading and shopping, Lindy


Wednesday, July 1, 2015

Fishing for Communication

As I have learned from my friend at Codding Hollow Associates, the concept of Go Fish can be used to learn and review a variety of topics everything from farm animals, to vehicles, to dinosaurs and academic concepts such as colors, numbers, letters, and shapes. 

And now in true Considerate Classroom fashion, you can use Go Fish to practice communication skills with students who are non-verbal or have limited language using aided language boards specific to various Go Fish Games!

 
The various Go Fish Games include dinosaurs, zoo animals, farm animals, people, places, vehicles, letters, colors, numbers, and shapes.  It is simple!  Just print, cut out and laminate the Go Fish cards: 
 
 
And print and put the aided language boards into page protectors.
 
 
Or even better take a little advice from Mary Asper, and print pages 27 through 33 of the communication set on Avery 25395 Name Tag Badge Paper.  
 
 
NO CUTTING OR LAMINATING REQUIRED . . . GENIUS!
 
 
Just stick the name tag badges on cheap playing cards from the Dollar Tree and you have a durable set of Go Fishing cards specific to your aided language boards!
 
 
If that is not enough, check it out, the cards and aided language boards can double as a memory game!
 
 
Or even an independent sorting activity! 
 
 
My sorting labels can be printed from the communication set. they include two levels.  One in which the child reads, and the other in which the child looks at the pictures to determine which cards go where.
 
 
Go to my teachers pay teachers store to get all 10 versions of Go Fish and the aided language boards to go along with them!  
 
A special thank you to, my friend and colleague Mary Asper from Codding Hollow Associates for helping me with this post. 
 
 
Until Next Time Go Fishing!
 
Lindy


Sunday, March 22, 2015

Communication for Centers


In writing a guest post for PreK Pages a few weeks back regarding behavior and communication, I realized it was time for an upgrade.  My classroom had huge success with the original framed center words as featured in previous posts, but just as little Miss Lilly needed more words on her communication cuff as discussed in a personalizing communication post I did last fall.  It is time to give those who are using my center words more WORDS! 

So without further ado, I give you multiple pages for the pretend play, block, art and writing centers:  


You can bind the multi-page center specific communication systems as a book:


Or simply put them in a clear plastic picture frame as the tabs on the side give students the opportunity to expand their vocabulary and talk about a variety of things at each center. 


The possibilities are endless!  As you can see in the video below with my boys, one using the block book words and the other using the writing word frame. 


Both boys have typically developing language for their ages, the boys and I just giving you examples as it can feel awkward to use pictures to talk at first.  But like I have mentioned in many posts in the past, we must MODEL language with pictures in order for the pictures to become meaningful communication for our limited language learners. 

In my new center mini books and frames I have added color coded backgrounds to help students and staff navigate the systems better.  For example if you want to build at the block center then you pull out or turn to the orange tab to choose a place to build.  If you want to add people, dinosaurs, farm animals, vehicles or zoo animals to the structure you built then you pull out or turn to the corresponding colored tab.  Again, this may seem awkward at first but as you get to know the placement of where words are it becomes more fluent. 


Also note you can start out small by only offering a few topics like I did in the block video. This is done easily by marking off the items that are not a choose for the day using a dry erase marker.    

To purchase these mini books head over to my teachers pay teachers store.  Also included in the updated center words are one page center words for the technology center (iPads and/or computers), the library center, table toys, and a sand and water table.


For those of you who are new to my blog, you might find it helpful to read more about my classroom's journey with aided language boards here.  If you are new to aided language boards, my products on teachers pay teachers give you sample phrases of how you can model communication with them. 

Aided language boards can truly benefit so many.  All children are visual learners by having pictures of the words you say they can create a visual in their mind that supports the expansion of their language and literacy skills.  When used with consistency, the boards can help children who are non verbal or have limited expressive language for a variety of reasons, including lack of exposure, communication delays, developmental disabilities or because they are learning English as a second language. 

Once a again happy communicating!  Until next time, Best Wishes!
Lindy

Wednesday, March 11, 2015

Home and School Communication


Have you ever thought about how students who are non-verbal or have limit language communicate with their parents and families about their school day? Even as language is starting to emerge it is hard for these students to share details out of context and it is equal hard for family members to understand what they are saying out of context.

The solution a home and school communication book.  I know this is not a new concept however this version has added aided language boards to facilitate communication!  On the front cover a label that says, "What I did at school..."


And on the back cover a label that says, "What I did at home..."


Then on the inside of the front cover an aided language board that supports the child in sharing where he/she went, what he/she did and who he/she played with at school.  


And on the inside of the back cover an aided language board that supports the child in sharing where he/she went, what he/she did and who he/she saw at home.  


Because my students use aided language boards throughout their school day for activities and games, it was a very natural progression for them to use the home and school aided language boards to  communicate with their family about their day at school and their teachers about their day and night at home.  

The beauty of the whole process was expanding language, a difficult task when the conversation is out of context and the student's sounds and articulation are in an emergent state.  So the inside of the book is used for correspondence between teachers and staff and parents and family members.  Teachers and staff write on the front pages and parents and family members write on the back pages.  


Last year, we used this home and school communication book with two of our students, who were socially motivated to share what they did throughout the day and were very good at using the PODD book and aided language boards. One student was in the morning class and one was in the afternoon class, so strategically our amazing speech clinician, Mrs. Wichers, pulled each one of them at the  beginning of their school day. With them they took their communication book to share what they did at home as part of their speech session!  

Then at the end of our school day during snack a para or myself would discuss with the students what they wanted to share about their school day with their parents and family members.  At that time, we would write a short narrative about what the students did at school and draw clues on the aided language board with a vis-a-vis marker as the boards were laminated so the clues could easily be erased the next day.


Click here to get a generic version of the printables for the home and school communication book.  Obviously this version does not have specific pictures of places and people but it does have some blank spots for you to add your own places and activities.  

Along with the printables for the book you will find the communication tags we use with the rest of our students, who were not quite ready for the elaborate communication book. Because of the varying levels and goals for the students, I made two versions of this tag.  The first one is simply a way for students to share how they felt about their day.


and the second one a way for students to share what they did throughout the day.  


You might notice that both versions have a comment section for staff to add context clues to help expand conversation between the students and their parents when they get home.  


All you have to do to make these tags is print them, cut them out, laminate them and attach them to your students' backpacks with a ring or shower hook.  (My preference is shower hooks as they are a little more durable!)  Then simply use a vis-a-vis marker to share about the student's day.

Happy communicating, until next time!

Lindy

Monday, February 9, 2015

Communication Considerations with a Special Education Blog Hop Freebie!

Welcome to day 9 of the Special Education Bloggers Sweet Treats!

With it being the month of friendship, I figured what better sweet treat than aided language boards for 10 of 20 of Our Favorite Games and Toys so friends and classmates of all abilities can join in the fun!


CLICK HERE TO GET YOUR 
AIDED LANGUAGE BOARDS 

If you are new to the Considerate Classroom blog and are not familiar with aided language boards, you may want to visit these two past posts:  Improving Communication Skills for Non-Verbal Children Through the Use of Aided Language Boards and Personalizing Communication Supports for Individual Success.

You will be amazed at the social communication that aided language boards can facilitate.  I began using aided language boards after attending a wonderful training by Linda Burkhart in regarding to Gayle Porter's Pragmatic Organizational Dynamic Display (PODD) system.  From day one, I have found that aided language boards give students, who are nonverbal the ability to participate and express their needs, wants and opinions more effectively with less behavior.  They have also been helpful for students with limited verbal communication for a variety of reasons: lack of exposure, communication and/or social deficits and disabilities or because English is their second language.  

One of the most important things to remember about using aided language boards or any communication system is INPUT BEFORE OUTPUT! In the words of Linda Burkhart, "How long do we speak to baby's before they give us anything back? We speak for 11 to 12 months of before they say the smallest approximations of words like Bye-Bye or Dada-Dada.  We must model aided language boards and other communication supports for just as long or longer with students who have significant disabilities and delays.  They need to see the form of communication we are expecting them to use in practice consistently and with fidelity. 

Here is a sample aided language board:  

Below is a video example of my three year old son and I using the board.  Given Payton has language but notice how I use the aided language board to facilitate and expand language. Also note that I strategically put all the swords in a fabric bag labeled take one so I had more opportunities to model language and Payton had more opportunities to communicate.  


For example if we each just picked a color of sword to be at the beginning, we would have only had one opportunity to request, "I want to be the blue swords."  Instead by putting the swords in the fabric bag and drawing one out on each turn, we had the opportunity to label several colors throughout the game.  


It feels a little awkward at first but I encourage you to give it a try!  What better valentine to give your students than the gift of a VOICE:) 

One final tip before I sign off, a great way to keep yourself organized and always have your aided language boards available for those who need them is to laminate or slide them into page protectors and tape them to the box of the game. . .


or the inside lid of the storage tub the game is stored in. . .  


Voila'! You have language at your fingertips and your students'!

That is it for now, stayed tuned by liking Considerate Classroom on Facebook, as I have some great aided language boards and visual supports for facilitating communication between home and school in the works!

Happy Communicating!  Best wishes, Lindy

PS- Don't forget to come back tomorrow for a freebie from You AUT- a Know.


Monday, January 12, 2015

Learning the Pronouns: His and Her

Looking for a way to teach your students appropriate pronoun usage? Check out this leveled his/her activity:


All you need to do is collect boy and girl clothing and accessories such as watches, hats, necklaces, barrettes, bracelets, gloves, mittens and shoes.  (Tip: Collect baby clothing items so they fit nicely in your workbox.)


Then make a tub labeled his, him, he with a picture of a boy on it and a tub labeled hers, her, she with a picture of a girl on it.  If you would like you can download this version from my Teachers Pay Teachers store.


Then have your students take turns picking the accessories out of a fabric bag or tote.  I use one of my “take one” fabric bags. "Take one" fabric bag you might ask... It is simply a fabric bag that I labeled "take one" with a permanent marker.


I have several of them, and we use them for a variety of activities.  It gives my staff and I the reminder to use the same prompt "take one" as the students put their hand inside.  Many kids who are impulsive will take a handful out of the bag so it is a learning process if needed I only put one thing in the bag at a time for errorless learning.  NOTE: By using a solid colored fabric bag versus a plastic ziploc bag the students have to pick out an item randomly as they can't see inside the bag and the bag is quiet when students pick an item out.  
After the students pick out an item, I have the students tell me if it is for him or her and put it in the corresponding his or her tub.  To make the activity fun and to facilitate more language I added this simple aided language board


The language board provides the students with a way to say “that is his” or “that is hers” and they can also make comments such as “I like that” or “I don’t like that” we are working on core vocabulary (this, that, his, her, me, you, mine) while at the same time facilitating language.  By having the pictures available for students to point to, they have another means to make sense of language and/or communicate. Click on the video below to see this strategy in  action (NOTE: The video is with my own children, who both have language, but hopefully it will still give you an idea of how the language board works.)  You can also access the language board on teachers pay teachers.  


Another great thing about the his/her game is that I put it in tubs that match the tubs I use for my workbox storage:


This way I can store it with my other work boxes.  


And one more great thing about the task is that it can be used in a variety of ways as a fun small group activity, a direct instruction activity with a teacher, para, or speech pathologist or as an independent work activity.

NOTE: Above is an example of a very concrete activity.  The students are actually feeling, seeing and try on boy and girl accessories.  If your students are ready for a more abstract version of this activity you can access this his/her card sorting activity on teachers pay teachers.  

Print, cut out, and laminate the cards. Then simply have your students sort them into a container with two parts.  (My favorite is a Lean Cuisine dinner tray.)  


I considerate this to be level two of his or her sorting, next I give you level three, two worksheet versions of the same concept.


NOTE: You can use these worksheets with a dry erase marker and page protector as a direct instruction or independent work activity so students can practice the concept several time without making multiple copies. 


Or you could even slide it into the cover of a binder as a slant board.  


Well, that is it for now!  Until next time, happy concept building! She and He will learn a lot:) 
Lindy