Showing posts with label Sorting Activity. Show all posts

Sunday, July 21, 2013

7 Day Work Task Challenge - Day 7: Counting, Sorting, & Pincer Grasp

Day 7 of the week-long work task challenge and I am taking it easy!  A wonderful friend, Vickie Unruh, gave me this medicine tower. Here it is on amazon, but I believe she said she found it at a dollar store.

I simply added sticker dots with numbers to each section. Then, the students can screw them together in numerical order. 


Or they can count out that many pony beads, put them in the section and screw the section to the next color. 


This can be done with a single color bead to demonstrate the one-to-one correspondence counting skill.  


Or you could use beads that correspond to the color of each container to make it an errorless learning activity.  


I also added an all done tube. The students will put the colored tower inside the tube prior to putting it in the finished hamper.  


Instructor's Insight: In my experience, students tend to toss their tasks into the all done hamper, in which case I foresee the medicine tower shattering as it lands.  As much as we train students to sit things in carefully, it doesn’t always happen so the tube will insure the tower’s safety.

One more side note, I used the clear container of the tower to hold the beads, this forces students to use a pincer grasp to grab each bead from the container as it's small and they can’t drag the beads to the side of it and pull them out as easy.  It also makes the task store itself which is a nice feature. 

Love the medicine tower!  Vickie, thank you for donating it for the final task number of the 7 Day Work Task Challenge.


Tuesday, February 19, 2013

New Year's Resolution Update & Task Box Countdown: Task Box # 10 - Pincer Grasp Bead Grab

Today is the final task in my Taskbox Countdown.  As you may recall, my New Year's Resolution was to use my classroom materials in a more purposeful and sequential order. 

Post Update:  I really did have the very best of intentions to get my classroom organized this year. Unfortunately, life had other plans.  The sickness of my own boys, as well as managing daily stresses like classroom paperwork, new students, IEPs, and inservice trainings have kept me busy recently.  However, I owe it to my readers to press on with my New Year's Resolution. Frankly, this blog keeps me accountable and I refuse to be one of the 92% who do not keep New Year's Resolutions!

So even if it gets done December 31, 2013, I will get it accomplished! Stay tuned & please keep me accountable! In the meantime, I'd love to hear about your classroom happenings and how you adapt my ideas in your classrooms.  Join the discussion on Facebook! 


Task Box Countdown: Task Box # 10 - Pincer Grasp Bead Grab

Several years ago, someone donated small tackle boxes of pony beads to the classroom.  For the longest time we used them to make bracelets and necklaces at the art center until I came up with this special function.  

Melissa, an occupational therapist in our school district, explained to me that children can really exercise their pincer grasps by digging small items out of little cases and containers.  For example, instructing them to use their thumbs & pointer fingers to pull out coins or beads from film canisters.  This is an excellent fine motor activity! 

With this idea in mind, I created two different tackle box activities that work on fine motor skills to strengthen students' pincer grasps while simultaneously providing students an opportunity to review colors, numbers, and counting.


In the above task, the students take the film canisters from the top row, read the color on them and put the same colored bead inside the canister. They then put the lid on them and place the canister in the third row (a.k.a. the "all done" row).


In the above task, the students take the film canisters from the top row, read the color and number label on the canister and then fill them accordingly.  When finished, they put the lid on the canister and place it in the "all done" third row.

Teacher's Tip: Although this task serves two purposes, I am able to store them together in one tackle box to save space.  (Keeping in line with my New Year's Resolution!)


Thursday, January 31, 2013

Task Box Countdown: Task Box # 7 - Lid Color Sorting

This is one of my most recent task boxes.  In full disclosure, I actually came across it at Walgreens quite by accident!  I was there looking for marked down items during the post-Christmas sale when I spotted these colored contact lens cases.  (You know you are a special education teacher when you spot something odd and immediately purchase it for your classroom!)  Anyway, it was a "buy one, get one have ½ off" sale... SCORE!!  So I purchased one set of six for $6.00 and got the other set of six for $3.00!  I didn’t realize I would actually need both sets until I got home. 


When I got home and opened my amazing purchase, I realized it could actually have two levels.  Students could work on self-help, fine motor, and color matching skills by screwing on two matching colored lids. 

Or by adding the other set of cases, the students could work on screwing on the lids using two attributes color and letter.  Like all contact lens cases, each lid has L or R on it. I simply mixed the two sets up so higher level  students can work on making a letter and color match at the same time
What an easy multi-purpose task box to throw together!!  You could even have students work on unscrewing the lids if you choose.  I find that simple tasks like this are the best! They piqued student interest, work on important self-help skills and support student independence and self-confidence because they are completing these task boxes all by themselves!

Tuesday, January 15, 2013

Task Box Countdown: Task Box # 4 - Shape Sorting

When my students are first introduced to the skill of sorting, I always have them sort different types of items like toy cars vs. bouncy balls or crayons vs. glue sticks.  

Next, we advance to sorting items by color.  They sort like items in different colors like counting bears or pom-poms.  They then move on to sorting a variety of objects by color like various toys or writing utensils.  

After they've mastered that skill, I like them to work on sorting by different attributes.  One of the attributes, I find very important is sorting by shape. 

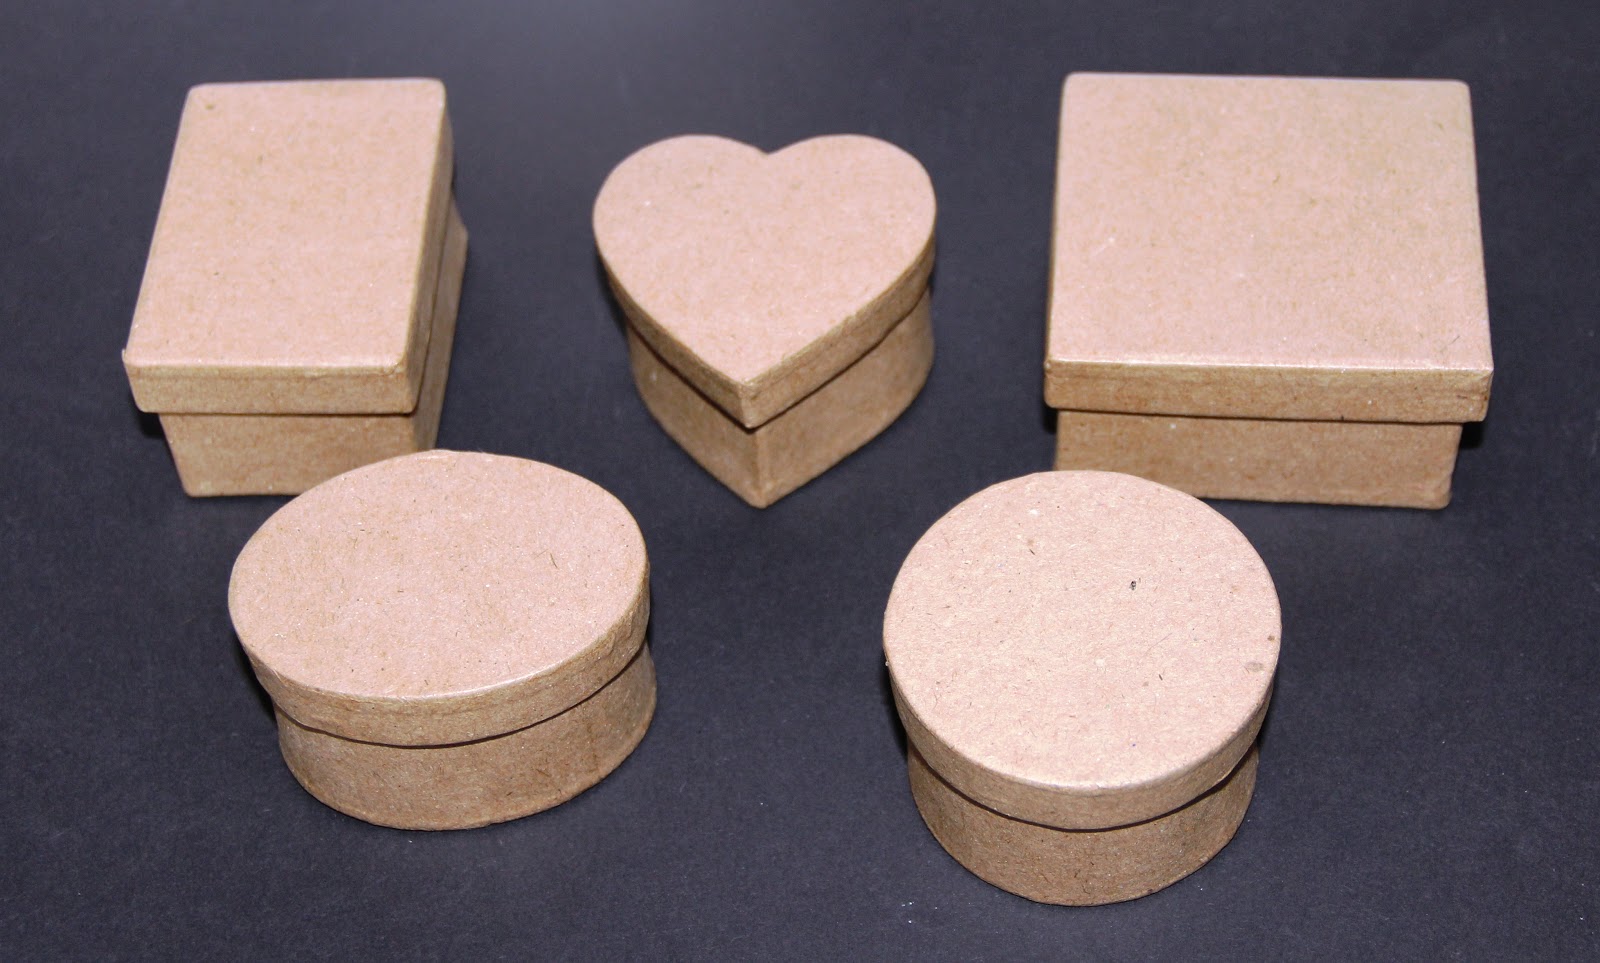
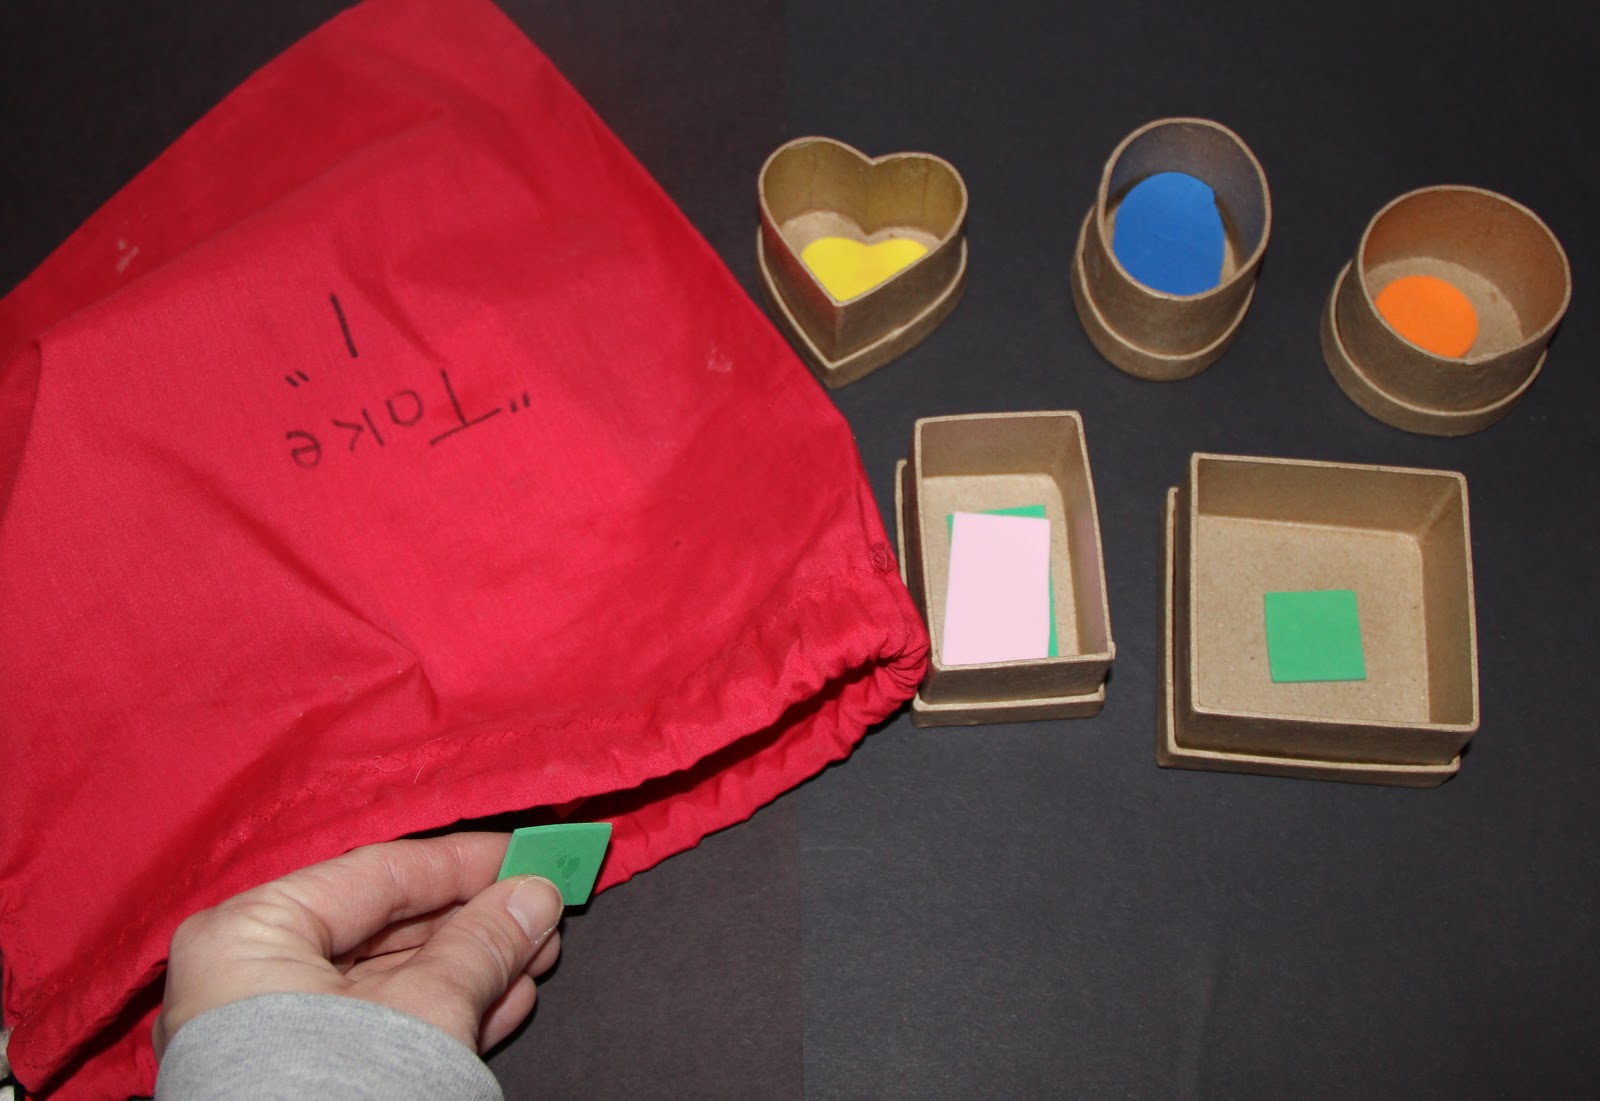
Rather than having students sort items into piles, I much prefer this hands-on approach to shape sorting.  I purchased little paper mache boxes of different shapes at Hobby Lobby.  I have a circle, oval, square, rectangle, and heart.  


These boxes are great because they also add fine motor, self-help and problem solving skills as the students have to work to take off and put on the lids. 

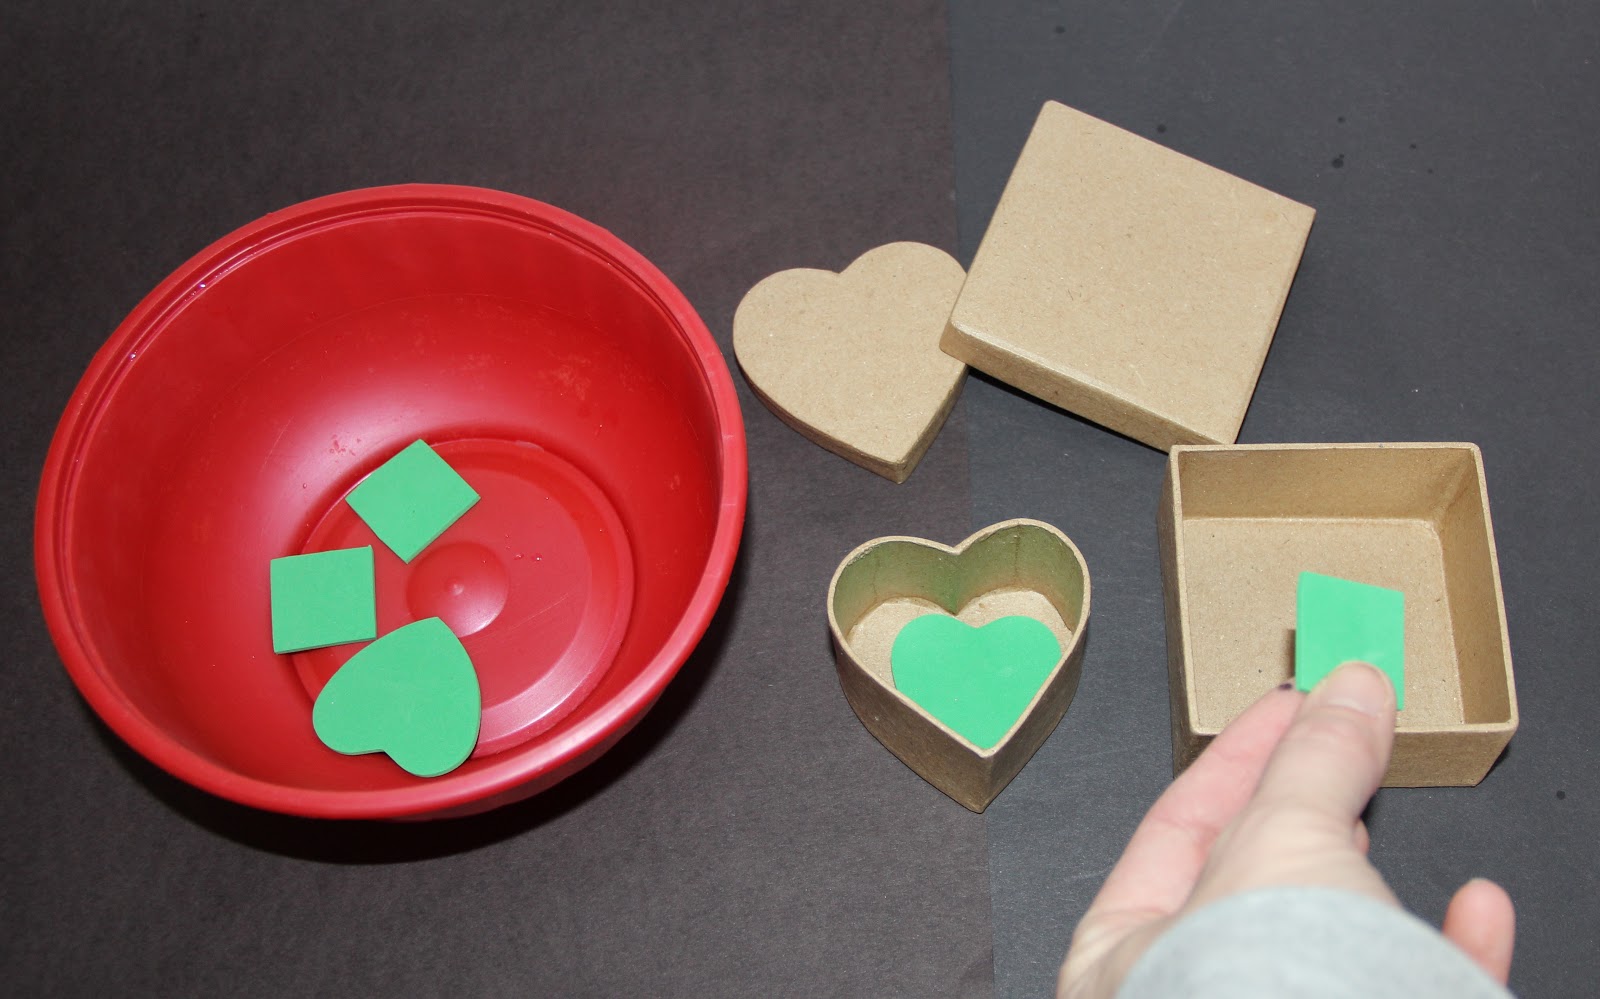
I then cut out foam shapes all of the same color to be sorted.  We start with only sorting two different shapes then move toward sorting a variety of shapes. 


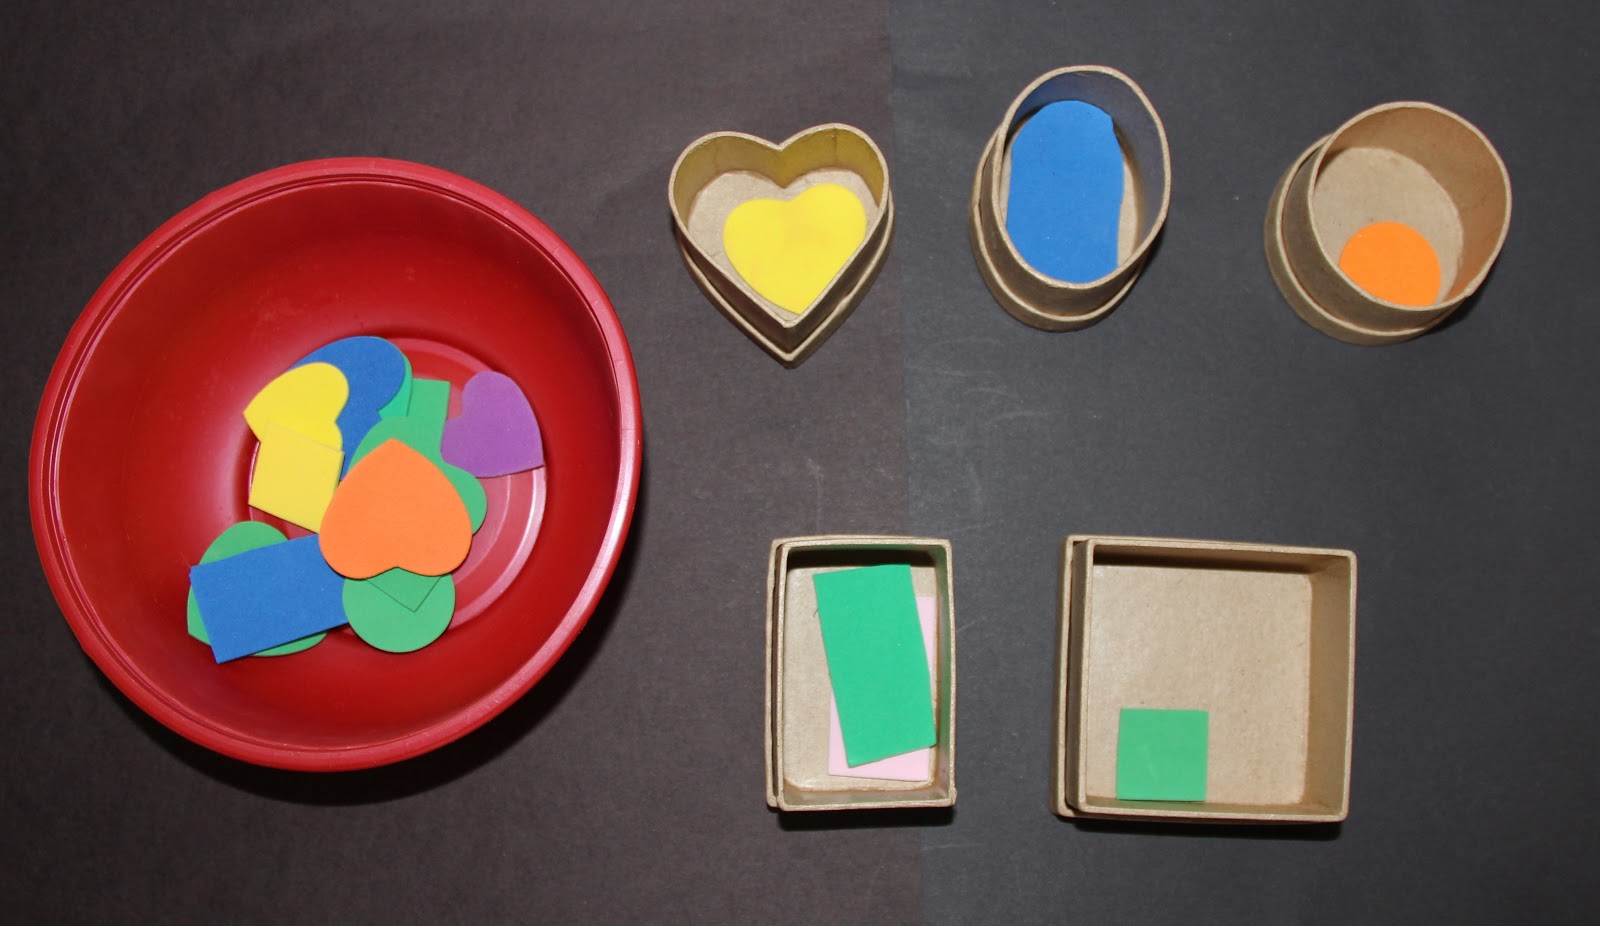
After the students have learned that skill, I add the element of color.  Although they are still sorting by shape, I want the children to ignore the unneeded information of the various colors and continue sorting by shape.  This can be tricky for some because the children have already practiced color sorting extensively. It becomes natural for the students to focus on the color of the shape even though it's an irrelevant characteristic. 


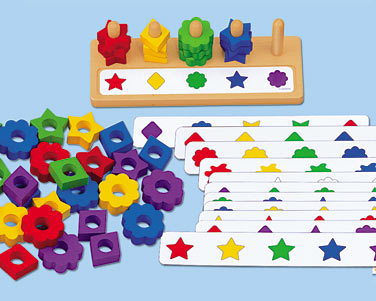
After mastering that skill, I often move on to a color shape sorter I purchased from Lakeshore a few years back.      

Another skill, I add into this task during direct instruction is the concept of taking one.  I put all the shapes in a fabric bag and request that they pull one out from the "Take 1" bag. This is an important social skill because some students will take a handful when presented with a bag or bowl full of items.  I often remind my students it is good manners to just take one.


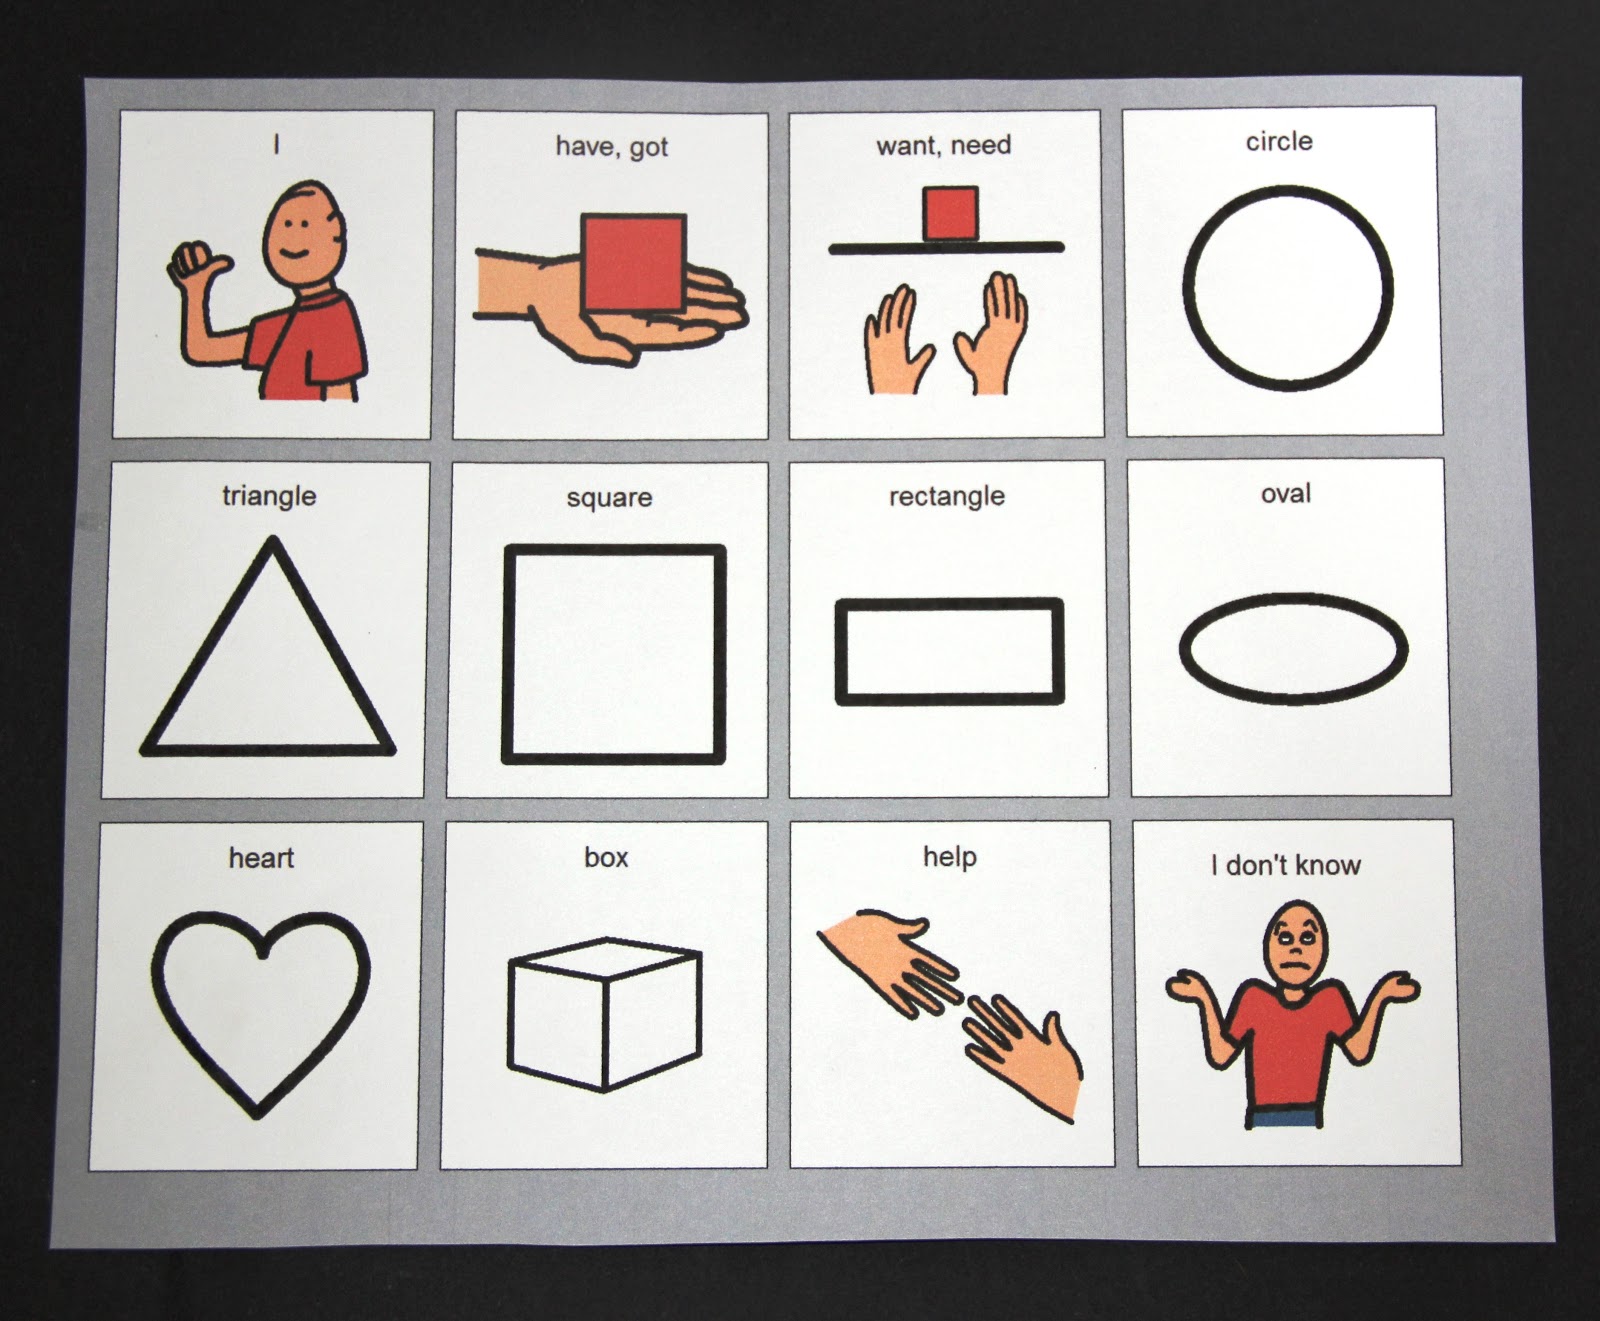
I also added the element of requesting for those students that need practice with labeling shapes and using their voice.  I will do that using the below aided language board.  I will hold the shape boxes back after they draw a shape out of the back them must request the correct box to but it in. 


Thursday, January 10, 2013

Task Box Countdown: Task Box # 3 - What Goes Up? and What Goes Down?

Moving right along in my "Top 10 Task Box Countdown"... Coming in at #3 is this clever little homemade sorting device.   

Several of my students struggle with opposites and prepositions. In an effort to help them understand the concepts of up and down, I created this simple work task that provides a visual of up and down while simultaneously providing a hands-on learning activity. 

Rather than just sorting things that go up versus things that go down into two separate piles. I wrapped a Pringles can with construction paper and cut slits at the top & bottom. I then wrote “Things that Go Up” around the top slit and around the bottom slit I wrote “Things that Go Down”.

Using Boardmaker, I created calling cards of things that represent up like a bird, airplane, butterfly, & clouds, etc.  I did the same for the down cards using representatives like caterpillar, car, grass, etc. 
CLICK HERE for the Up and Down Printables

The students love playing this game during one-on-one or small group instruction with a teacher or staff person. Although I recently realized that if I intended for the students to use this task during independent work, I needed a way to check their completed work. So I asked my husband to cut the bottom out of the Pringles can.  I put a second Pringles lid on the bottom and taped a piece of cardstock in the middle of the can.  (It's not pretty but it serves the purpose!) 

Now when the students put something into the top slit, it stops half-way down. And when they use the bottom slit, the card goes to the bottom.  Making it easy for my staff and I to go to the independent work area later and check a student's work. 

Tuesday, January 8, 2013

Task Box Countdown: Task Box #2 - The Bubble Gum Machine Fun

My Top 10 Task Box Countdown began last week with "TaskBox #1: Academic Sensory Bags".  This week we move onto an excellent multi-purpose task box, The Bubble Gum Machine.

My students often get tired of the same old task boxes. Even though they may not have mastered the skills being practiced in the task, it gets old working on the same task over and over.  Other times students master a skill when presented in a specific context, but have difficulty using the skill in a different capacity. Needless to say, I am always looking for new ways to work on the same concepts.  
Teacher’s Tip:  When creating task boxes for the classroom, think of ways to make your materials fit more than one skill. You’ll get more bang for your buck!!!  

For example, this week I found these small bubble gum machines for a dollar at Dollartree.  Simply add some fuzzy pom-poms and you have a motivating and unique assortment of tasks.


Activity #1 - Basic Counting Task:  Add number flash cards and you have a counting game.  Instructor's Insight: Add sticker dots to your flash cards and you have a way to work on one-to-one correspondence.  Or if you put the sticker dots on the back, they can be used for the more complex skill of self-checking. 


Activity #2 - Advanced Counting Task:  Put several different colors of pom-poms in one machine and have your students count how many of each color.  For a higher-level challenge, use this template to increase the task’s complexity. 


Activity #3 - Fine Motor Skills Task:  Add an ice cube tray & tongs and you have a unique fine motor skill building activity.


Activity #4 - Non Verbal Task:  If you have nonverbal students or students who do not know their colors yet, you can use this aided language page.  The students can match or point to the colors as they draw them from their bubble gum machine. 

If you are playing the game with a student who is at a higher-level and already knows how to sort and name colors, ask him/her to graph the colors he/she and their friends draw from the bubble gum machine using this graph template.   


Language-Aid Page

Activity #5 - Taking Turns:  Lastly,  add a "Take 1" fabric bag or container for a turn-taking practice game.  

A "Take 1" bag or container is just a little fabric bag or container with the phrase “Take 1” written on it.  I make them to use in our classroom to practice selecting only one item.  Often times when students are asked to take one item from a bowl or bag of items, they grab a   handful.  By using the take one bag we can work on the skill of taking one, and all support staff will remember to prompt with the term "take one" as it is printed on the bag.  Instructor's Insight:  If a student is having trouble with the concept of taking one, I will only put one item in the bag or container to make their selection errorless. 

To use the "Take 1" bag in The Bubble Gum Machine Game, you would simply have the students take turns taking one pom pom out of the bag, name the color they pulled, and then  put it into the correspondingly-colored gum ball machine.  Or add several different colored pom-poms into the bag.  Have the student draw only one pom, identify its color, and place it in the bubble gum machine.


There you have it .... five activities for the price of one!  And to think, I almost passed up purchasing these bubble gum machines because I thought it was too much storage for one simple sorting activity.  

Extra credit:  A great app that goes along with the same idea of sorting gum balls is 
Candy Count - Learn Colors & Numbers. 


Tuesday, November 6, 2012

Multi-Purpose Seasonal Sorting Activity

Check out this fun way to review concepts such as colors, shapes, letters, numbers or even Thanksgiving vocabulary.  

All you need is a disposable pie pan, glue gun and one piece of off-white felt.  
  1. Cut your felt into a circle the size of your pie pan. 
  2. Fold it in half and cut three slits in the middle.  
  3. Glue it to the edge of the pie pan.

Here's a photo of the completed "pie".

You then have a "pie" to draw cards or objects out of.  Put small items or flash cards inside the slit of the pie. Students take turns pulling out various cards or items after you sing:  "What’s in the pie?" to the tune of “Are you Sleeping?”  

What’s in the pie? What’s in the pie? Stick your hand in and find out. Stick your hand in and find out.  What’s in the pie? What’s in the pie?  
Lesson Plan Note:  I use this activity as an extension to one of my favorite Thanksgiving books by Alison Jackson, "I Know an Old Lady Who Swallowed a Pie". 

Instructor's Insight: Put the same number of items in the pie as students who are playing the game. This gives the students a visual cue of how long the activity will last.  When the pie is empty, we are all done.  


Here we are using the activity to practice Thanksgiving vocabulary,
as well as sorting the items by color. 

Teacher's Tip:  Get the most out of this activity by adding other concepts to the game. For example, if you have three different colored items in the pie then have three sorting bowls beside the pie for the kids to sort the items by color. Or if you have numbers in the pie, have a Velcro paint stick outside the pie and put Velcro on the back of the numbers so that students can put the numbers in order as they pull them out of the pie.  

Extra Credit: It is always good to have a structured place for kids to put game pieces so they are not fiddling with them and can attend to the task at hand.