Showing posts with label Early Childhood Development. Show all posts

Tuesday, December 9, 2014

Strategies for Reading Aloud for Non-Verbal Students and Children with Special Needs

A few weeks ago, I had the opportunity to meet Vanessa Levin of Pre-K Pages and Deborah Stewart of Teach Preschool.  They "wowed" me with their experiences, love, and excitement for preschool during their presentation entitled, “Wow Your Crowd with a Read Aloud” at NAEYCAs a reflection of their presentation and Vanessa’s blog post dated 11-19-2014, I began to think about the strategies they shared and how they relate to children with developmental disabilities, limited language, social deficits and/or Autism. 

During their session they shared 10 strategies for wowing the crowd based on the books Literacy Beginnings: A Prekindergarten Handbook by Gay Su Pinnell and Irene Sue Foutas and The Read Aloud Handbook by Jim Trelease. 

The first strategy they discussed was stamina (which I totally bought into to!)  They described stamina as the length of time children can listen to a story or look at a book independently.  This concept is huge when thinking about children with disabilities. Often attention spans are shorter than typically developing children.  

When choosing a read aloud book for my special needs preschool classroom, I always kept the attention span of my lowest level students in mind.  In the beginning, our books were very short and using high interests. For those that needed it, I would also incorporate a task strip to help them know how long the book was and how long they would be sitting.  


In the book, a frog eats different bugs with his sticky tongue and then gets eaten by a fish at the end of the story.  To help students who have a hard time sitting, I would offer them little images of each bug and animal that gets eaten in the story and they would attach it to a task strip. 


Although we want our students to be actively engaged during a read aloud with the book itself and the reader, some students are not able to sit and attend without knowing how much work they have to do.  The icons and task strip help reduce anxiety and support success as they know exactly how long the story will be. 

This strategy is based off of the TEACCH program.  The TEACCH program is designed to support children with Autism. The idea is that the activity, in this case a book, is visually structured so the students know how much work they have, and when the work will be finished. 

Now moving on to the second strategy shared by Vanessa and Deborah...vocabulary.  They shared, "when children understand the vocabulary used in a read aloud they will be more engaged and you will be better able to capture their attention."  Makes total sense! However, with some of our special needs students, vocabulary is very limited. 

In some situations in order to support a student's understanding of the vocabulary in a read aloud, we play games in small groups or at direct instruction to prepare them for a read aloud later in the day. 

For example with The Icky Sticky Frog book, I may have students match photos of the bugs and animals that are in the story to icons of bugs and animals that are in the story. 


This helps students generalize that a fish can look like this or like this but it is still a fish. 


This activity often helps with IEP goals related to increasing the number of words a students knows, says and/or understands.  It also supports the student in making sense of picture icons and photographs so they know that pictures and icons have meaning in order to use them for individual schedules and choice boards. 

Leading me to another version of the same thing, for students whom do not yet understand icons we use three-dimensional objects to help with making sense of vocabulary.  

Here is a sample of a three-dimensional vocabulary task. Instead of matching icons and pictures, the student matches objects to pictures that are magnetically attached to spaces in a muffin tin. 


Next up...Repetition.   While reading the same book over and over may not appeal to the adult doing the reading, it is important for increasing comprehension and vocabulary.” –Vanessa Levin

When working with students with special needs, I often introduce new books at direct instruction or in the small group literacy center and then repeat the story as part of read aloud at large group.  The idea is that I am setting students up for success.  Many students with special needs struggle in large group settings. By introducing a book at small group or during one-on-one direct instruction, I can expose them to a book to support comprehension and prepare them for success in a whole group setting. 

Another option is to work on adding imitation and repetitive phrases in small group and in one-on-one settings.  Many students with special needs have limited verbal and gross motor imitation skills.  By reading a story in a small group setting, I can teach them the words and actions.  For example with the Icky Sticky Frog, we could work on sticking our tongues out when the frog does it in the story and/or working on saying “Shhh" or "Shhh, frog didn’t make a sound” when that part comes up in the story.  

Do you have a student who is non-verbal?  No problem.  Program a voice recording button or use the voice memo on your phone or iPad to say the phrase so every time the phrase comes up in the story your non-verbal student can contribute at the same time as their verbal peers. 


I prefer to use a voice recording button for this activity, but I figured I would show you with the voice memo on my phone since mobile device and iPads maybe more readily available.  Note: You can also tape little visuals in your book where the repetitive phrases come in so students can see when it is their turn visually.  A great self control activity to wait for the button visual!


This page also has a velcro bug. We do that in our mini-version as another way for students to interact with the vocabulary, attend to task, and know how long they need to attend to the story.  All the characters are on a velcro strip and get pulled off and put into the story as it appears.   


Now moving on to other books and a new strategy, Narration.  Vanessa Levin shared that Narrating or retelling helps children understand what a story is about and how story structure works. Children enjoy retelling stories independently in centers using tools and props such as flannel boards and puppets.”

A way we like to retell stories in our classroom is through pretend play.  For example after reading the Birthday Monster by Sandra Boynton, we might transform our pretend play center into a birthday party! (More to come on the Birthday Specific Pretend Play Center in a future post.) To see a pretend play center transform based on a book, click here.  The book it was inspired by is Biscuit Visits the Vet by Alyssa Satin Capucilli.

The final strategy is Wordless Picture Books!  Vanessa shared in her blog that Nothing is more interactive, motivating, and engaging than inviting a child to tell you the story they see in the pictures using their own words.”                                                                                                                                     

I totally agree. But what if a student does not have verbal communication? How can it be done then?  Through aided language boards!! They are systems I have come to know through the work of Gayle Porter and Linda Burkhardt in their work creating Pragmatic Organizational Dynamic Display.  You can see more regarding aided language boards by clicking to this past posts on communication supports.  The video below demonstrates my son working through a story using pictures to retell it.  Note: To stay with the Icky Sticky Frog theme, I chose to use the book and just place sticky notes over the words. 


(Even though my son is not nonverbal, I asked him to play the part so you can get an idea of how it might work.) 


Some teachers are reluctant to use visuals such as this because they want their students to talk, rather than point however research shows that visual support facilitate communication.  I use aided language boards and other visuals with many students regardless if they have language deficits or not as the support helps the students come up with the words to retell the story and builds literacy.  Remember visual supports are easier to fade than verbal ones so if you have to help a student retell the story by doing so with visuals instead of words, they will become independent more quickly!

Until next time...Happy reading aloud!

Lindy

Tuesday, October 14, 2014

A Special Look at Data Collection from a Guest Teacher, Ms. Stephanie Kramer!

Today, I am welcoming Ms. Stephanie Kramer as a guest blogger to discuss a very important topic and one I am not very strong in...DATA COLLECTION!  

Ms. Kramer has come up with an excellent method to assess all her students in all developmental areas three times a year.  I could not be more proud and excited to share this post as Stephanie was my student teacher four years ago.  She is a phenomenal teacher, and wonderful friend & colleague who so passionate in her work with children.  So without further ado, it is my pleasure to share Ms. Stephanie Kramer’s expertise.

As a new teacher, I needed to create a progress monitoring/data collection system that was quick to administer.  I wanted it to provide valuable and reliable information that was easily read and understood by parents. I was really fortunate to have many, many resources to work from as I pulled my data collection forms together.  I utilized materials from college, the state standards, and various curriculum's that we use: Handwriting Without Tears, Read it Once Again, ZooPhonics, and some aspects of: Creative Curriculum, and High Scopemy Mom, past teachers, co-workers, and anywhere else I get my hands on data collection forms and ideas!  

Initially all of the many, many documents I collected were very overwhelming, but I slowly began to condense, combine, and reformat the stacks of pages to create an organized system that is teacher, student, and parent friendly.  The system works well in our classroom and the best part is it is included in our daily routine. 

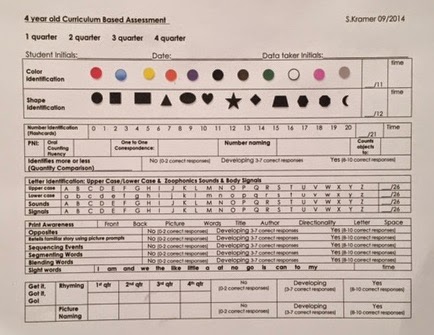
First off, the three and four year old Curriculum Based Assessment (CBA) forms. If I had to select one part of my data collection process that I find most useful, this form would be it!  


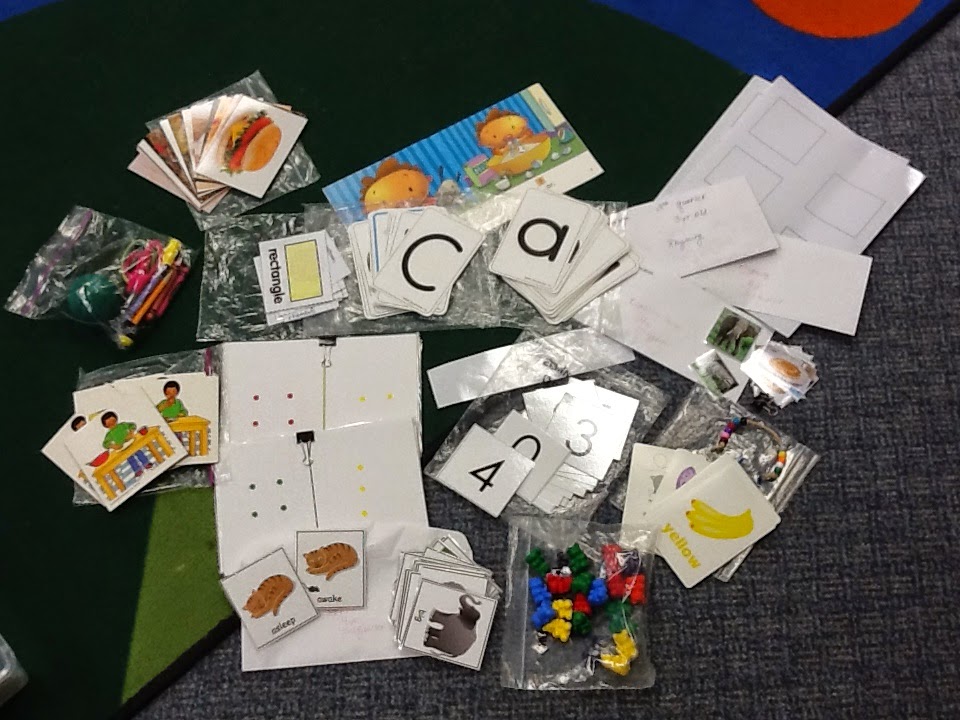
To gather the data needed to complete each 9 week CBA, we have all the items and manipulatives in a small tote.  Below you can see what types of items we use. 


We have a tote for each quarter so that we know the students have generalized the skills and are not learning to the test. 


As you may have noticed on the CBA forms, all 4 quarters are listed at the top.  We use a new form for each quarter and simply mark which quarter the form is being used for.  This allows my staff and I to quickly compare data and note any changes in student performance, making for very parent friendly forms to share during conferences and meetings.  The goal is that by the end of the year, students will have been exposed to every concept on the CBA form and current levels of performance would be evident based on the students performance and data collected. 


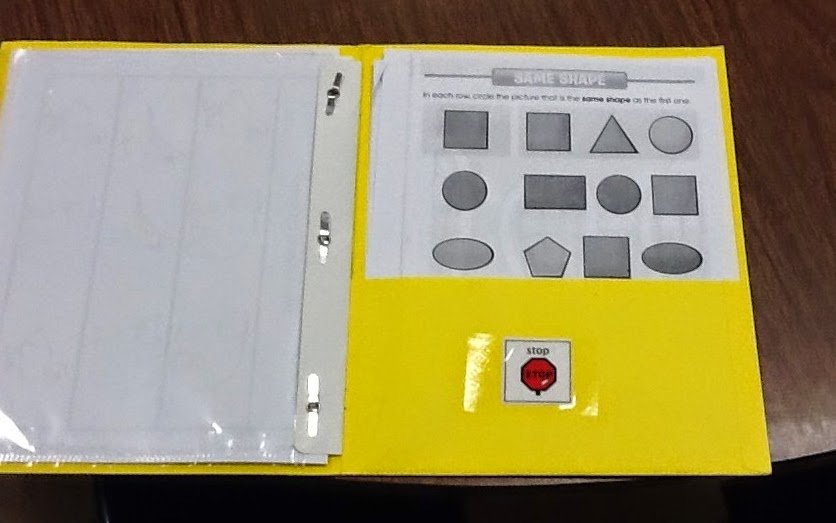
So how do we keep it all organized and provide students with an opportunity to work on target areas on the CBA each day?  We have a morning and afternoon class so we use our school colors to designate between classes.  The morning class has yellow folders and the afternoon class has blue folders.
 

Each folder contains a sheet protector with the pages only the teacher should write on in the sheet protector.  These pages are our CBA forms and another set of forms I will get to at the end of this post.   


As the students complete their work samples/data collection forms in their data collection folders, we file them  into their portfolios so that the data collection folders stay very organized and student friendly.  In the page protector section, we also have the following forms to collect data in regard to gross motor, fine motor, personal information, body part recognition, name writing, self- portrait drawing and other specific things we track related to the curriculum and programs our district has choose to adopt. 
The front pocket holds pages for the student to work on. They are denoted with a green light as a visual prompt for student to know they need to work on the items in this pocket. 


The back pocket is labeled with a stop sign and contains pages that are to be completed within the quarter when a teacher moves them to the front pocket and the students are ready for them.  This system has been adapted and modified so that every student in our ECSE classroom participates and does so as independently as possible.  


We complete the data collection packet by doing our "folder jobs" as part of our opening routine.  With each student's name and/or photo on their folder, the students are responsible for locating their folder and pencil in our pocket chart and then getting to work.


Choice time is the following activity, which proves to be motivational when implemented in conjunction with our classroom behavior management system that encourages students to always do their best. It also provides my staff and I some time to help individual kids when needed while other students move on to choice time.  


NOTE: Some student worksheets require more one on one time with teachers than others so we'll only place 1 or 2 of those forms in the front pocket each day while other students work on independent forms.  We also support students in working on various concept worksheets during arrival job time, small group centers.

Then as students progress, we incorporate some folder work into our independent work time.  Here is what that looks like in the classroom. 


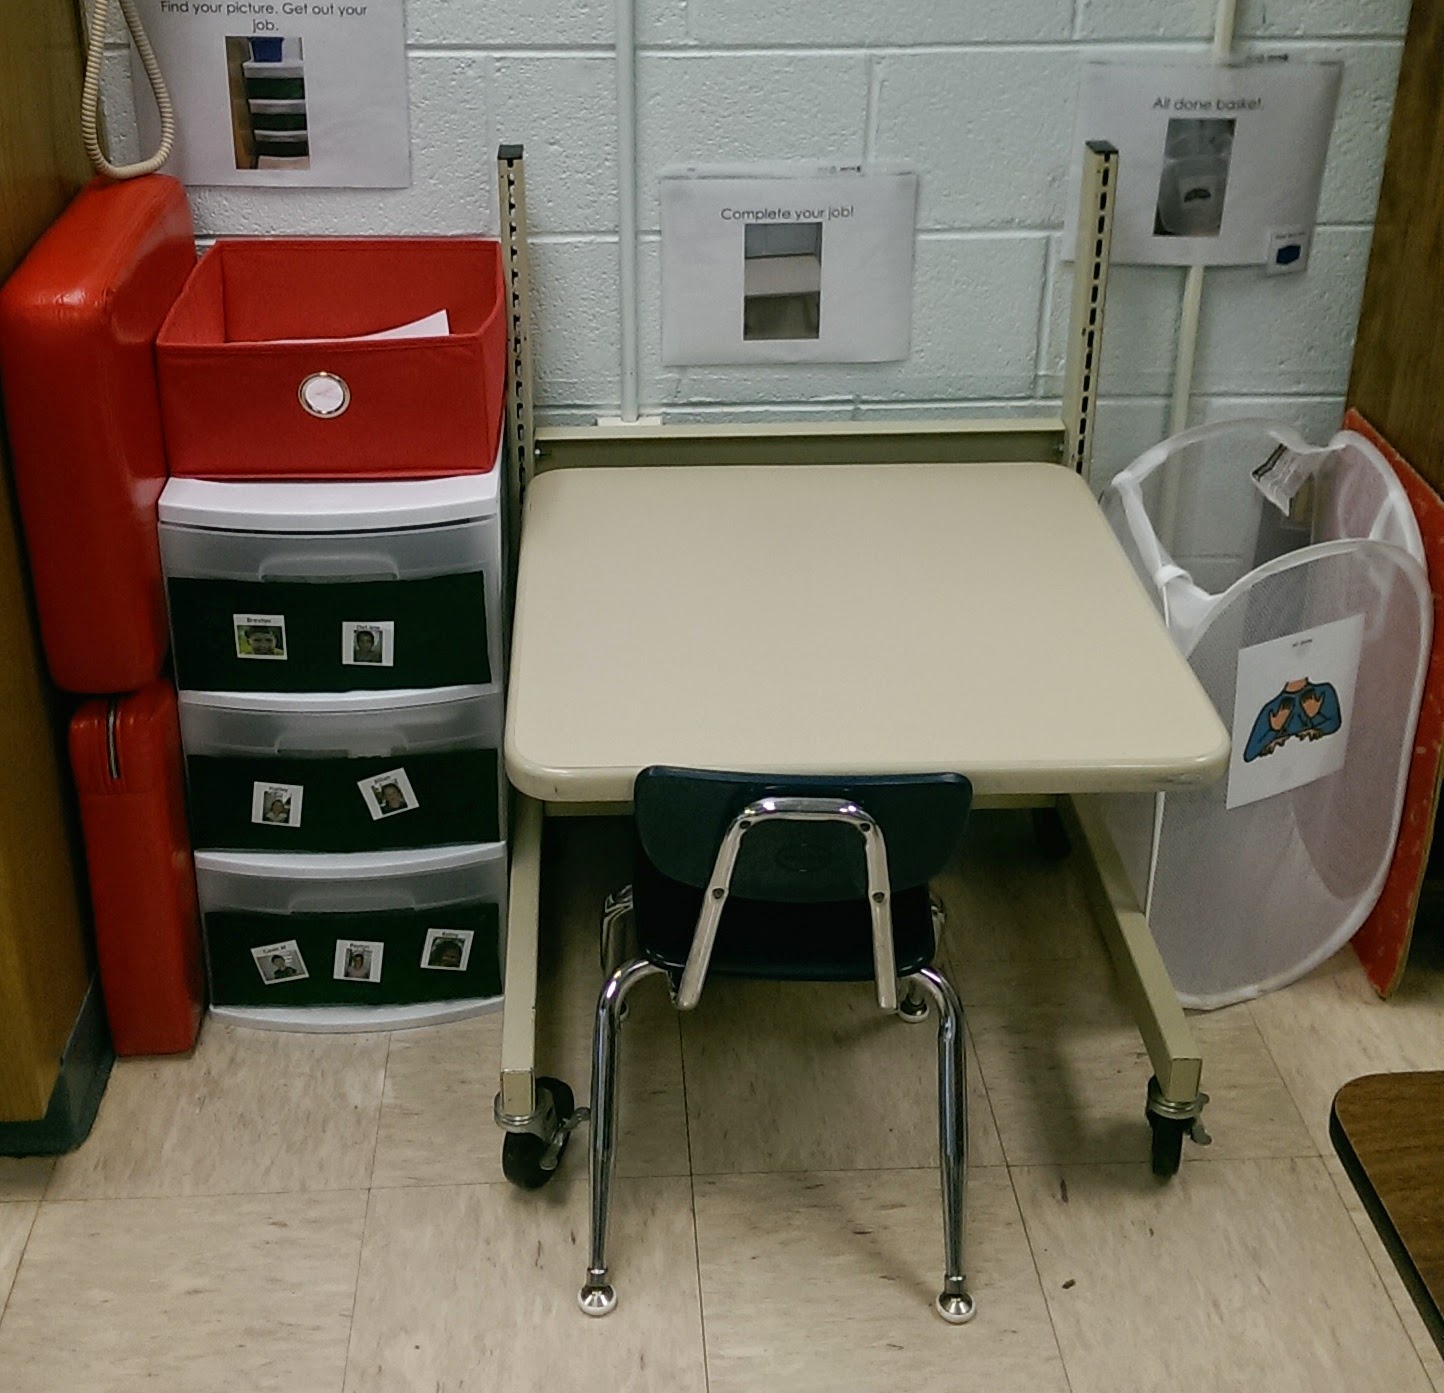
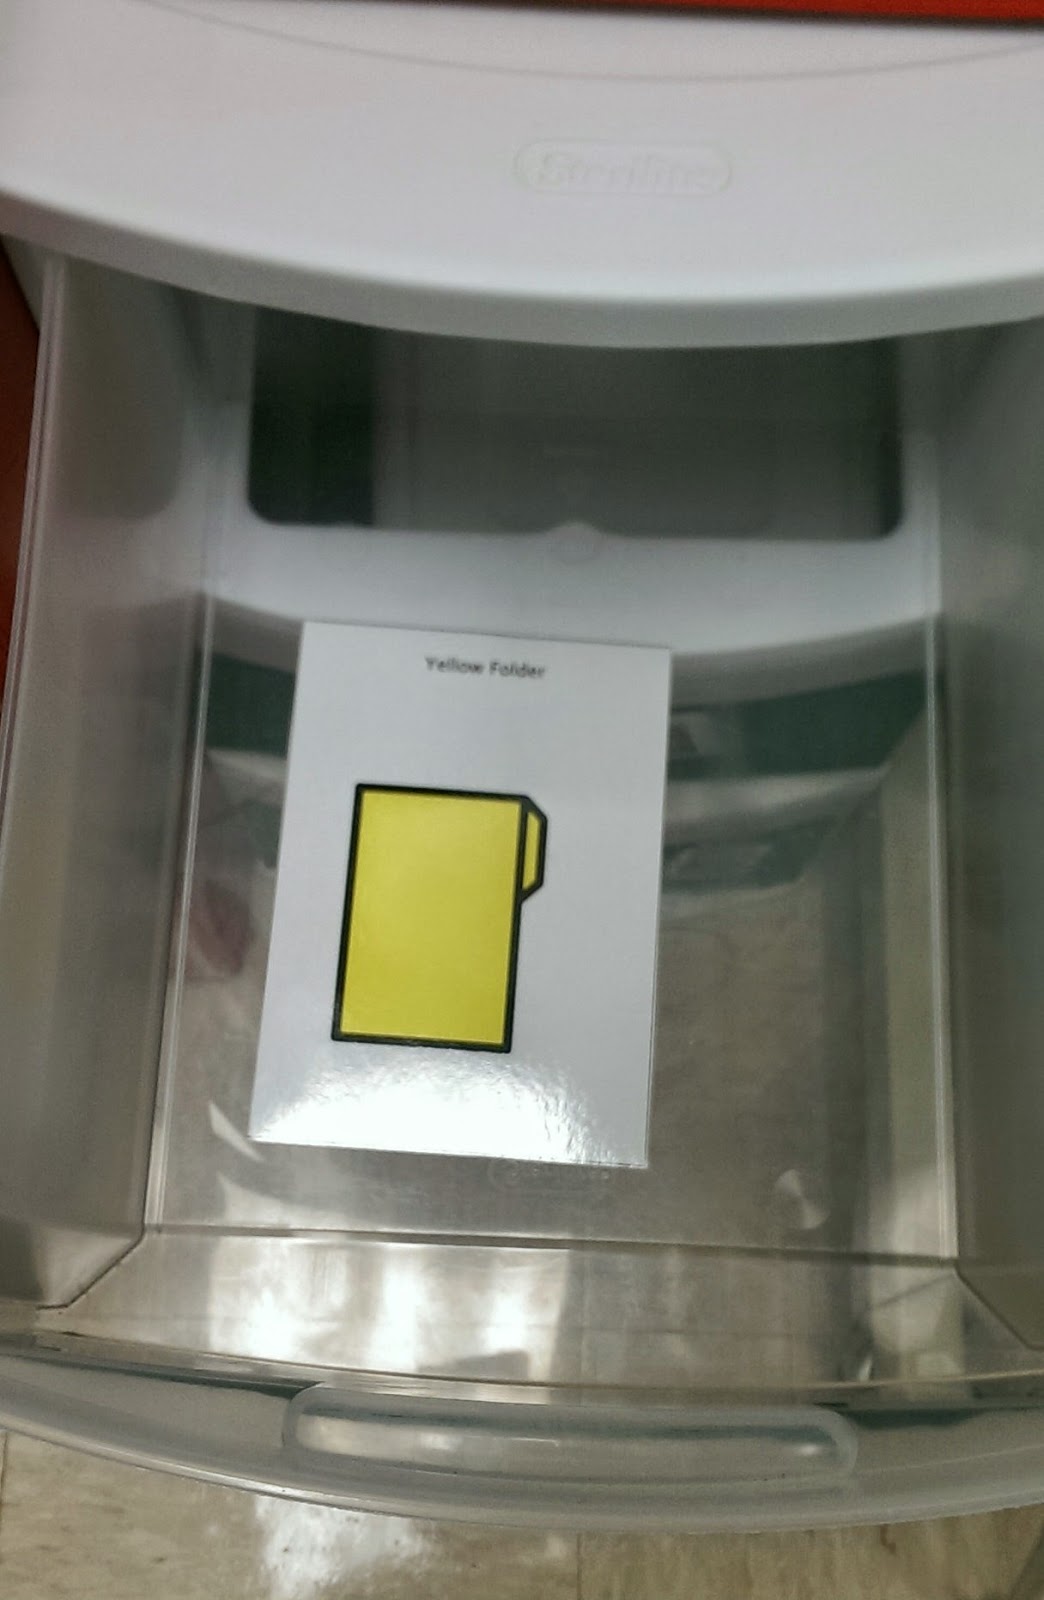
We have 3 drawers that contain a job for each student and if they need to do a folder job, we simply place a photo of a blue or yellow folder in the drawer.


Please feel free to ask me questions about this system at skramer20@gmail.com!  I've learned so much from reading blogs, observing, and listening to other professionals.  Although this system may not work for you exactly as I've explained, tweak it, make it your own and if you have time share the changes you've made with us.  We would love to hear your ideas! 

Now if you're still reading this, I'm done rambling.  I am incredibly humbled and honored to share my ideas with others and want to leave you with a huge THANK YOU for the infinite and invaluable time, endless dedication, and unrelenting passion you spend preparing and working with young children!  I wish you well in your data collection journey! 

Sincerely, 

Miss Steph

Wednesday, October 1, 2014

Personalizing Communication Supports for Individual Success

In the past couple month, there has been a lot of interest and excitement around the mini communication book and aided language boards as featured on the blog in October of 2013.  I contribute their success to a presentation I heard from Linda Burkhardt regarding Pragmatic Organization Dynamic Display (PODD).  She made me think about language in a whole new way! 

As I began thinking about our limited language learners in a different light, it was time for me to give them the opportunity to communicate more than just requests.  They deserved the right to communicate their needs, wants, and opinions.   And thus, PODD books and aided language boards were born.  

At first, my own insecurity and inexperience limited my use of the PODD book. As much as I learned at the training, I still felt silly navigating the book and fumbling through the words.  But just as a baby or a toddler experiments with language, it was important for me to do the same with PODD books.   

I owed it to my limited language learners to get into their worlds and start communicating in a way that they could see and eventually start being a part of themselves. 

I say "eventually" because as you might remember from my October 2013 post, we speak to typically developing children for at least 12 months before they respond in a verbal fashion. It takes 12 months of modeling and speaking to them and not getting anything in return! And even when we do get something in return, it is inconsistent at first and in little one or two word chunks like "mama", "dada", and "bye-bye". 

So long story short, I was going to have to be patient with the process.  Patient with myself and my staff as we learned to communicate using the PODD books and patient with our students as they watched us model its usage and started to dabble in the communication process themselves.   

For those of you who know me, you know that patience is not my strong suit.  I want to see progress and I want to see progress quickly.  There is no time to lose!  So as my staff and I started dabbling in communicating with the PODD books, we also began carrying a core word sheet in our aprons to support our kids in communicating. 


We were much more fluent in using the sheet than the PODD book so our students were able to pick up on using it pretty quickly.  By December of our first implementation year, we noticed the kids needed more. They were acting out and behaviors were off the charts!!  

In that moment, I had to reframe the behavior.  I remembered from early trainings with TASN-ATBS that behavior is communication.  The kids were trying to communicate but they didn’t have enough words to do it so as you might remember from my earlier post, we created a 5 page mini-communication book.


Page One: Core Words

Page Two: Manners & Action Words

Page Three: Greetings & Feeling Words

Page Four: Food & Hygiene 

NOTE: Page five is not available as it is the people page 
with specific photos of staff and students.


Page Six:  Colors & Shapes

You can access the mini-language book in the Boardmaker Online Community.  NOTE: Boardmaker has recently changed it's look and features a bit to better meet the needs of educators.  Feel free to use and change this template under Boardmaker Share to meet your students' needs. You can get the coil spiral binding at Binding Depot.  If you do not have access to Boardmaker and/or you are interested in the updated version check out this product on Teachers Pay Teachers.

You may also remember that from the 5 page mini-book came a little language cuff for one of our little gals.  She was in love with the 5 page mini-book and would try to take it from our staff aprons as she jabbered and pointed.  At first this made my staff and I reluctant to keep the mini-language books in our aprons as her behavior was such a distraction for herself and others, but then as my speech path and I were talking we began to reframe her behavior.  She was trying to COMMUNICATE and we would be doing her an injustice if we took her voice away.

So we changed our perspective.  We often reminded ourselves that although she had limited verbal language, her behavior of grunting and pull on any and all language boards she could get her hands on was a bit disruptive...However, it was her way to communicate! She had soooo much social communication in her just bursting to come out!  She was and still is a little social butterfly. She just needed a way to get it out.  And lucky for you, her parents have given me permission to share her journey with aided language supports. 

It's my pleasure and pure delight to bring you...Miss Lilly!  


This video is of Lilly the first time she attempted to use her language cuff.  Notice the cuff was Prototype 1.0. It was a toilet paper tube and in hindsight not the right fit.  It was not flexible enough for her little arm and it got wet every time she washed her hands. 

After recognizing the concept of the original language cuff was good but not functional, we moved on to Prototype 2.0, a very high-tech cutoff tube sock with the words hot glued to the outside. 


This version was function for communication purposes but did not fit Miss Lilly's very fashionable style so one of my fabulously talented paras, Miss Molly, created Little Miss Lilly this very high fashion cuff.  She knitted it with a plastic pocket insert in which we could change out the words as needed.  


It was such a hit that her mom asked Miss Molly to make her two more as Christmas gifts.  What a great idea, Mom!  There is no better gift than the gift of communication! :)  

At first, the words on Lilly's language cuff were just enough.   She used it to communicate she wanted to be "all done", wanted more, needed help, or was sad, happy or mad.  But in May behaviors returned, Lilly communicated with all her being that she needed more words.  She would touch sad or just continually tab the cuff in frustration with no functional means.  Lilly wanted and needed more words!  

To make the added words functional and purposeful for Lilly, we incorporated her interests and strengths.  Lilly's has a strong interest in interaction with others.  She likes to greet people, interact socially, sing, and go on functional walks in the hallway.  So purposely, we added communication pages to her cuff that would be motivating for her to use.

We added a social page in which Lilly could greet people, ask how they were, what their name is and tell them what her name is.


And then a page in which she could communicate her need to be all done, and move onto preferred activities such as delivering tools to the janitors room, delivering mail, or singing with teachers.


These additions are pretty specific and not necessarily general enough for her cuff at home.  They were created to motivate her to use her communication device and turn pages to get what she wants. As she starts to get the hang of it, more words will be added and then eventually she will move to a full PODD book as the language cuff is set up in the same turn-the-page fashion as a PODD book.  

As you can see by looking at page one of the language cuff, it has colored tabs for turning and a "more to say" icon in the upper right corner.  


The pages are ziploc name badge holders. (I purchased mine for $0.70 a piece at a local office supply store.) Then, I punched tiny hole punch circles on the sealed side of the holder to spiral bind together that way I can slide new communication pages in and out as needed.  

Note:  That my staff and I continue to model the PODD book alongside Lilly's language cuff so when she is ready to manage more words we can move to her own PODD book.  

In the beginning, we granted any request she communicated with her cuff but as time went on we set limits using the later and time to work icons on her cuff.  For example, if she communicated that she wanted to sing during direct instruction or small group learning rotations, we would honor her communication by saying you want to sing, then we would point and say "sing later, work first."

Here's Lilly in action again the first day she was given her cuff with more pages and words. 


WOW!  Right?? She is a rock star!!  And you haven’t seen anything yet.  On the second to last day of school (last May), Lilly surprised me with this amazing play session.  


For specifics about the play kit in this video click here.  

What a great way to end the year!  And for me who moved on from the classroom over the summer it was bittersweet.  I know that her amazing family and teachers will continue to help her grow and expand her communication skills but I am totally sad that I won’t be in the frontlines to witness her greatness.  Her love and enthusiasm to communicate and be social are contagious.  I would like to thank Lilly's parents for allowing me the opportunity to share her enthusiasm with all of you!!


Take her enthusiasm and run with it in your own journey with verbal and aided-language communication!

Best, 
Lindy


Thursday, August 14, 2014

Our ECSE Classroom's Schedule: Part Two - Centers (8:15 am - 9:40 am)

I am back!  It is 8:15 and time for centers or what we like to call "Learning Rotations".  I stole the term from two amazing educators doing wonderful work here in western Kansas, Teri Berkgren & Dixie Teeter.  They use the term for their older students whom are involved in structured teaching rotations within an inclusive setting. However, I stole the term for our classroom to help parents and staff recognize that although our centers revolve around play activities, they are very much learning opportunities!


Following arrival time, the students begin their 80 to 100 minutes of learning rotations.  Depending on if we get to go outdoors for recess and how many peers and staff groups there are, each rotation is 10 to 15 minutes.  Staff members know which center they will supervise with which student(s) by looking at this magnetic marker board chart. 


It is perfect for staff as the center photos and student pictures are on magnetic dots so we can change the chart as needed when peers or staff are absent. We can write little reminders to staff using a dry erase marker.   

The students know where they are starting learning rotations by the icon or object they are presented through their individual schedules.  I am not going to get into the centers themselves as you can go to each centers link below to see more details.


However I will share a few logistical details about learning rotations.  We have four staff people in the classroom (and sometimes an extra volunteer).  Each person is in charge of two centers.  The students rotate around the room in a clockwise motion. 

Staff have the flexibility to rotate each group through their centers in a way that works for the group.  For example if we are switching adults every 20 minutes, the staff person can choose to have her group at her first center for 12 minutes and then do the other center for 8 minutes.  The whole idea is that we work with the students’ interests and abilities in mind.  Some students even leave the classroom with their paired adult between centers to do a functional errand or two. (I will share more about that later).   
I provide my staff with the tools and flexibility to support the kids however is best for each group. The only stipulation is that the group must work in both centers and complete their work for both centers before the 20 minutes is up and it is time for students to switch adults.  
At which time, we try to sing this song.  It is to the tune of Clementine. Originally I got it from Miss Joelene, an amazing preschool teacher here in Hays, who got it from Mailbox Magazine.  We changed the words a bit so we could work on the transition piece as well as saying goodbye and hello to staff.   
Changing centers, changing centers,
It is time for something new,
Changing centers, changing centers,
It is time to say goodbye to YOU!
Note: When I first started teaching in the special education preschool classroom, my staff and I were each assigned to a student or group of students per day.  We would go with our group to every center with our student or group of students.  We did so simply because I couldn’t wrap my mind around how the kids could possibly transition by themselves.  

With individual schedules and intentional teaching, you would be surprised how quickly the kids picked up on the transitions.  It is also a much better fit for staff.  We don’t all have to learn how to run each center instead we can focus on our expert center.  It also benefits the students as they learn to work with every staff person, every day.  It has also made my job a whole lot easier.  I teach direct instruction for each student so I have the ability to touch base with them every day and really work on their individual IEP goals in a one on one format. 
So there you have it.  It is 10:00 and Learning Rotations are over and it is time for Large Group!  Join me next time for more details.