Showing posts with label Teacher's Tip. Show all posts

Tuesday, September 24, 2013

Direct Instruction in an Early Education Classroom

As previously promised, today I am sharing how the Direct Instruction area works in our classroom.  The Direct Instruction area is where I work one-on-one with a student to achieve the individual goals for that child.  I created this area in my classroom after attending a training on "Structured Teaching" several years ago.  

Structured Teaching derives from the TEACCH  (Treatment and Education of Autistic and other related Handicapped Children) out of North Carolina.   The program was developed to support children with Autism in becoming more productive and independent.  However, I have seen phenomenal benefits in using the program with all of my students.  

Here is a video that demonstrates how Direct Instruction is organized in my classroom. 


As mentioned in the video, I use a chart with the students' names and the task numbers each student needs to work on as the lesson plan that drives instruction.  I have created an example using my sons.  Here is a picture of what their chart looks like.  
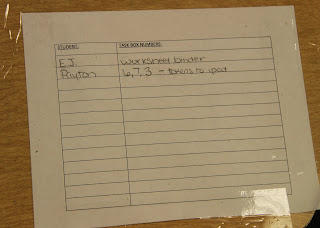

  
I use packing tape to adhere the chart to the table. Then, use a pencil to write what each student is work on.  This allows me to simply erase and write new task boxes as needed.  Click here to access a printable copy of the chart.
 
The next video shows Payton, my youngest son, using task boxes to promote his individual skills.  In full mommy disclosure, the intention of this video is partly "Parent Pride", but mostly to share the success of organized one-on-one teacher time (or in this case mommy time)!! 


Payton is 2 years-old. He has never experienced any of these tasks or the system before.  The simple organization of tasks made him successful on the first try.  Now given, he is a ‘typically’ developing two year-old and some of the students that use the system do not have his ability or attention span. In those cases, I must work harder to keep the child's attention and support his/her success. Task boxes are a relatively simple solution to develop the skills and attention it requires to be successful at a particular task.
   
With our lower level learners, the focus of Direct Instruction is to teach each child the skills needed to learn.  We focus on things like sitting quietly, attending to the task at hand, complying with teacher directives, imitating and using waiting hands.  As modeled in the video, task boxes are a great way to start working on these skills as well as other early learning concepts.  

As you may recall from previous blogs, I store my task boxes by topic in clear plastic shoe boxes.  Teacher's Tip:  Reading Kimberly Henry’s book, How do I Teach this Kid?, and other task books by Task Galore, will help you build your task box library.

Now moving on to a video clip of EJ, my older son, and I modeling direct instruction using higher level tasks and an individual binder.


As you can tell from the video, EJ was able to perform and attend to more work.  He was able to work on paper and pencil tasks that share his knowledge of skills and prepare him for kindergarten curriculum. 

Here is a closer look at my master binder of worksheets.


There are five copies of each worksheet.  All contained in a page protector.  As you saw in the video, I simply pull out a copy of the desired worksheet and have it readily accessible. 

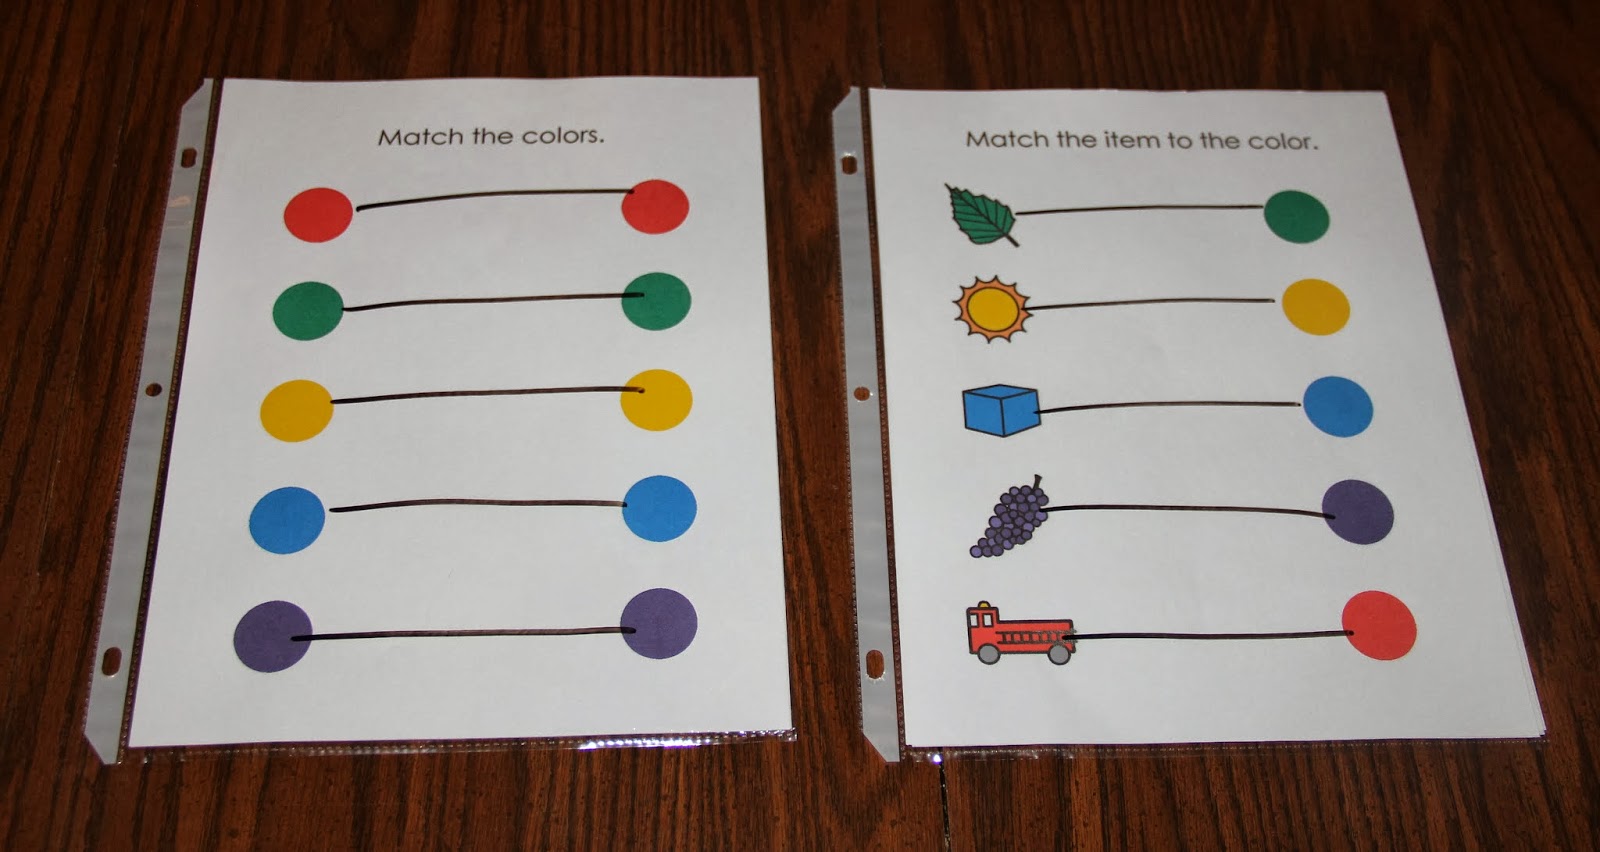
Several of the worksheets in the binder come from three early learning concepts books I bought through our Scholastic book order points several years back. The other worksheets included in the binder were my own personal creations.  They are leveled worksheets that work on color matching and sorting, among other skills.  The importance of making them leveled is to present them to each child in an errorless fashion.  For example on the first level of "Circle Yellow, all the objects on the page are yellow. 


As the student gains an understanding of the color yellow, I move on to circle yellow where not all the items on the page are yellow.


Here is another example of a leveled worksheet.  This one is matching colors where the corresponding color is across from the item. The higher level concept requires the student to make a diagonal line to the correct match.  To receive copies of my errorless learning level worksheets, email me or find me on Boardmaker Share.
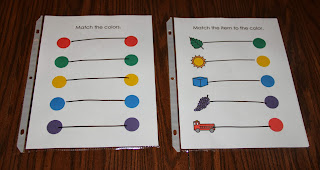
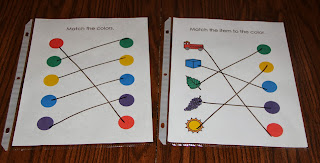

They continue to be a work in progress as I create more when I see specific needs for specific students.  For instance, just last week I noticed a student having trouble differentiating between happy and sad.  As a result, I developed this set of worksheets. Here, the student is to circle happy with all the photos on the page being images of happy children. Then at a higher level version, the student is to find the happy faces amongst the mixture of happy & sad images. 


Please note that in order to do worksheets at Direct Instruction, the student needs basic writing skills.  Often times, I start my worksheet system by simply teaching my students how to make lines and circles so they can advance and use those skills to share what they know about other early learning concepts. 


Regardless of the child’s level, each one participates in Direct Instruction whether it be doing 6 put-in tasks, 6 concept worksheets, or a combination of worksheets and task boxes.  Sometimes, it simply takes us as teachers to think outside the box and find tasks that motivate and speak to each individual child!!

Best wishes in your endeavors to grow and organize your Direct Instruction area.  And remember, I'm always here if you get stuck!  Tune in next week to see how I transition mastered tasks and worksheets to our independent work area.


Thursday, April 25, 2013

Name Practice for Pre-K Students

View binders, or binders with the clear plastic covering that allow you to slide in a cover sheet, are an excellent tool for students to practice writing.


Teacher's Tip:  For students who press hard, you can hot glue
a heavy piece of cardboard or a small piece of wood inside the cover
to make the binder more sturdy.

The 2 ½ or 3-inch binder provides students with nice slant to put their hands in a good position for holding their pencil correctly.  Then, slide papers in and out of the cover pocket and have the children write on them using dry erase markers or crayons.  Dry erase crayons are a newer item that can be found at any craft or department store or at Crayola.com. 

Instructor's Insight: When you use dry erase crayons you have the option to break them down into smaller pieces  so that students have to hold them with the correct pencil grip because they are so small.
For another use for "Crayon Nubbins, check out the previous "Literacy Workbox" post.

The "Green for Go. Red For Stop." hand-writing form will assist students with writing names using the green line as the starting point and the red line as the stopping point.  Click here for the template.

Last year with my students headed into kindergarten, I used this idea for the students to practice writing their names.  I would pre-write the student's name with a yellow highlighter and then have the student trace the writing at direct instruction in the binder Monday through Wednesday.  Finally on Thursdays, our student's last day of school for the week, I would have them write on the actual page.  

This procedure saved paper but also helped show progress because we had weekly documentation of the student's writing skills.  As the student begins getting a concept of writing his/her name, I pre-write less of the letters and have the child write from memory with dots to show them where to start.  (Refer to "Susie's" provided example above.)


Thursday, April 4, 2013

Personalized Piggy Banks: Great Homemade Baby Shower Gift

Welcome to the world, Baby Jett!!  

It is a tradition in our classroom that whenever a staff person has a baby, we make their child a personalized piggy bank.  Miss Molly, our wonderful para from last year had a baby two months ago and I had to share the students’ piggy bank masterpiece!  

Each student put a thumbprint on the piggy bank then I made their thumbprints into bears (since we call our class the "Buddy Bears").  Below each bear, I put the name of the student that made the thumbprint.  In the middle of the bank,  I added “'Thumb’body thinks you are ‘bear’y special!”  


A special thank you goes out to our local pottery store Pottery Works and Pam Fellers for always being so good to our classroom.  Whenever we have a special project in mind, Pam gives me ideas and is willing to accommodate our needs by letting us check out the paints.  She also helps us fire the painted ceramics.  Thanks, Pam!!! You are wonderful!!! Here's 'a link to her Facebook page.  

Teacher's Tip:  Don’t have a pottery store near you?  You can purchase a ceramic piggy bank in the craft department at Wal-mart for your students or children to paint.  Here is the link

Tuesday, April 2, 2013

Handmade Gift Ideas for Staff Appreciation

Our school recognizes paraprofessionals in April by celebrating "Para Week".  Each teacher and classroom takes the time to appreciate the hard work of its paraeducators and teacher assistants.  I did a little research, and unfortunately, learned that there aren't any national special days or weeks designated to recognize the hard work of paraprofessionals.  

However, I think any & every day is deserving to thank those who make our classrooms more successful. I'm the first to admit my classroom would not run effectively without the hard work and dedication of my staff.  I often joke with them that they are my brain.  Some of my best classroom tips and strategies come from them because they truly have the best interest of the students in mind.  Therefore, this week I am posting my top five ways to recognize classroom assistants.

1.  "Hand"some Bouquet - Help your students secretly make a bouquet of flowers made from their hand prints.  Simply trace their hands on colored construction paper and glue them together. 


Then, wrap them into a flower shape and hot glue the flower together using a colored popsicle stick as the stem and colored pom-poms as the inside. 


Next, have your students sign their names on their flower and place them in a vase with colored aquarium rocks inside.  Add a pretty ribbon and you have a gift your paras are sure to love!  


2. Show Off Their Greatness - Take vertical photographs of your paras working with the students. Download the photos to the Walgreens Photo Website and print as a pretend magazine cover.  

The cover I like to use is Woman’s World:Woman of the Year.  Put it in a nice frame and wrap it with student-decorated wrapping.  Your paras will smile when they open such a unique gift.  

This sample is of my son and his daycare provider.
THANKS, JACKIE!! YOU ARE THE BEST!!
It is so reassuring to know my kids are in good hands when I can't be there.
Parent Tip: Childcare Provider Day is Friday, May 10th this year.  Moneysaving Thought: Watch out for Walgreens' sales! You can often get 30 to 50% off of photo gifts and prints. 

3.  Paint Them a Masterpiece - When your paras are away, secretly have your students take turns choosing a paint color. Have them paint a few strokes across the same piece of paper.  Keep a list of what color each child chose. After each student paints, fold the paper in half to make the paint merge together for an abstract affect.  


When the paint dries, frame the painting in a nice frame with a mat, wrap it, and attach a special note that reads: 
    A special thank you for all that you do! This one-of-a-kind artwork was painted with you in mind. Each student painted with a different kind. . . Red by Jake, Brown by Kendall, Pink by Kathy, Orange by Jim, Blue by Payton, Dark Blue by Todd, White by Steve, Green by Mike, Dark Green by Julie,
    Teal by Stacy, Hot Pink by Emmitt, and Yellow by Douglas

    4.  Make Them Famous for the Day -  Help your students decorate crowns for your paras.


    Order personalized trophies that say "World’s Best ParaEducator" or "Number One Para".  I ordered mine from Crown AwardsNext, grab some red bulletin board paper for a ‘red carpet’ and have your paras walk the red carpet as your students clap and cheer for them. 

    5.  Give them a Taste of Home - Send out a note or email to parents that you are secretly collecting favorite family recipes for a special surprise for your paras. 


    You will be surprised by how into this your families will get!  Several of our families typed them out and added pictures of their kids cooking them or had their children draw special pictures on them.   

    Then, have your students help decorate a recipe box for them.  I got my recipeboxes in the craft section at Wal-mart.  My students decorated the boxes by using their hands to make various fruits and vegetables.  I added silly little sayings for each piece of produce.  


    • For the cherry - "You are ‘cherry’ cool!"
    • For the grapes - "You’re ‘Grape’!", 
    • For the carrot -"You ‘carrot’ about us!" 
    • For the bananas - "I am bananas for you." 
    • For the peas - "You are ‘pea’fect!  


    Note: I removed the class pictures to post this idea on the blog. However, the class pics definitely added a special touch to a wonderful keepsake!

    Teacher's Tip: These ideas could also be used for a variety of other occasions.  For example, we have made the painted masterpiece and recipe box as retirement, housewarming, going away and wedding gifts.  We have also used the handsome bouquet as a get well gesture.  They could be used as unique gifts for family and friends, too!  Keep in mind that Teacher Appreciation, School Nurse’s Day, and Secretary’s Day are just around the corner!! :)

    I hope you enjoyed my top five paraeducator appreciation gifts.  My only wish is that I could give my paras much more because that's what they deserve!!  Happy Paraeducator Week to my current paras Miss Penny and Miss Molly. . . I truly couldn't do it WITHOUT YOU!!!!! And to those who have worked in our classroom in the past: Miss Alaina, Miss Molly K, Miss Andrea, Miss Wendy, Miss Jolene, Miss Lori, Miss Rene',  Miss Kelsi, Miss Joelene, Mrs. LaFond and Mrs. Linenberger. . . each of you have made an impact on my life, as well as the lives of our students and their families.  Thanks for your love and dedication! 


    Thursday, March 21, 2013

    Easter-Themed ECSE Activity: "Where did the bunny land?"

    Here is a fun, simple Easter activity that works on a variety of skills.  

    All you do is take a blue piece of fun foam or construction paper and add green islands of grass on it.  If you use paper, you will probably want to laminate it so you can use it from year to year without having to remake it.  Then, you take a plastic bunny that hops and have the children push the tab to see if the bunny lands on land or water. What a great fine motor activity!!


    These game pieces are available in the Easter section at most department stores. I actually bought mine at Dillon’s after the season one year for $0.50! 

    Following each bunny hop, have your students work on their recall skills by using the bunny chart to show if their bunny landed on land or water.  Teacher's Tip:  I slide my chart into a page protector and then use dry-erase markers on it so it can be reused.   Send me an email if you would like a copy of the bunny chart. I would be ‘Hoppy’ to share! 


    It can be great math practice too by asking the students to watch if the bunny lands on land or water more often.  

    Happy Hopping!  


    Tuesday, March 19, 2013

    Not-So-Typical Easter Egg Hunt Ideas

    This week I am sharing two ways the McDaniel family has done Easter egg hunts.  I was getting tired of the typical hunt for candy and little goodies so two years ago I filled eggs with loose change and placed them around the yard.   Then, I left a note with a brand new piggy bank for my then three year-old to put the loose change from the eggs in.  He loved it!


    Last year, I purchased a small Easter puzzle at Wal-Mart.  I put the inside parts of the puzzle together and wrote this message on them.  


    I then took the outside edges of the puzzle and placed them in Easter eggs to hide around the yard.  On Easter, my son went out and searched for the puzzle pieces to complete the puzzle.  The outside edge of the puzzle had three clues to where he could find the Easter bunny.


    After he read all the clues, he discovered that the Easter bunny was in his bedroom.  He ran to his bedroom where there was a note that said he just missed the Easter bunny but instead found two personalized Easter baskets filled with goodies for him and his baby brother.  


    I found the personalized Easter baskets at Walgreens last year.  They had "Egg Hunt" embroidered on them.  I added the boys’ names and the word treasures with fabric paint.  So the baskets read Emmitt and Payton’s Egg Hunt Treasures.  I plan to use the baskets as a new tradition each year.   

    Another tradition is to add these little bunny footprints along the trail to finding the boys’ Easter baskets.  


    My student teacher, Miss Stephanie, gave me the idea and I love it.  Thanks, Steph!  

    All you do is wet your fingers and place two knuckles in powdered sugar and then place them on the carpet to make a “bunny footprint trail”.  I realize this week’s blog entry is not written for classroom use but a lot of us are parents, too. I wanted to share it because my family has had so much fun with it! 

    Teacher Tip: You could easily modify the puzzle piece egg hunt in the classroom to help the kids find a special Easter snack or surprise.  

    When I have egg hunts in the classroom, I typically structure them so students at lower skill levels are looking for eggs with their photo on them and my more advanced students are looking for eggs with their first or last name on them depending on their level and ability.  This helps the children all get the same amount of eggs.  In the past, I have also color-coded the eggs so each friend in my morning class has to look for a specific color as they are younger and need the visual support to know which eggs are for them and then my older group will look for an egg of each color that has their name on it.  We use a social story and visual checklist for students that need it so they can successfully and independently search for their eggs.  


    Thursday, February 14, 2013

    Task Box Countdown: Task Box # 9 - Magnetic Answers


    This taskbox is an oldie...but goodie!  I originally created this activity while in college, as a supplement to a magnetic theme I submitted for a thematic unit assignment. It was long before I knew anything about task boxes and work systems.  But makes for an excellent task box because it could easily be used for a variety of learning concepts. 


    Simply make a worksheet of questions with Yes/No  answers.


    Then, glue the worksheet to the inside of a file folder.  (Teacher's Tip: Laminate the worksheet before gluing it to the file folder for added durability.) Next, program the back of the file folder to showcase the correct answers by hot gluing circle magnets to the back of the folder directly behind the correct answers.  Finally, glue another file folder over the top of the magnets to hide the answers. 


    Provide your students with magnetic dots to answer the questions.  They simply read the question and cover the correct answer with a magnet.  It is a fun self-correcting activity that could be used for any age to review concepts or for test prep.


    Tuesday, February 12, 2013

    Classroom Valentine's Party Idea: Special Deliveries

    It's an annual tradition in our classroom to let the children dress up as mail carriers to deliver their valentines to each other. 


    We invite parents and other family members to join us for the Valentine's Day celebration.  The children sit in a circle in the large group area.  Then each child dresses up as a mail carrier and delivers his/her valentines.
      
    A few days prior to the party, the children make valentine boxes or bags at the art center.  Here is a picture of what last year's valentine bags looked like.  


    In the past, I have had the students make their boxes out a variety of things like milk jugs, cereal boxes, shoe boxes, oatmeal containers, etc.  This year, a parent is donating large tins from her restaurant to paint and decorate for our party.  I am looking forward to seeing how they turn out. 

    Teacher's Tip:  To make the process runs smoothly, check the student's valentines the night before the party to make sure everyone has a valentine for each student.  I also take out the teacher's valentines and have the kids hand-deliver them to the teachers prior to the party.  This helps the students get a little advance practice and shortens the time required to pass out valentines.
       
    Instructor's Insight:  In advance, think about which students would be good models to deliver their valentines first.  Have students who have a hard time waiting go toward the end so they spend their wait time anticipating the activity. If they go first, they might lose interest and have a difficult time waiting for their friends to deliver their valentines.
     
    To support the students in being successful with this activity, I velcro a schedule to a paint stick as a reminder of how to deliver their special valentines.  There is velcro on the back of the stick too so as the children do each step we can remove that step by velcroing it to the back.  Turn the stick over and we are already to use it for the next student.   

      
    If you would like a copy of this schedule send me an email and I will email you a boardmaker version of it.


    Thursday, February 7, 2013

    Task Box Countdown: Task Box # 8 - Drawing a Self-Portrait

    Each month my students draw self-portraits to demonstrate their handwriting and problem solving skills development.  We hang them in slicker sheets above the direct instruction table and share them with parents at parent-teacher conferences & IEP meetings.  


    After each month’s drawing, we slip the students' work into the front of the slicker sheet so their most current work is displayed.  We also pass them along to the students’ next teacher when they transition to kindergarten. 

    To support their progress and provide them with the same consistent visuals each month, I created a series of eight step-by-step cards.  The visuals give the students a starting place to work from because most of our students do not have the thought process to even begin drawing themselves.  The goal is that the visuals are no longer needed by the time they leave our program.  We use the technique of Mat Man from the Handwriting without Tears   program to narrate the process of drawing of self-portraits.  This allows us to use the same verbal prompts each month.  


    Self-Portrait Instruction Series 

    Step 1:  Make a mat for your body.

    Step 2:  Add a circle head on top of the mat.

    Step 3:  Add a face on the head (little curve mouth,
    ears, eyes, and nose). What else can you add to your face?

    Step 4:  Add two big lines for arms.


    Step 5:  Add little lines for hands & fingers.

    Step 6:  Add 2 big lines for legs.

    Step 7:  Add 2 little lines for feet.
    Step 8:  Add personal touches - hair, shirt designs,
    eyebrows, shoes, etc.      
    Teacher's tip:  Have students write their names in a rectangle box at the top of the page each month to track handwriting progress too.