Showing posts with label Halloween Theme. Show all posts

Sunday, October 26, 2014

Seasonal Handprint Painting Ideas for Pre-K Children

Hello Everyone!

I am in the process of putting together a post about our classroom art center. Well, ladies and gentlemen, you will have to wait at least one more week for that post.  In the meantime, I want to share this seasonal hand painting book idea before I miss the next three holidays!

The kids painted one page of this book every week from mid-October to Christmas break a few years ago.  It was a fun counting, art and sensory project as the kids had their little hands painted with a brush to make the following designs.


So without further ado...I give you "Look What My Fingers Can Do!"


The Cover:  Look What My Fingers Can Do!  
By:______________

Page 1: One finger makes a pumpkin, 

Page 2: Two fingers make a candy cane, 
(on 3 by 4 inch construction paper)

Page 3: Three fingers make a ghost, 
(on 3 by 4 inch black construction paper)

Page 4:  Four fingers make Santa, 
(on 4 by 4 inch green construction paper)

Five fingers make a turkey,  

Six fingers make a tree, 

Seven fingers make two Native American Indians,  


Eight fingers make a spider,


Nine fingers make a Christmas tree,


and ten fingers make a reindeer!

There you have it...what 10 little fingers can make!  

To download the pages of the book click here.  A few housekeeping tips for making this ongoing project:

1. Store the finished pages in a file folder system by the art center.  I got mine at Wal-mart a few years back.  It has been a lifesaver.  Label a hanging folder for each student.  Then, as the students finish each page, you can file them in their folder for easy book making at the end of the project.

2.  At the end of project, have the book making scheduled in your lesson plan as an art activity so you or a staff person do not have to take extra time to put it together.  The students will love helping and it adds a numeracy and literacy activity to their day, making them have more ownership of the book they made so they will go home with excitement to read it to their families!  

3.  Have a plan for what students will do when they are not painting their page.  For example in our classroom, the staff person who is doing art will set all the kids (in her small group) up with open ended art activities from the art shelf such as markers, watercolors, bingo daubers, or play dough and then have each student paint their page one at a time.  This eliminates down time by giving the students something to work on while they wait.    


It also offers them choices by allowing them to choose an art activity either verbally or with an aided language board.  
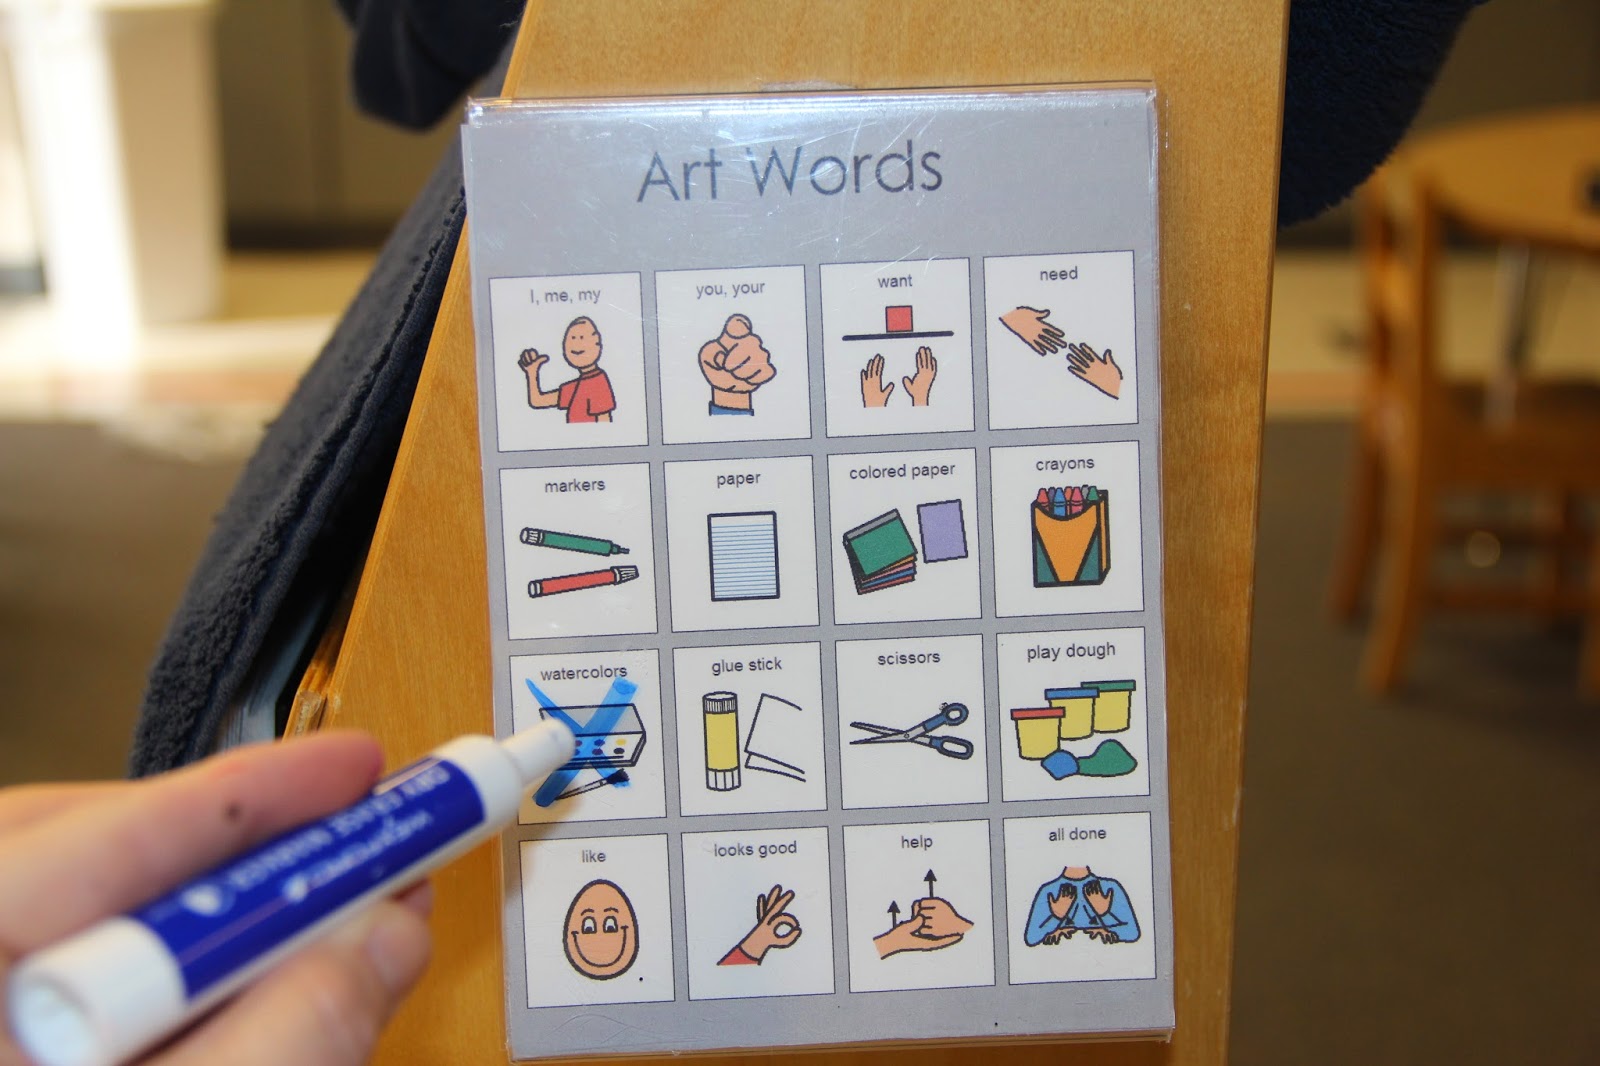
Tip:  If you put the aided language page in a plastic frame you can use 
a dry erase marker to mark off art materials that are not a choice for the day.  

Choices make the world of special education a much better place.  By offering two choices you are okay with, the students feel they have some power and we are not giving up too much power.  For our reluctant painters, just saying, "Do you want to paint first or do (play dough) first?" Helps their anxiety toward painting go down as they have a choice!!  

We will get into this more at a later date.  For now I am going to sign off to work on the BIG Art Center Post that will be coming out SOON!  

Until then, happy painting!  -Lindy  


Tuesday, October 16, 2012

Greet and Treat Halloween Party

Our classroom is currently preparing for our Annual Greet and Treat Halloween Party.  Every year we celebrate holidays with functional parties that practice social skills that relate to the traditions for the holiday.  This helps students practice the social skills they need to be successful at family and community events. 

For Halloween, the skill we practice is trick-or-treating (without costumes).  Before the big day, I find teachers and staff who are willing to let us visit their classrooms/offices during out  greet and treat activity.  I often choose rooms and people who are familiar to the students  (the nurse’s station, the speech language room, the office, etc.)  Parents donate small party favors or snacks beforehand that serve as the treat at each stop. The children decorate a treat bag during art the day before our Halloween party.  


Our Greet and Treat Bag:  It's a large grocery bag with a handle cut-out near the bag's opening. 
On the big day, I post numbered, printed light bulbs outside our designated stops.  The light bulb images representsignify the illuminated porch lights the children will look for while trick-or-treating in their neighborhoods later that evening. 


The above image signifies the second stop on our Greet and Treat quest.
Then during the designated time for our elementary building’s fall parties (usually the last hour of the day), we have the students "Greet and Treat".  Before we start I read a social story about what we will be doing during our "Greet & Treat". 

Teacher's Tip: Social Story™ describes a situation, skill, or concept in terms of relevant social cues, perspectives, and common responses in a specifically defined style and format.)You can learn more about social stories by visiting Carol Gray’s work at this link  www.thegraycenter.org/social-stories.   

Our Greet and Treat Social Story 
Today, we will be Greeting and Treating. It is just like trick-or-treating.  We will walk quietly in the hall in search of five classrooms with light bulbs outside of them.  
When we find one, we will knock on the door and say "hello”.  The person who answers the door will say “hello” back and give us a treat. We can only take one treat and we may not go into the classroom. We are only stopping by for a visit. Then we will say "thank you" and "goodbye".  
Next we will search for more light bulbs.  When we have all five light bulbs, we will quietly walk back to our classroom and put our bag of treats in our backpack so we can show our families after school.  
Greeting & Treating is lots of fun when we follow the rules.  We stay close to our teachers.  We walk quietly in the hallway and we use our best manners to greet teachers and say "thank you" and "goodbye".  

The story is written on Boardmaker using visual cues.  If you would like a copy of it, just shoot me an email at considerateclassroom@gmail.com.

Next, the children line up to go on our "Greet and Treat".  We walk down the hallway in a line in search of rooms with numbered light bulbs affixed to their doors. When we get to one, the children knock on the door and say "hello" and then receive a treat.  Many of our children have IEP goals that work on appropriate social greetings so this activity is perfect.  

For those students that need extra support, we provide mini language aided boards to facilitate their language.  For nonverbal students, we bring a step-by-step communicator for the students to say "hello", "thank you and "good-bye".  (Refer to this link for more info http://www.mayer-johnson.com/step-by-step-with-levels .) 


Mini Language Aid Boards used to support non-verbal students.
Instead of the step-by-step communicator, this year I am going to try using our iPad so the student has to choose what they will say rather than just hitting a button.   I plan to use the Answers: Yes No App by Simplified Touch. Using this app I can program two buttons for the kids to choose from to communicate with.  I am going to use "hello" and "thank you".  We also work on waving and signing thank you as appropriate. Instructor's Insight:  Sometimes by having the staff wave or sign thank you, the children have a cue to do the same and often add language to it.  

Often our first stop is Miss Andy, our Speech Clinician.  She then joins our quest and serves as additional support. The activity also provides great data on greeting goals.  It is amazing to see how many of the children greet appropriately for a treat.  It is a highly motivating activity that serves a dual purpose of getting the children ready for the evening’s events.  

Some of our students have never been trick-or-treating because parents are a little nervous to do so, but after they see their child’s success at our Halloween party they are more likely to give it a try. (All parents and caregivers are invited to join us for our Halloween party.) I also provide my address to families if they would like to trick-or-treat at the house of a familiar face later that evening.
 
** A special thank you to my little sister, Julie, for helping me brainstorm this idea five years ago when I started teaching Special Education Preschool.  

Tuesday, October 9, 2012

Pumpkin Sensory Activity

As a preschool teacher, I am always trying to come up with new ways to use our sensory table. This year I am putting navy beans and lima beans in our table with orange, yellow and brown pipe cleaners (cut at various lengths) to serve as the inside of a pumpkin.  


Before playing at the center, we will cut a pumpkin open and explore it’s insides so the students understand the correlation.  So often children do not like touching the yucky insides of a pumpkin so this will be a touch friendly version of pumpkin guts.   


My son, Payton, testing out the pumpkin sensory table.
I will add various-sized plastic pumpkins so the children can work on stuffing the pumpkins using size relationships.  We will work on stuffing small pumpkins with smaller seeds like navy beans and larger pumpkins with larger seeds like lima beans.  We can also add magnet wands for the student to pick up the pipe cleaners later in the week.

Teacher's Tip: I usually change what is in my sand table weekly, but as the week progresses we add more items, skills and concepts to the table.  To start the week, the goal is simply appropriate exploration, playing with the materials inside the table, getting used to the new textures and items in the table.  

Instructor's Insight:Many students with special needs need time to adjust to change.  Then as the week goes on, we add more items and skills.
 
Extra Credit:  The items in the table such as corn, beans and rice seem to be too loud and it bothers students’ sensory systems.  I place a soft padded carpet at the bottom of the table to make it less noisy.