Thursday, October 31, 2013

The Super Friend Cape - A Special Guest Post from Ms. Cris Wilson of Joyful Noise Preschool

I have started to get emails from teachers who are doing fabulous work.  As teachers, we all know that there's not always a lot of recognition for the long hours, personal funding, and creative ingenuity that goes into our classrooms.  So in the coming weeks, I'd like to share some of brilliant ideas and folks I've come across recently.  Consider it Considerate Classroom's Consideration for Considerate Classrooms! :)

Today's guest blogger and recipient of "Thumbs Up Thursday" is Ms. Cris Wilson of Joyful Noise Preschool in Goodland, KS.  Ms. Cris was referred to me by a colleague, Dixie Teeter. Here's what Dixie has to say.

"One of my preschool teachers Ms. Cris does this awesome social skill reinforcement that I thought I would share with you. It's called "Super Friend". When students show these skills spontaneously they get to wear a "SUPER CAPE". 
I asked her to type up her thoughts behind the cape.  I also took some pictures. Didn't know if this is something to share on Considerate Classroom? Reinforcing social skills is difficult. Let alone having a regular education teacher decide to do this on her own. I thought it was amazing."
Well, Dixie, I do too!  I am delighted to share the idea here.  Here is Ms. Cris Wilson's explanation of "Super Capes".
Here is my "thinking" behind the super friend capes I am using this year at Joyful Noise Preschool. 
To be a super friend, a child must go beyond the typical expectation of responsibility.  My example of responsibility is taking care of your own self.....you get toys out, you put them away.    You make a mess, you clean it up. Being a super friend is when you have taken care of your own responsibilities and then you go and take care of someone else's because they made a poor choice and the job still needs to be done.      
I say, "You are being a SUPER FRIEND because you ...".   I also have them tell others why they are wearing the cape. Some of my non-observant children ask, "What's she got that on for?".  I have the child tell them "I am a SUPER FRIEND because...".  They are excited when parents arrive at pick-up time to tell Mommy "I got to be a SUPER FRIEND today and I chose the Hello Kitty cape". Then, Mommy can engage in language and find out why!!!!
Examples of when capes have been "earned" are picking up someone else's mess, helping a friend get things into their cubbie, doing something to help Ms. Cris when I needed "extra hands", acts of kindness when not being asked to do so, and comforting a sad friend.
When the bell rings and everyone is expected to be picking up all toys, none are eligible to earn a cape.   The room has to be ready for circle time and all of us have to help.   The capes are given at all other times.
To be a super friend, a child must show concern, care, and compassion for another.  In essence, they "earn" the right to wear the cape when they have exhibited behaviors that are non-typical.   My thinking is that if everyone acted as a super friend every day, the world would be a better place and there would not be a need for cape rewards!!! However, we are not there yet, so I am using this as a motivator for good choice behavior.
A child can lose the right to wear the super friend cape if they behave inappropriately while wearing it. (whine, aggression, poor choice, etc.)
They are allowed to choose which cape they want to wear.    The capes are two-sided, and sometimes they start with one side and flip it over during the day.   
The students have learned the language already. After 4 weeks of preschool, the student proclaims "I'm a super friend because I picked up toys when somebody didn't be responsible". Then, the child walks over to the hook where the capes are and waiting for me to put it on!!!   They can wear it as long as they want (and remain eligible) and some have taken it off after only a few minutes of wearing it.   We usually take them off before going out to the playground for safety reasons, but they can leave on under a jacket/coat if desired.    
I am really excited about this plan.  There's cooperation, responsibility, pride, self-esteem, personal worth and value, LANGUAGE, social skills, good choices, and just a whole lot of LOVE going on in the classroom.    I am using it for all four classes.  At this point, not all children have taken advantage of the opportunity, yet those who are motivated by this approach seem to "earn" a cape daily.   Some of the things they are doing may seem minute to the outsider, but within the classroom, I see those as big steps to life!!!
I have a total of 6 capes right now.    Have fabric to make more, just haven't had time to sit at the sewing machine to do so.   I know I need 12 because there could come a time when all of my class is a SUPER FRIEND!!!


Then, Ms. Cris signs off with a statement to Dixie that I wish more teachers could honestly say. 
Thanks!   You know I appreciate how you always notice change and good things in this classroom!
So on this "Thumbs Up Thursday",  two thumbs up goes to Ms. Cris Wilson and her Super Friend Cape idea!  

I'd love to make "Thumbs Up Thursday" a regular occurrence at Considerate Classroom.  If you or someone you know is doing excellent work in the classroom, just send me an email with the classroom idea, your name, and some photos. 


Tuesday, October 22, 2013

Improving Communication Skills for Non-Verbal Children Through the Use of Aided Language Boards

This week I'd like to share with you some classroom-friendly ways to incorporate aided language boards.  This tool facilitates and increases the amount of words nonverbal students have access to in the classroom setting. 

The techniques I am sharing with you derived from my attempt to use PODD communication books based on the work of Gayle Porter and Linda Burkhart. If you are unfamiliar, PODD stands for Pragmatic Organization Dynamic Display. Here are two sites you can visit for more information on PODD:  Novita Children's Services and Linda J. Burkhart's website.You can also watch amazing footage of their clients using PODD communication books on YouTube.
  
I attended a workshop by Linda Burkhart and loved the technique. If you ever get a chance to go to one of Linda’s trainings... JUMP AT IT!  It will give you a whole new perspective on augmentative communication and the importance of language. After returning from the training, I couldn't wait to get started with the PODD books. Although I had the best intentions, it was difficult for me to implement the technique because of everything else that goes on in the classroom.  

I feel the books are extremely beneficial and will continue to work on my implementation style but in the meantime I really needed some simple words for my staff and students to get started with so I came up with a core word page.  My staff and I keep them in our aprons for easy access. 


Here is a video clip of my son and I modeling how to use it. We shared these video models one at a time during large group for a few weeks when we first started using the 
board. 


They prove to be very helpful and by last December, we realized that the kids needed more words so I created this mini language book.


Page 1:  Core Word Page w/ a Few Additions
Page 2:  Manner & Action Words
Page 3:  Greetings & Feelings
Page 4: Pictures of staff & students (Not pictured here.) 

Page 5:  Personal Hygiene (Toileting & Snack in Our Classroom.)
If you have Boardmaker, you can access this mini book from Boardmaker Online to edit it to meet your students' needs.  If you do not have Boardmaker, you can go to my TPT store to access the new version!  It is not editable but it has some new action words and play items:


Here is a clip of my sons and I modeling the use of the mini book. NOTE: My older son has had a little experience with the book and is starting to become a reader while my younger son has not seen it before. Therefore, it is more of a model of language for my two-year old. The game featured in the video is Design and Drill.


That video brings up a good point. Some games, books, and activities we do in the classroom require different words than the ones in the mini book. In those instances, we create an activity specific board.  Here is and activity specific board for a game we play around Easter.


Here is a book example. The book is Baby Foods by Saxon Freymann and Joost Elffers.  It is one of our favorites. By having the PODD available the kids can tell us what animals they see and what fruits and vegetables the animals are made out of. 


Teacher's Organizational Tip: Recently, I started a binder of aided language boards for our children’s book collection. 


I keep each board in a page protector inside the binder. Then, I have the binder available for staff at the literacy center. As my staff and I need a board for a specific book, we can simply pull it out. It is definitely a work in progress because I make the boards as books come up in our lesson plans.  Hopefully by the end of the year, I will have a vast collection of them!☺ 

I also keep the activity specific boards in page protectors and store them with the activities in my thematic tubs. (My thematic tubs are a whole other topic...maybe we will open that can of worms at a later date!)


After seeing how activity specific language boards impacted our students, I realized I should make center specific boards. Instead of laminating them or putting them in page protectors, I place them in 5X7 plastic frames so they can easily set on a table top for frequent use. They are always out and available as I velcro them to the furniture in each center when they are not being used. As a result, the students have access to them for communication at all times. 


If you have Boardmaker, you can download these from Boardmaker Online and modify to meet your needs, if not check out my Teachers Pay Teachers store for a new and improved version that includes extras!

The day after I put the boards up, a student who does not have many words in his vocabulary walked right over to the art center, pointed and said word approximations for “I” “want” “scissors”. Oh, the things that warm a teacher's heart!  It was so exciting!!!  If the language board was not at easy access, he would have never had the words to request what he wanted. The day he learned that his words have power. Ever since, that is the first thing he does when he arrives in the classroom. He hangs up his book bag and immediately runs to a language board to communicate where he wants to play. Leading me to a great point, if you can strategically place items of interest out of reach or in a way that students have to request your help to use them, they are more likely to use the boards and pick up on their purpose. 

For example, one of the first boards our students started using was for our sensory table as it is a highly motivating center and kids can’t open it without our help. They would go to the board and point to “I want open.”

Teacher Tip:  Another great feature about the plastic picture frames is you can use vis-a- vis markers to mark off things that are not available for the day or to emphasis something to a student visually. 


Before I say so long, I want to share one final discovery that we recently started using in our classroom. We have a student in our classroom with limited verbal and nonverbal communication skills. She is very social but tends to use only one noise to interact.  It's a grumbling sound. She has interest in the PODD books that her speech pathologist and I wear, and also the mini language books we use. But we have found she only has access to those words when in close proximity to us. We tried giving the student her own mini book. Unfortunately, she is not functional with it because she does not yet have the skills to navigate it by herself and her fine motor ability inhibits her to turn pages.  

As a result, we cut the top of a tube sock off and hot glued words she most frequently would want to communicate.  


She wears it as a wrist band and absolutely loves using it to communicate. It is not completely functional yet but we are getting a lot less of the grumbling noise and more pointing to words with some speech sounds attached like “bye-bye” and “a du” for all done. This method really speaks to her!! As we continue to model its use, I think we will start to see even more verbal and nonverbal language attempts.  CLICK HERE TO SEE THE UPDATE ON THIS LITTLE GAL'S JOURNEY!

With that, I leave you with one final note that Linda Burkhart shared at her training that really spoke to me. She asked how long do we speak to a typically developing baby before we hear them speak back? Around 12 months, perhaps?  Well, that's 12 months of modeling and speaking to them and not getting anything in return. It may take 12 months or even longer (especially for students with cognitive impairments) for you to see significant growth with a student using aided language boards and PODD books.  

So I encourage you not to give up.  Model! Model! Model! The ability to communicate is a true gift that we take for granted. Being able to give nonverbal students this gift is priceless. It can change a student's whole life.  And that, folks, is what keeps this teacher going!

Thursday, October 17, 2013

Virtually Tour Our Literacy Center

Hello, Everyone!  This week I'm thrilled to share a terrific center, our literary center.   With so much going on in it, I think you will understand it best by simply watching the video. 


Okay, so that was a very quick rundown of the literacy center.  It has become one of my favorites!  I feel like it has really evolved over the years.  This is the first year that I have the leveled boxes in the bench seat.  They have really helped organize the center and help us provide differentiated instruction.  They also hide the materials that we don’t need for each group while providing students with a visual of how much work has to be done at this center.  When the items in the box are all done, they may choose a book off the shelf to free read or in our case free look at.
 
I do want to mention that the books/activities in each box are different each week depending on what we are studying.  This was just one glimpse of what goes on in the literacy center.  The books for this week were about spiders because we are learning about the color black.  Teacher's Tip: To save on cost when making books for my students, I often put them in page protectors and then in a binder.  So I don’t spend time and money laminating each week,  I have a set of page protectors that already have the Velcro strips on them so I can use them for various books.  See this link to view another Velcro book option I posted last winter.
 
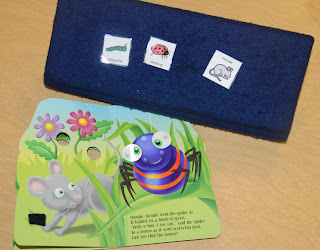
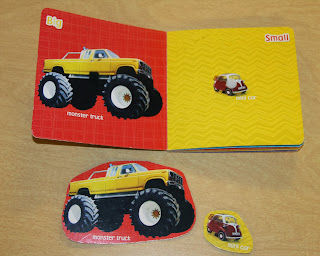
This week the books/activities happened to have a math related feature and be all self-made. However, this is not the case for all weeks. Sometimes we use flap books, push button books, or even just good old fashion children’s book with Velcro pull-off vocabulary like the one featured in the photo below.  


A little trick I have learned along the way is to buy three copies of the same cheap board book.  Then, I use two of the books as templates to cut and Velcro into the other book.  (You need two as board books often have pictures on both sides of the page so you have to cut into both).  


Money-Saving Thought: The Target dollar bins often have great board books! Pick up three for a dollar a piece and you have a nice durable interactive book to use with your students for years to come. 

Another way to make books more interactive and help children respond more functionally, especially if they have limited language or are nonverbal, is through aided language boards.  I will often write questions in my personal books with a pencil or marker and then make an aided language board to go along with the book. 


Coming Soon:  In next week's blog, I share more ways to use aided language boards and supports.  

To close today’s post, I want to share a few of the tools we use in the center.  I forgot to mention in the video that each day Miss Molly, our fabulous literacy center para extraordinaire, starts off by singing the alphabet song as she and/or the students point to the letters on the alphabet stick. 

Here's a better look at the name activities Miss Molly is doing right now.  They are new to the center and will change as the students’ skills & interest in letters and their names grow.  They are not something that changes weekly as I find with names and letter recognition the more reinforcement you can offer the better. 

Level One: Foam letter puzzle/name put on. 


Level Two: Name flip book 


The template of this book is available at Boardmaker Share.  If you are not connected to Boardmaker Share, I'd be happy to email you a copy

Level Three: Marker board name activity


Please excuse my filthy white board. I tried the old Pinterest trick to clean it with Febreeze, but sadly, it may be unsalvageable. With budgets being so tight, I tend to hold on to supplies. 

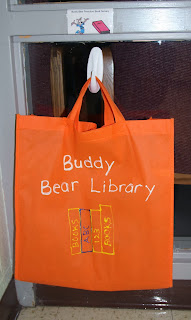
Lastly, here's a picture of our library book errand.  As I shared in the video, we use bags in the classroom for this heavy work sensory activity and here is what they look like outside our school library door.  


This feature was added last year because we had several students who needed more movement throughout their day. Even though the literacy center only lasts 10 or 15 minutes, sometimes taking a walk to change out books is just the purposeful sensory activity a child needs to regroup.  Some kids do this at the beginning of their literacy center so they can come back and be more focused with the literacy activities, while others do it at the end of literacy center as they need that movement to reorganize before we rotate to direct instruction. 

So there you have it, folks!!  Our literacy center wrapped up in one quick post.  As always let me know if you have questions, or if you have great books and other activities you use to promote literacy and you would like to share with our Considerate Classroom family.  


Tuesday, October 1, 2013

Tour Our Classroom's Independent Work Area

Building from last week's post that detailed our Direct Instruction area, this week we are going to look at our Independent Work area. Students transition to the Independent Work area directly following their time at the Direct Instruction center.

Independent Work is another area in the classroom that was created after I attended a Structure Teaching training based on the TEACCH concept.  The goal of the Independent Work area is to individually teach each child how to sit and attend to activities at his/her level.  This video demonstrates how the Independent Work area is set up in our classroom. 


Please ignore my less than professional, soccer mom attire! The only time I could schedule the video this week was right after Saturday morning soccer ... said this working mom! :).

In the video, I shared that each student has a drawer and contained in his/her drawer there is a task or activity specific to that child's development.  To promote true independent work, the activity in each child’s drawer requires skills already mastered at either Direct Instruction or elsewhere. The work in each drawer always has a clear beginning and end as we want the student to know how much work must be completed and when he/she will be finished.  Some students have work as simple as putting items into a container.  Others have sorting, matching or writing activities.  As the school year advances, the student's work increases based on his/her individual progress.  

Here is a peek into every child’s drawer for next week. I am sharing them in order of lowest to highest skill level.

Drawer One: A simple errorless put-in activity where the student puts the pegs into the same color container and then closes the container by placing on its lid.

Drawer One
Drawer Two: A simple money slot where the student puts pennies in.  This is a great one for hand strengthening as the slot gives little resistance and the student has to push to add the pennies.
Drawer Two
Drawer Three: An errorless sorting activity where the student has to put tokens and bears into the correct holes.  Note: If you flip this task over, there is an option to simply put all the tokens and bears in the same large hole which is an easier skill. It's been a nice feature so I can use the same box for two skills!


Drawer Three
Drawer Four: Another errorless sorting task where the student has to sort circle and square blocks by putting them in the correct holes.

Drawer Four
Drawer Five: A sorting task where the student has to put the bears in the correctly colored bucket.  Notice: I hot glued foam to the top of the buckets so that the items would not fall out when the student puts them in "All Done".

Drawer Five
Drawer Six: Another sorting task where the student puts the pom-poms in the slit in the middle and sorts the pipe cleaners by the correct color around the outside of the slit.  This task is from Second Story Window

Drawer Six
Drawer Seven: Is a silverware sorting task provided by Kimberly A Henry’s "How Do I Teach this Kid?"
Drawer Seven
Drawer Eight: The student must use the mini tongs and fine-motor control to place the pom-poms into the ice cube tray.  

Drawer Eight
Drawer Nine: A task from Christine Reeve and Susan S. Kabot’s book "Building Independence: How to Create and Use Structured Work Systems."  (If you are struggling with the concept of how to build independence, take a look at this book. It is a phenomenal resource!) In the task, the student has to simply put a colored eraser top on the correspondingly colored pencil and put them in the "All Done" portion of the pencil box. 

Drawer Nine
Drawer Ten: A size sorting task where the student matches the circles to the correct circles on the Velcro board.

Drawer Ten
Drawer Eleven: This is a task that takes a little more time and effort. The student has to put the correctly colored beads into the approriately marked canister.  You can read more about this one by clicking here as it was featured in my Top 10 Task Box Countdown last winter.

Drawer Eleven
Drawer Twelve: A task that came from my errorless learning worksheets that were shared in last week’s Direct Instruction post.  The task I simply filling each bug in with color. 

Drawer Twelve
Note:  Each drawer is assigned to a morning and afternoon student. Between classes, my staff undoes all the tasks and puts them back into the drawer for the next class.  Which leads me to a really good point....NEVER EVER undo a child’s task in front of the student!! As promoted by the TEACCH model, undoing a task in front of the child leaves an impression that his/her work does not matter.  It would be like your administrator coming into your classroom and deleting an IEP you just completed because your work was not meaningful.  (Maddening thought...but it really drives home the point, huh?)

On the note, I'll share my "Dos & Don’ts for the Independent Work" area. We have this list posted along-side the center to help staff remember how to support students.  


The most important tip is to prompt from behind and use as few cues as possible especially verbal cues as they are hardest to fade.  These tips were given to me by a colleague of mine, Peggy Lawrence.  Thanks Peggy!!

Also as we do at all centers, I have a list of rules for the students to follow at independent work.  


Beside the rules, I also have a Velcro strip that shows which students work at that desk as we have a two work areas. Here to see a video model of my sons using the Independent Work area.  NOTE: In the video, I am the camera lady and the teacher so it is little different but I think you will get the idea. 


This video clip was shared with my students last week to show them how the process should look as some of them were struggling to figure out how to use their time wisely after the task was completed.   

As you noticed in the video, my boys did their work and then sat and did one of the choices for two minutes.  The two minutes was noted by a large sand timer.  We have a 10, 5, and 2 minute large sand timers. They are a favorite in our classroom!!  We use them for a variety of things.  I honestly don’t know what we would do without them!  You can purchase them from Watch Time Pass.  


After the two minutes were up, the boys transitioned to the iPad table.  The iPad table and independent work area are a joint center. Together, they run 10 minutes for my morning students who have shorter attention spans and 15 minutes for my afternoon students.  

From Direct Instruction, some students transition to the iPad, followed by the Independent Work while other students transition from Direct Instruction to the Independent Work then to the iPads.  I know this sounds a little confusing but with all students using an individual schedule, everyone knows where & when they need to be.  I promise to show you how individual schedules work in my classroom in a future post.

Finally, I did want to share a little "extra credit" with you.  On occasion I will have a student who can’t attend all of large group but is very successful with independent work. In these cases, I will have a set of three drawers that that student transitions to in the middle of large group.  The student will then get some much needed downtime from large group by completing the three independent tasks.  When the child is finished, they come back to group with the rest of the class.  This helps to give the student a functional, engaging break from group in a while offering the rest of the class the opportunity to attend to group in a much more relaxed, calm environment.  Here is a pic of what the drawers look like for this process.  


I know this post may seem like a lot of "Independent Work" for the teacher but I promise the success you will see in your students makes it well worth it!  You don't have to do it "independently", feel free to reach out for support or guidance.  It may take some time, but I eventually respond to all your emails.  (In fact, it makes my day to hear from y'all!) 

Wishing you lots of success with your own Independent Work areas!